

1
Create a GitHub account
If you don’t already have one, sign up for a GitHub account.
2
Navigate to GitHub App settings
- In the upper-right corner of any page on GitHub, click your profile photo.
- Navigate to your account settings:
- For an app owned by a personal account, click Settings.
- For an app owned by an organization:
- Click Your organizations.
- To the right of the organization, click Settings.
- In the left sidebar, click Developer settings.
- In the left sidebar, click GitHub Apps.
- Click New GitHub App.
3
Configure basic app information
- Under GitHub App name, enter a name for your app. Choose a clear and short name (maximum 34 characters).
- Optionally, under Description, type a description of your app. Users will see this when installing your app.
- Under Homepage URL, type the full URL to your app’s website. If you don’t have a dedicated URL, you can use your GitHub repository URL or organization URL.
4
Configure callback URL
If your app needs to act on behalf of a user (generate a user access token):
- Under Callback URL, enter
https://api.nango.dev/oauth/callback. - You can add up to 10 callback URLs by clicking Add callback URL.
6
Configure setup URL
What you do here depends on the previous step.If you left Request user authorization (OAuth) during installation unselected, under Setup URL enter
https://api.nango.dev/app-auth/connect. If you use a custom callback URL, take that URL and replace oauth/callback with app-auth/connect. Nango also shows the exact value on the integration page once you create it.If you selected Request user authorization (OAuth) during installation, GitHub disables the Setup URL field. There is nothing to enter, the connection completes through the callback URL and the installation webhook instead. Keep going with this guide, the remaining steps apply to both flows.In both cases, select Redirect on update under Post installation.The Setup URL is not to be confused with the Callback URL from the earlier step.
7
Configure webhook settings
Leave webhooks off for now. The webhook URL and secret both come from your Nango integration, and that integration needs the App ID and private key you generate later in this guide.
- Clear the Active checkbox. GitHub requires a webhook URL while Active is selected.
- Under SSL verification, keep Enable SSL verification selected (recommended).
8
Set app permissions
- Under Permissions, choose the permissions your app needs. For each permission, select the dropdown menu and click Read-only, Read & write, or No access.
- Select the minimum permissions necessary for your app’s functionality.
- Common permissions include:
- Repository: Access to repositories
- Issues: Access to issues
- Pull requests: Access to pull requests
- Workflows: Access to GitHub Actions workflows
- Organization: Access to organization settings
GitHub Apps use installation tokens that are scoped to specific repositories. The permissions and access are determined by the installation scope.
9
Set installation options
Under Where can this GitHub App be installed?, select:
- Only on this account - For apps that only you or your organization will use
- Any account - For apps that will be installed by other GitHub users or organizations
GitHub Apps can be installed at the organization level or the repository level. The permissions and access are determined by the installation scope.
10
Create the GitHub App
Click Create GitHub App to complete the registration process.
11
Generate a private key
After creating your GitHub App:
- On your GitHub App’s settings page, scroll down to the Private keys section.
- Click Generate a private key.
- A private key file will be downloaded to your computer. Store this file securely as GitHub will not store a copy.
- This private key will be needed when configuring your integration in Nango.
The App Private Key needs to be generated in your GitHub App settings (not to be confused with the Client Secrets).
12
Note your App ID and installation URL
- On your GitHub App’s settings page, note the App ID at the top of the page.
- Also note your App Public Link (e.g., https://github.com/apps/your-app-name).
- You’ll need both of these when configuring your integration in Nango.
When setting up a GitHub App, the App ID is made of numbers (e.g. 401953) and the App Public Link is the URL to your Github App public page (e.g. https://github.com/apps/nango-github-app).
13
Set up the integration in Nango
Create the integration in Nango and fill in the App ID, App Private Key and App Public Link you just collected. Use GitHub (App) if you left user authorization during installation unselected, and GitHub (App OAuth) if you selected it.GitHub (App OAuth) also needs the client ID and client secret. See GitHub App OAuth setup for those.Saving these lets Nango derive the webhook secret, which it cannot do before the integration exists.
14
Enable webhooks on your GitHub App
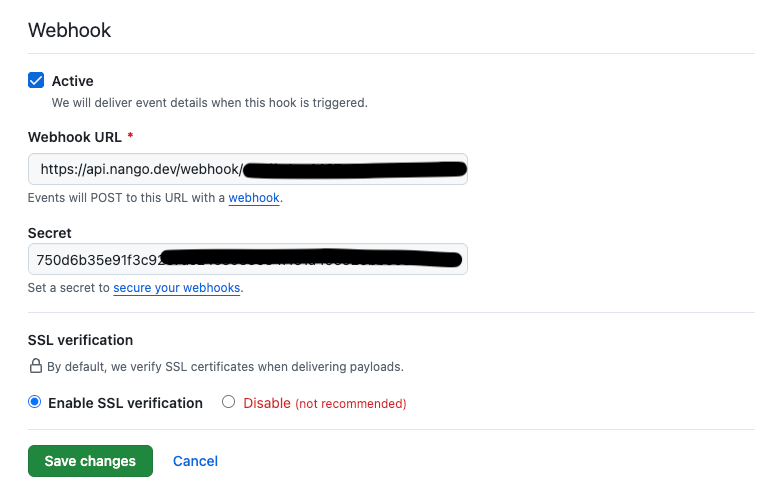
On your Nango integration page, copy the value under Webhook URL and the value under Webhook Secret. Then go back to your GitHub App settings:
- Select the Active checkbox under Webhooks.
- Under Webhook URL, paste the webhook URL from Nango.
-
Under Webhook secret, paste the webhook secret from Nango. This is required. GitHub only signs payloads when the secret is set, and Nango verifies every payload it receives. Keep it secure and never expose it publicly.
- Under Subscribe to events, select the events you want your app to receive, such as Push, Pull request, Issues or Repository.
- Save the changes.
15
Next
Follow the Quickstart.
Add the webhook secret to an existing GitHub App
If your GitHub App sends webhooks to Nango without a webhook secret, GitHub does not sign the payloads and Nango cannot verify them. Add the secret to start sending signed payloads. This applies to both GitHub (App) and GitHub (App OAuth) integrations. The secret is set once on the GitHub App and covers every installation. Your existing connections keep working, and your users don’t need to reinstall or reauthorize anything.- On your Nango integration page, copy the value under Webhook Secret.
-
In your GitHub App settings, under Webhook, paste it into Secret and click Save changes.
-
To confirm, open the Advanced tab of your GitHub App settings. New entries under Recent Deliveries should include an
X-Hub-Signature-256header and a200response from Nango.
Nango derives the webhook secret from the App ID, App Private Key and App Public Link. If you change any of them in Nango, copy the new Webhook Secret to your GitHub App again.
Important considerations
- There are certain API methods that only work with an OAuth App that will not work with a GitHub App. Please check the Github documentation and look for a “Works with Github Apps” header under the endpoint.
- Nango supports initiating a connection with a GitHub App using the frontend SDK, but not directly from the GitHub Marketplace. Therefore, you should encourage users to install your GitHub App from your product, rather than from the GitHub Marketplace directly. This is a limitation we plan to fix in the future.
- GitHub Apps can use both REST and GraphQL APIs, but the available endpoints depend on the permissions configured for the app.
- When making API requests with a GitHub App, you need to authenticate as the app installation, not as the app itself.
- Rate limits for GitHub Apps are higher than for OAuth Apps and are based on the installation, not the user.