
Pipedream Workflows is shutting down on March 31, 2027. If your SaaS product or AI agent relies on Workflows for customer-facing API integrations, you need to migrate before that date. Nango helps you rebuild them with AI coding agents and run them on its cloud platform.
You can use Claude Code, Cursor, or Codex to adapt Nango’s prebuilt actions and sync templates to your existing integration logic. Nango handles customer authentication, token refreshes, API calls, data syncs, and webhooks. You keep the integration code in your repo.
This guide covers mapping workflow steps, reconnecting customers, carrying over state, and switching traffic. The example is a support SaaS that tracks customers’ GitHub issues and sends updates to their connected Slack workspaces.
Pipedream Workflows is shutting down: what needs to move?
Plan for both replacing the workflow and recovering its data. Pipedream’s official notice sets separate deadlines:
- March 31, 2027: Workflows and String shut down.
- By April 30, 2027: Associated Workflows data, including account credentials and OAuth tokens, will be deleted.
Pipedream Connect, including its API, MCP servers, and API proxy, remains supported. This guide addresses integrations you run on Workflows.
Before those deadlines, use Pipedream’s workflow export to inventory the triggers, steps, and dependencies you need to rebuild. Treat the export as a reference: running workflows and account authorizations do not transfer into Nango.
Is Nango a good fit for your Pipedream workflows?
Nango fits teams whose customers connect external accounts to a product. Your application keeps track of which customer owns each connection and decides when to call it. Nango manages the credentials and runs the API integration code.
Use your workflow inventory to check the fit:
| Workflow | Fit for Nango |
|---|---|
| Product API integrations and agent tools | Customer authentication and provider operations. |
| Scheduled external-data replication | Sync functions maintain a dataset for your app. |
| Provider webhook processing | Process events in Nango or forward them to your backend. |
| Processes spanning several apps | Nango handles integrations; your backend or job runner coordinates persistent state. |
| Visual automation, long waits, approvals, or arbitrary scripts | Retain an appropriate workflow engine or backend. |
Nango actions support multi-step provider logic, including multiple requests, within one integration and connection. Your application selects the customer’s connections and coordinates operations across them.
You can also choose where the integration code runs. Use Nango-hosted functions for provider operations, or keep code in your backend with its existing language and libraries, using Nango’s authenticated proxy for provider calls. For code you move into Nango, check the supported dependencies and execution limits as part of the migration.
What your product gains with Nango
For the support SaaS in this guide, Nango provides:
- Customer account connections: Customers authorize GitHub and Slack through Nango Connect UI in your product. Nango stores their credentials and handles supported token refreshes.
- Integration code you own: A coding agent adapts the Slack action to your message format and delivery rules. You review, test, and deploy the function from your repo.
- Updates from external APIs: GitHub webhooks notify your product when issues change. If you also need an issue mirror, sync functions can maintain it on a schedule.
- Logs for each customer connection: Operation logs show which connection and function produced a failed request. OpenTelemetry export brings those operations into your monitoring stack.
Map Pipedream workflow components to Nango
Use these capabilities to assign each component to Nango or your application:
| Pipedream component | Migration approach |
|---|---|
| Connected accounts | Reconnect through Nango, map connections to customers, and verify provider scopes. |
| API action steps | Check prebuilt actions first; customize a close match with a coding agent, or use a custom action/proxy request. |
| Scheduled data polling | Use sync functions with checkpoints and records consumed by the application. |
| Provider event triggers | Configure provider subscriptions and connection routing, then webhook functions or forwarding. |
| Transformations, conditions, and loops | Implement TypeScript in functions or application code, with coding-agent assistance. |
| Business state, long waits, and approvals | Persist and resume the process in an application or workflow engine. |
For scheduled steps that maintain a dataset, such as an issue mirror, a sync function fetches provider data and saves records. Keep arbitrary cron jobs in a backend scheduler and approval waits in a system that persists and resumes workflow state.
How to migrate your Pipedream workflow to Nango
This migration covers code, connected accounts, and stored state in six stages:
- Export and inventory: Record triggers, actions, account dependencies, field mappings, configuration, and stored state.
- Assign responsibilities: Choose Nango actions, syncs, or webhooks for provider operations, and application code for customer routing and business state.
- Reconnect and configure: Authorize customer accounts, verify scopes, and restore secrets, customer mappings, and webhook subscriptions.
- Rebuild the logic: Start with prebuilt actions and sync templates, then customize the code and connect it to your backend.
- Prepare state migration: Identify checkpoints and completed writes to carry over. Import confirmed state during cutover with both writers stopped and outstanding work reconciled.
- Validate and cut over: Compare outputs, test failures and duplicates, then switch triggers with one writer active and a rollback path ready.
Start with one workflow and a test customer so you can compare behavior before switching production traffic.
Example: migrate a support SaaS’s GitHub and Slack integrations
Suppose your support SaaS lets customers track engineering issues alongside their support tickets. Each customer connects their GitHub organization and Slack workspace in your product, chooses a repository, and sets a channel for issue updates.
The existing Pipedream workflow receives GitHub events, updates the customer’s support record, and sends a Slack message. After migration, Nango receives the GitHub events and runs the Slack action with that customer’s credentials. Your backend keeps the support records and decides which customer and channel each update belongs to.
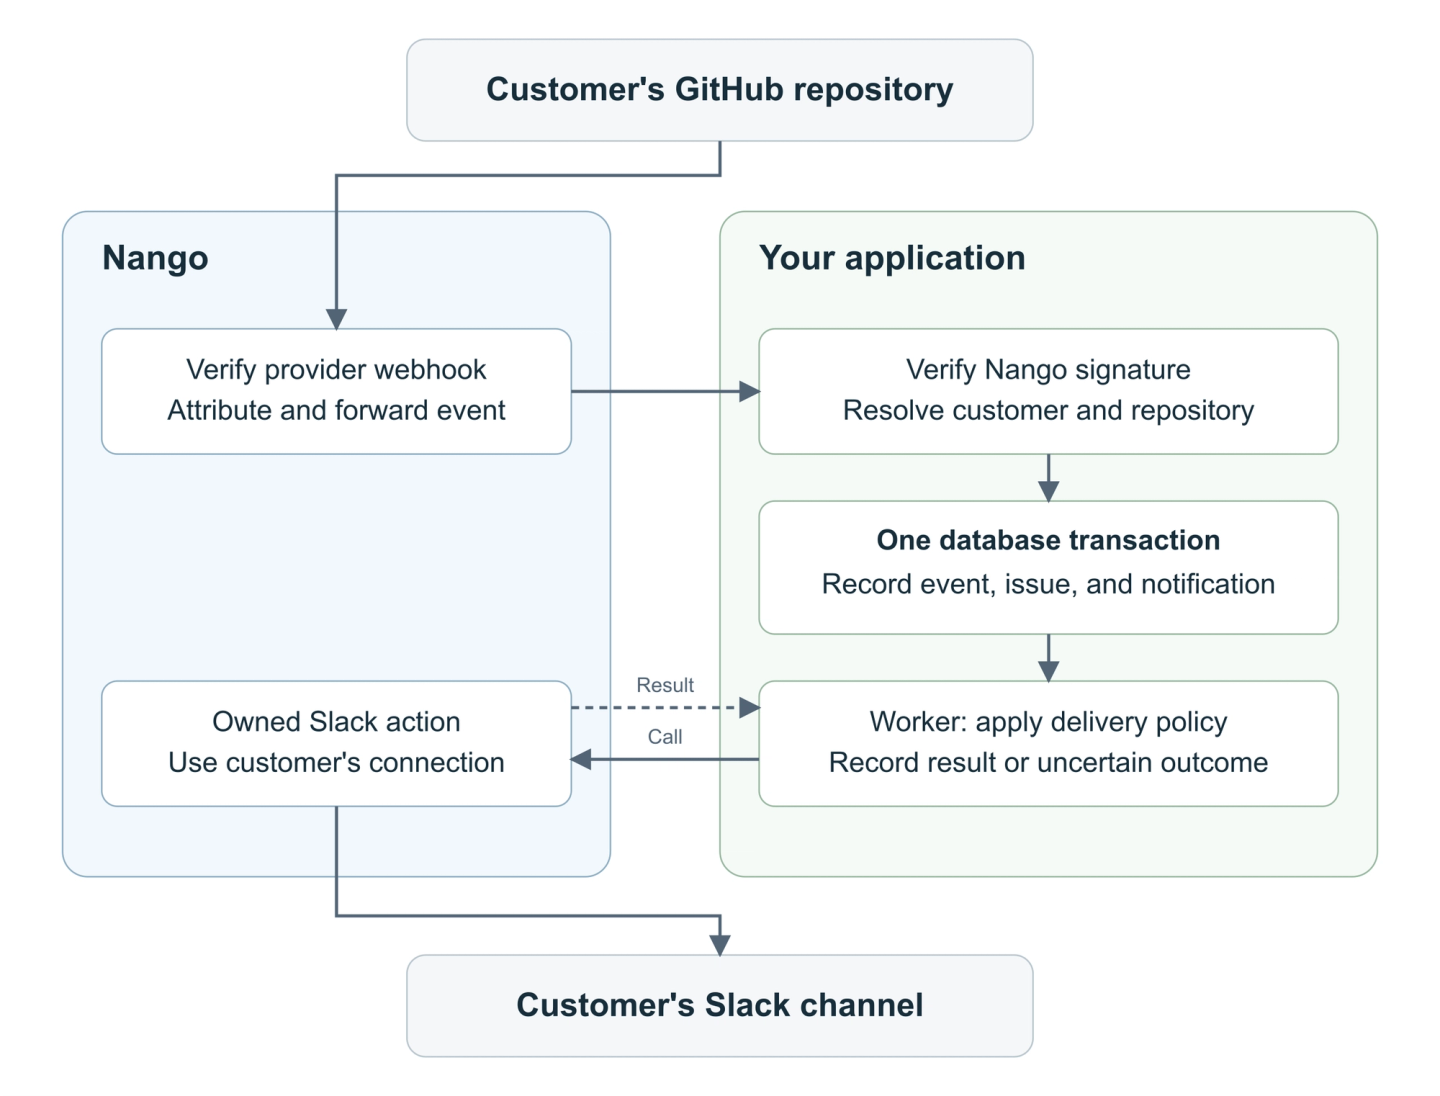
We tested a Pipedream baseline and its Nango replacement on November 1, 2026, including a controlled cutover and rollback. The example source includes both implementations, the backend, tests, and a dashboard. Follow its README for local setup and the pinned Node.js and Nango versions.
1. Inventory the source workflow
Pipedream’s export requires a plan with File Store. In project Settings > Export Workflows, export the latest deployed versions and download the archive from File Store. Check manifest.json for warnings, skipped workflows, and truncation. Undeployed drafts are excluded.
Our free test workspace lacked File Store, so we provide the tested tutorial baseline’s source files directly. We did not generate an official export or migrate an existing customer’s workflow.
The baseline has five steps: HTTP trigger, GitHub event validation, support-record update, Slack request, and receipt storage. It receives Issues events for one repository and sends notifications through a dedicated Slack bot. Setup instructions are in the example’s pipedream/README.md.
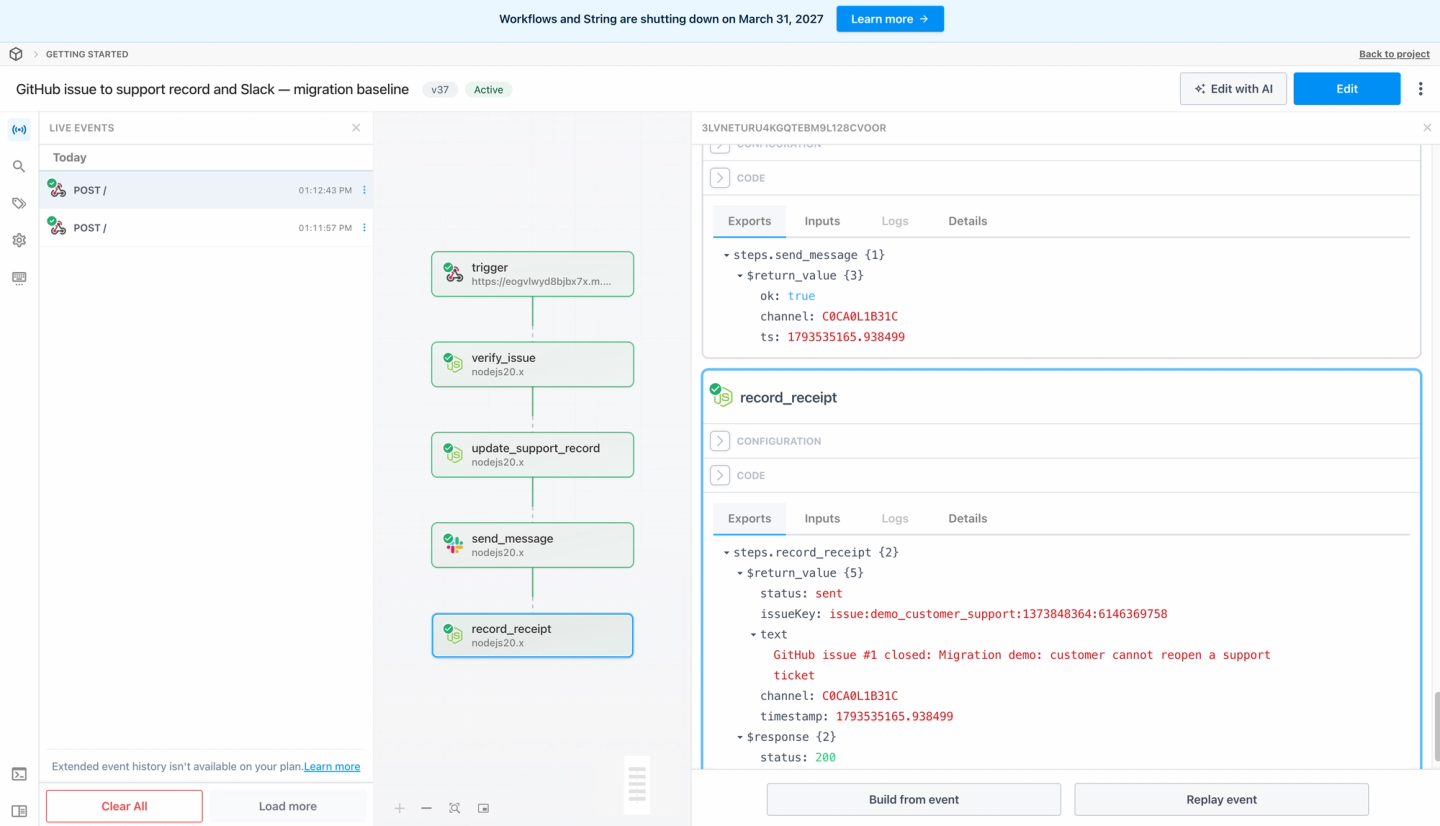
Record the supported issue actions (opened, closed, reopened), account mappings, message text, and sent-notification records. You will use these to compare the replacement and carry over completed work during cutover.
2. Configure GitHub and Slack in Nango
Create dev integrations named github-app and slack, matching the example’s configuration. You configure these once; each customer then creates their own connections through your product.
Follow Nango’s GitHub App setup. Leave user OAuth during installation unchecked, set Setup URL to https://api.nango.dev/app-auth/connect, and enable Redirect on update. Grant Issues: Read-only; GitHub includes Metadata read-only. Choose Any account if customers outside your organization will install the app. Enter the App ID, private key, and public app link in Nango.
For Slack, choose a Nango-managed OAuth app or register your own. A managed app has fixed scopes and shows Nango on the provider’s consent screen. Your own app gives you control over branding and scopes. Check that the app supports production use and has Slack’s chat:write scope.
3. Let customers connect GitHub and Slack in your product
Add Connect GitHub and Connect Slack buttons to your product’s integration settings. Each opens Nango Connect UI for the customer who is signed in. Pipedream’s authorizations do not transfer, so existing customers need to complete both flows again.
When a customer clicks a button, your backend creates a connect session. Restrict it to github-app or slack with allowed_integrations. Set the organization_id tag from the customer’s authenticated session, then pass the session token to the frontend SDK. Keep the Nango API key on your backend.
Connect GitHub
The customer clicks Connect GitHub, chooses their GitHub account or organization, and installs your app on the repositories they want to connect. Start this flow from your product so Nango can complete the connection after installation.
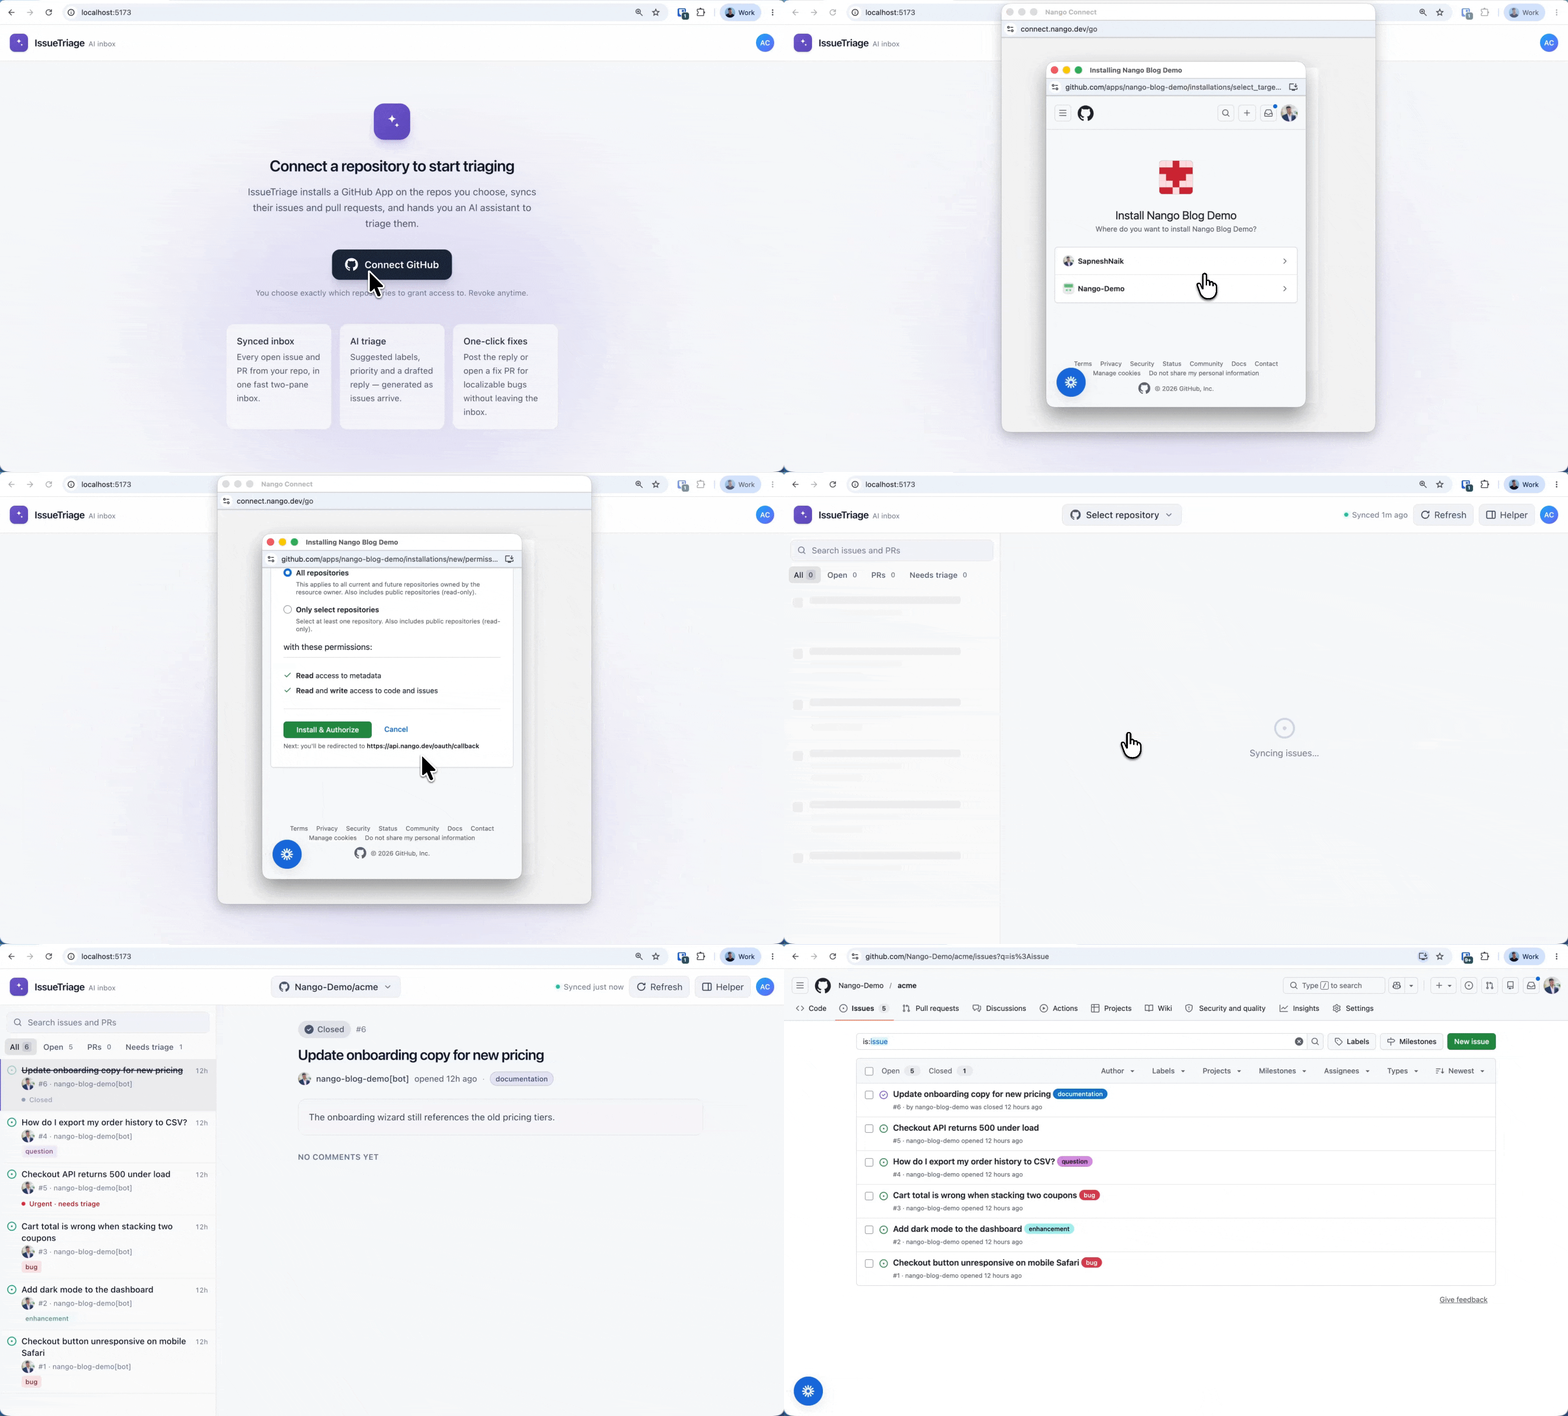
This recording comes from our GitHub integration guide, whose demo also syncs issues and supports write actions. For this migration, use the read-only GitHub App configured above.
Connect Slack
The customer then clicks Connect Slack in the same integration settings. Nango opens the authorization flow, where they choose their Slack workspace and approve the app’s requested permissions.
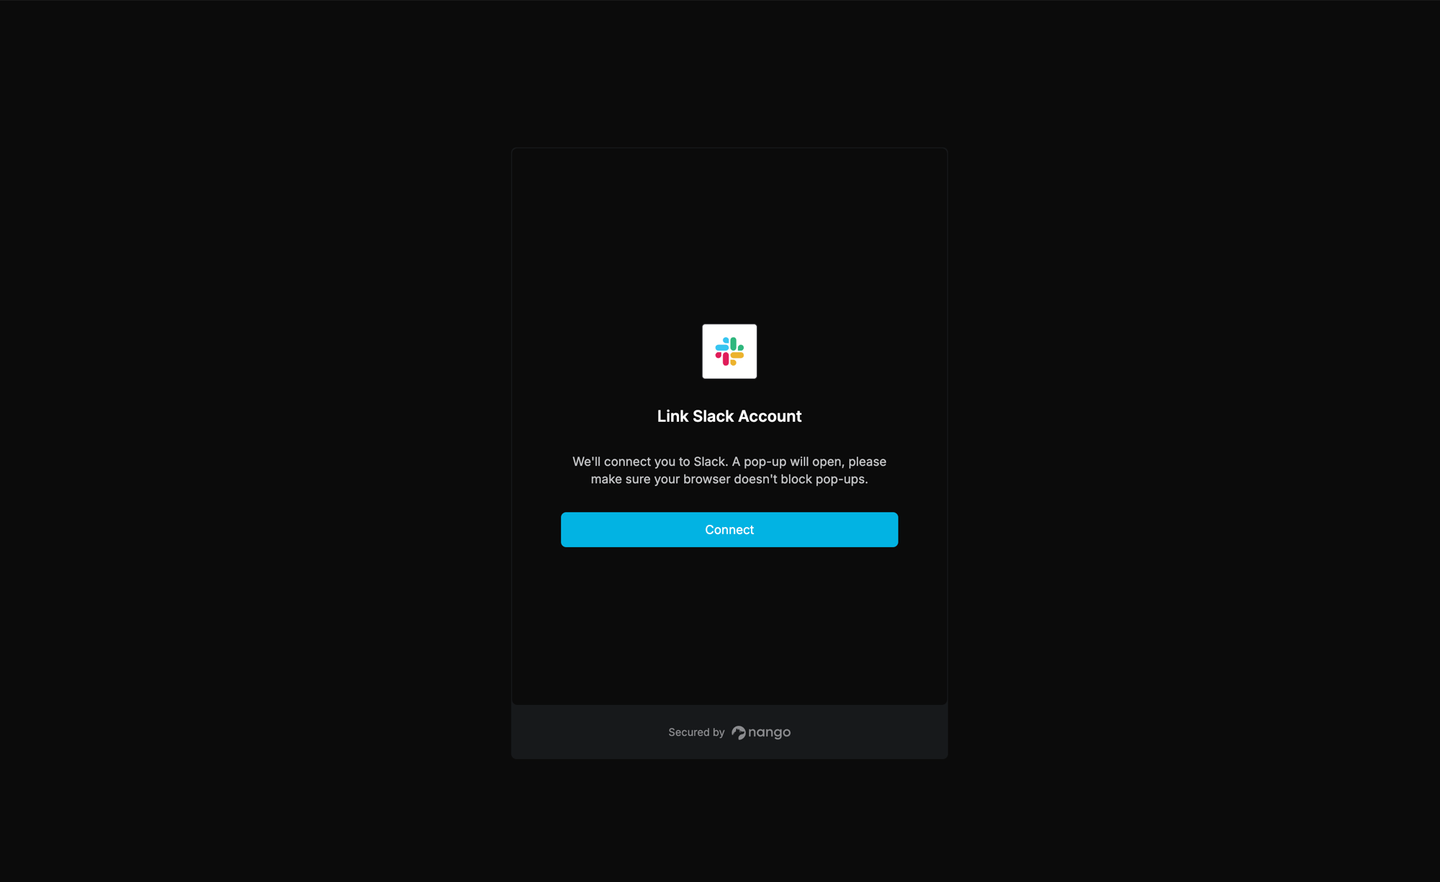
The Slack screen comes from our Management MCP walkthrough. Your product opens this Connect UI with the customer’s session token.
Save both connections against the customer
Enable connection-creation webhooks in Nango’s Environment Settings. After each successful authorization, verify the auth webhook. Use its server-set organization_id tag to find the customer, then save the integration and connection IDs against that customer.
Let the customer choose a connected repository and enter a destination Slack channel ID. Validate repository access through their GitHub connection and confirm the Slack bot can post to the channel. The customer must invite the bot to that channel. In Slack, they can find Channel ID under channel details > About.
The example backend uses this mapping:
[{
  "customerId": "customer_123",
  "githubIntegrationId": "github-app",
  "githubConnectionId": "<GITHUB-CONNECTION-ID>",
  "githubRepositoryId": "<REPOSITORY-ID>",
  "slackIntegrationId": "slack",
  "slackConnectionId": "<SLACK-CONNECTION-ID>",
  "slackChannelId": "<CHANNEL-ID>"
}]
Each customer’s mapping points to their own connections. When an issue changes, the backend looks up that mapping to find the correct support record and Slack destination.
The supplied migration demo uses Add Test Connection and a local routes.local.json file for one test customer. It does not include an onboarding frontend. To run it, follow the README’s environment setup and copy fixtures/routes.synthetic.json to routes.local.json. Replace the fixture IDs with your test connections, repository, and channel, then load the file:
npm run routes -- routes.local.jsonUse the product connection flow above when adding customer onboarding. The reused visuals show that flow in separate Nango demos.
4. Route GitHub events to the right customer
Copy Nango’s webhook URL and secret into your GitHub App. Enable Active, subscribe to Issues, and keep SSL verification enabled. Leave Nango’s Allow unverified webhooks off and enable external webhook forwarding on the integration.
For local testing, run npm start and tunnel http://127.0.0.1:3407 to HTTPS. On the GitHub connection’s Settings tab, set Override webhook URL to https://<your-tunnel>/webhooks/nango. This override sends that connection’s webhooks to your test receiver. In production, configure your application’s receiver in Environment Settings.
The backend verifies Nango’s signature and checks the forwarded event’s connection, repository, and delivery ID. It uses the saved customer mapping to select the support record and Slack connection. Events without a trusted route are quarantined.
The example then saves the event, updates the support record, and queues a notification in one database transaction. A worker sends the queued message through Nango. Keeping this work in your backend preserves the support-record update if Slack is unavailable.
Store processed GitHub delivery IDs against the customer so redelivery does not send the same notification twice. The receiver, database transactions, and worker delivery policy are in the example’s backend source.
5. Deploy an owned Slack action
The queued notifications need a Slack action to deliver them. Nango’s catalog of 10,000+ customizable tools provides a starting point: its Slack send-message action accepts channel_id and text and returns a receipt.
Catalog actions are available without deployment and update automatically. For this product workflow, pull and deploy an owned function so you control its contract. If you want to customize the template yourself, run these commands in a separate functions project:
npx skills add NangoHQ/skills -s building-nango-functions-locally
npx nango pull slack send-message --catalog
Give Claude Code, Cursor, or Codex the Pipedream source and this prompt. Follow the coding-agent setup to give it access to Nango’s docs and build tools.
Adapt the Slack send-message template for this issue notification.
Preserve channel_id and text inputs. Disable blind write retries.
Return sent, rejected, rate_limited, or uncertain outcomes.
Review the Pipedream source and test the approved dev connection.
The supplied slack/actions/migration-send-message.ts already implements this behavior. To use it unchanged, follow the example README’s test and deployment instructions. Its tests and local demo use synthetic data and mocked provider responses.
The worker invokes the deployed action through the Node SDK:
import { Nango } from '@nangohq/node';

const nango = new Nango({ apiKey: process.env.NANGO_API_KEY });
const result = await nango.triggerAction(
  job.slack_integration_id, job.slack_connection_id,
  'migration-send-message',
  { channel_id: job.slack_channel_id, text: job.text }
);
The job contains the customer’s saved Slack connection and destination channel. The action returns sent, rejected, rate_limited, or uncertain. The example worker retries explicit Slack rate-limit responses according to its delivery policy. If a request times out after Slack may have accepted it, reconcile the result before retrying.
6. Run the complete flow
With the action deployed and receiver running, start the worker using npm run worker. Use npm run dashboard to inspect the support records and notification receipts.
Open, close, and reopen an issue in the test customer’s connected repository. Check that your product updates that customer’s support record and sends the message to their connected Slack workspace. Nango’s operation logs show the API request for the selected connection.
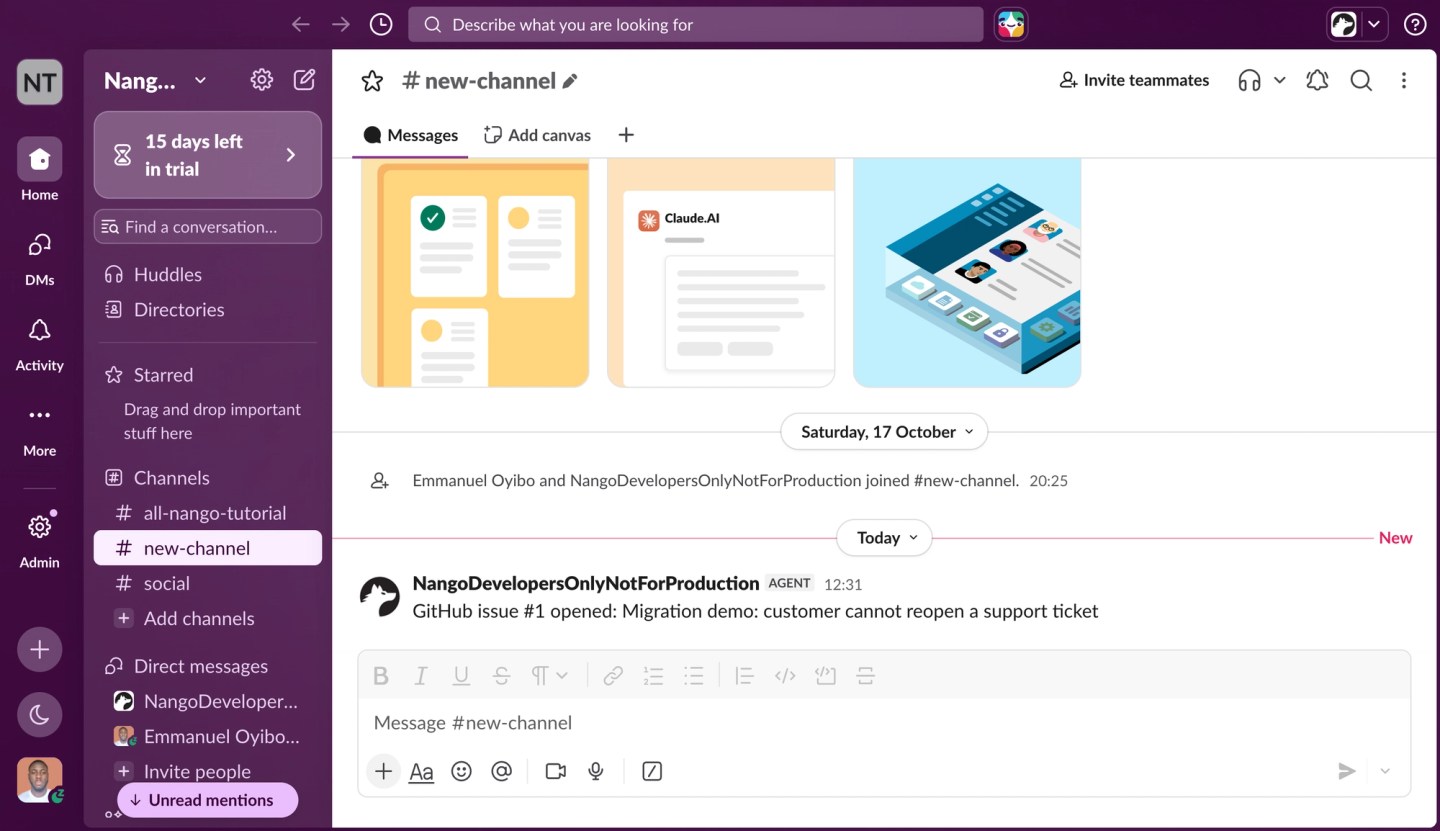
The migration test’s Slack notification after opening an issue. The pictured bot is a development connection.
Redeliver the GitHub event and confirm it produces no second notification. Repeat with a second test customer and verify that their events cannot update the first customer’s records or send messages through their Slack connection.
Carry over configuration and workflow state
Before switching production traffic, recover the workflow’s configuration and accumulated state. Pipedream’s export preserves ordinary configured props, workflow structure, code/component references, and control flow. Its exclusions require separate work:
- Map each customer’s old Pipedream accounts to their new Nango connections.
- Re-enter secrets/environment variables and verify retained configuration.
- Copy needed Data Store records, File Store contents, checkpoints, and event history separately.
- Recover private multi-file component source from your repository.
- Register new webhook subscriptions and retain the old configuration for rollback.
Migrate both data-fetch checkpoints and sent-notification records where applicable. For this example, the checkpoint instructions cover a verified issue snapshot and an already-sent Slack receipt. During cutover, stop both writers and reconcile outstanding work before importing that state without resending:
node --env-file=.env scripts/import-checkpoint.mjs routes.local.json data/checkpoint.jsonTest the migration and cut over
Before importing state and switching traffic, compare both implementations’ support-record fields, message text, customer routing, and destinations. Exercise duplicates, concurrent delivery, stale updates, unknown connections, expired auth, rate limits, and timeouts after remote acceptance. Our failure/concurrency tests were local simulations; the connected-account tests covered lifecycle events, redelivery, and controlled writer switching.
Cut over one test customer before moving the rest:
- Pause the old trigger. Record the switch time, drain running executions, and reconcile uncertain Slack writes. Stop both notification writers before importing confirmed state.
- Enable the Nango route. Keep only one notification writer active. Independent GitHub subscriptions can assign different delivery IDs to the same change, so deduplication alone cannot protect overlapping writers.
- Recover changes during the switch. Fetch GitHub changes with a time window that overlaps the cutover. Update support records without sending historical notifications, then check delivery receipts before sending anything missing. A current issue snapshot cannot recover every intermediate transition; retain event history if you need those transitions.
- Verify the customer outcome. Check the product’s support records, Nango’s connection logs, and the customer’s Slack destination before expanding the rollout.
Our rehearsal switched Pipedream → Nango → Pipedream → Nango with one writer active at a time. Seven real issue changes produced seven notifications. Live tests covered one customer and repository; multi-customer routing and failure tests ran locally. The rehearsal did not cover concurrent production cutover or automatic backfill.
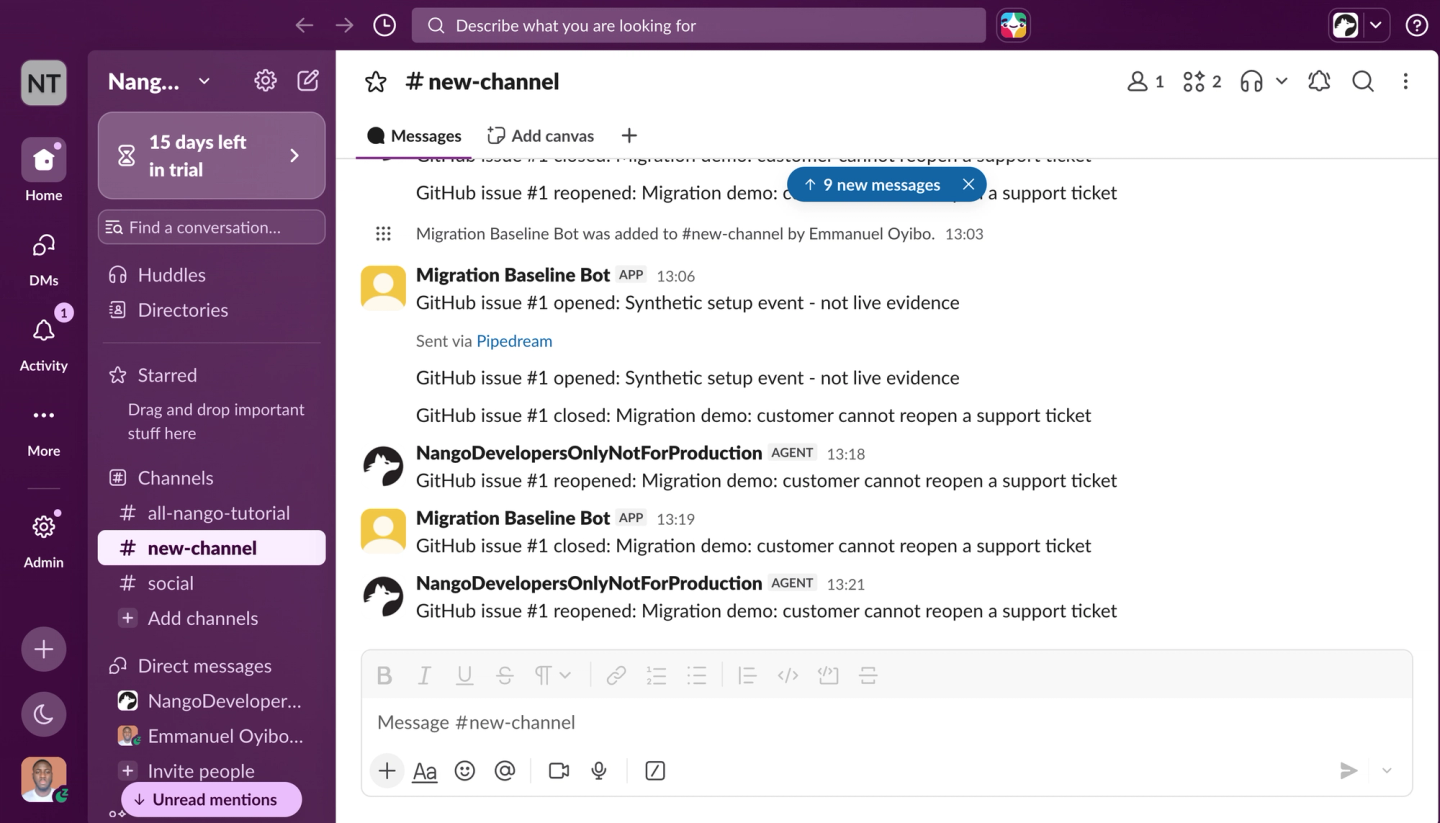
Slack notifications from the Nango replacement, the Pipedream rollback, and the restored Nango implementation, using development connections.
Preserve this rollback path by retaining the old implementation and configuration until validation is complete. To roll back, stop and drain the new writer, reconcile state, then restart the old one. After March 31, 2027, rollback must use an earlier deployment of your replacement system.
FAQs
Can I import a Pipedream workflow directly into Nango?
Rebuild it using the export or source as a reference. Map steps to Nango functions, provider requests, and application operations. Coding agents help implement the mapping; they do not provide automatic workflow conversion.
How do I coordinate steps across GitHub and Slack?
Your application selects the customer’s connections and coordinates the steps. Nango actions run the provider operations. Keep business state, waits, and approvals in your application or workflow engine.
Do connected accounts need to be authorized again?
Yes. Pipedream exports exclude credentials and OAuth tokens. Customers reconnect through Nango, including when using a managed OAuth app.
Can the rebuilt integration serve an AI agent?
Yes. Agent sessions expose your owned actions as tools, scoped to selected customer connections. This was not part of the migration test.

