
Passing an OAuth token as a tool argument or result puts the credential in the model conversation. From there, the token is at risk of exposure. Ideally, your AI agent should never see access tokens when executing tools or API calls.
Nango Agent Sessions lets your agent get temporary access to selected accounts and tools while Nango stores and uses the OAuth credentials. You control which connections the agent can access, which tools it can call, and when access ends.
In this tutorial, you’ll build a Gmail assistant with access to one mailbox and one read-only action through a five-minute session. You’ll inspect what reaches the model, then verify tool restrictions, session termination, and expiry.
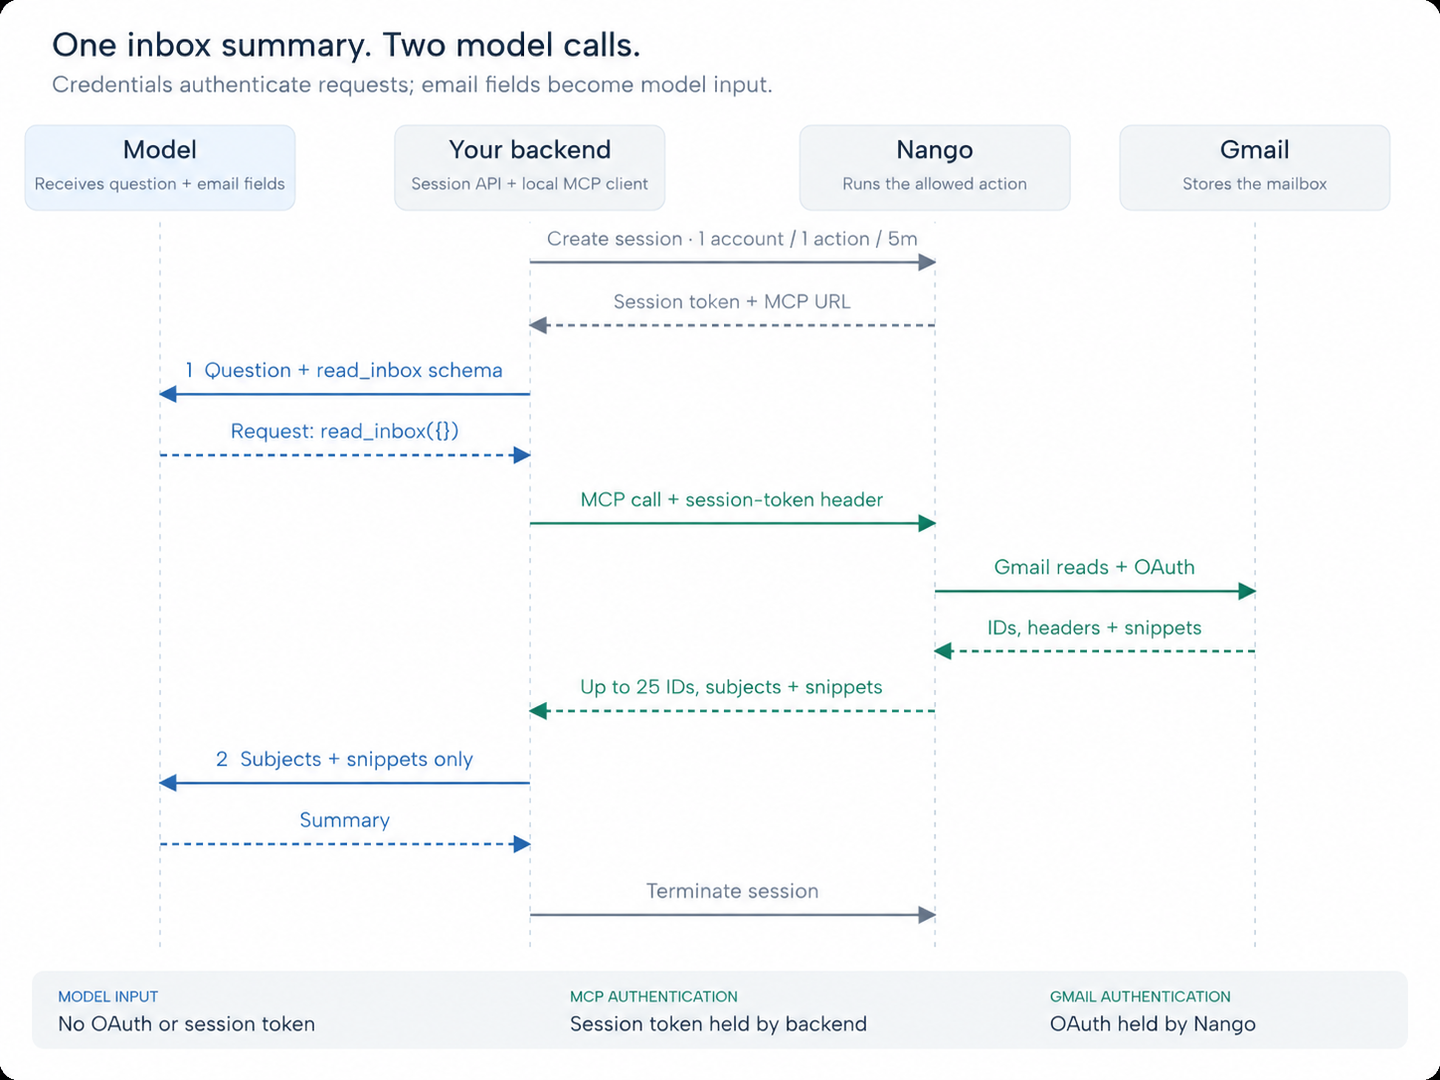
The coding agent writes and tests the integration. The inbox assistant you’re building runs the model calls and reads Gmail through it. Enter credentials locally; the coding agent does not need to see them.
What you’ll build
You’ll run a terminal assistant that answers:
Summarize up to 25 emails in my inbox.
Your backend creates the session and exposes read_inbox to the model. It executes the requested tool through Nango, sends the subjects and snippets to a second model call for summarization, then terminates the session.
The companion demo includes source, tests, and captured requests for the original five-message example. Follow the coding-agent prompts below to build this 25-message version or adapt the companion.
Your backend uses the session token to authenticate the MCP client. The token grants the access defined by your session policy and stays outside the model’s input. Gmail’s OAuth credentials remain in Nango.
Prerequisites
- A Nango account with a
devenvironment. - Codex, Claude Code, Cursor, or another coding agent that can edit files and run commands.
- Node.js 24.10 or later and npm.
- A Gmail test account.
- An OpenAI API key for a Responses API model that supports function calling.
Use non-sensitive test messages: subjects and snippets go to OpenAI.
Step 1: Set up the local project
If you’re using the companion code, run npm ci --ignore-scripts --no-audit --no-fund in its folder and continue to Step 2. Otherwise, create a project and install the Nango development skill:
mkdir gmail-agent-sessions
cd gmail-agent-sessions
npx skills add NangoHQ/skills -s building-nango-functions-locally
Give your coding agent this prompt in that folder:
Set up a Gmail assistant project using building-nango-functions-locally.
Use ES modules with nango 0.71.7, zod 4.3.6, and
@modelcontextprotocol/sdk 1.30.0. Install dependencies and keep the
Nango project at the root. Keep .env out of Git and agent output.
Do not deploy yet.
Check the installed versions with npm ls --depth=0.
Step 2: Connect a Gmail test account
If you already have a working gmail.readonly connection in dev, copy its connection ID and skip to Step 3. Use its integration ID throughout the code if it differs from google-mail-readonly.
Nango provides pre-approved OAuth apps for popular APIs, including Google’s. Use Nango’s provided app for this walkthrough.
In Nango, select dev → Integrations, add Gmail, and select the Nango-provided OAuth app. Set the integration ID to google-mail-readonly in Settings, and request this scope:
https://www.googleapis.com/auth/gmail.readonlygmail.readonly allows reads without send or modify access. The custom action in Step 3 limits each call to 25 messages.
Open Add test connection → Authorize → Connect:
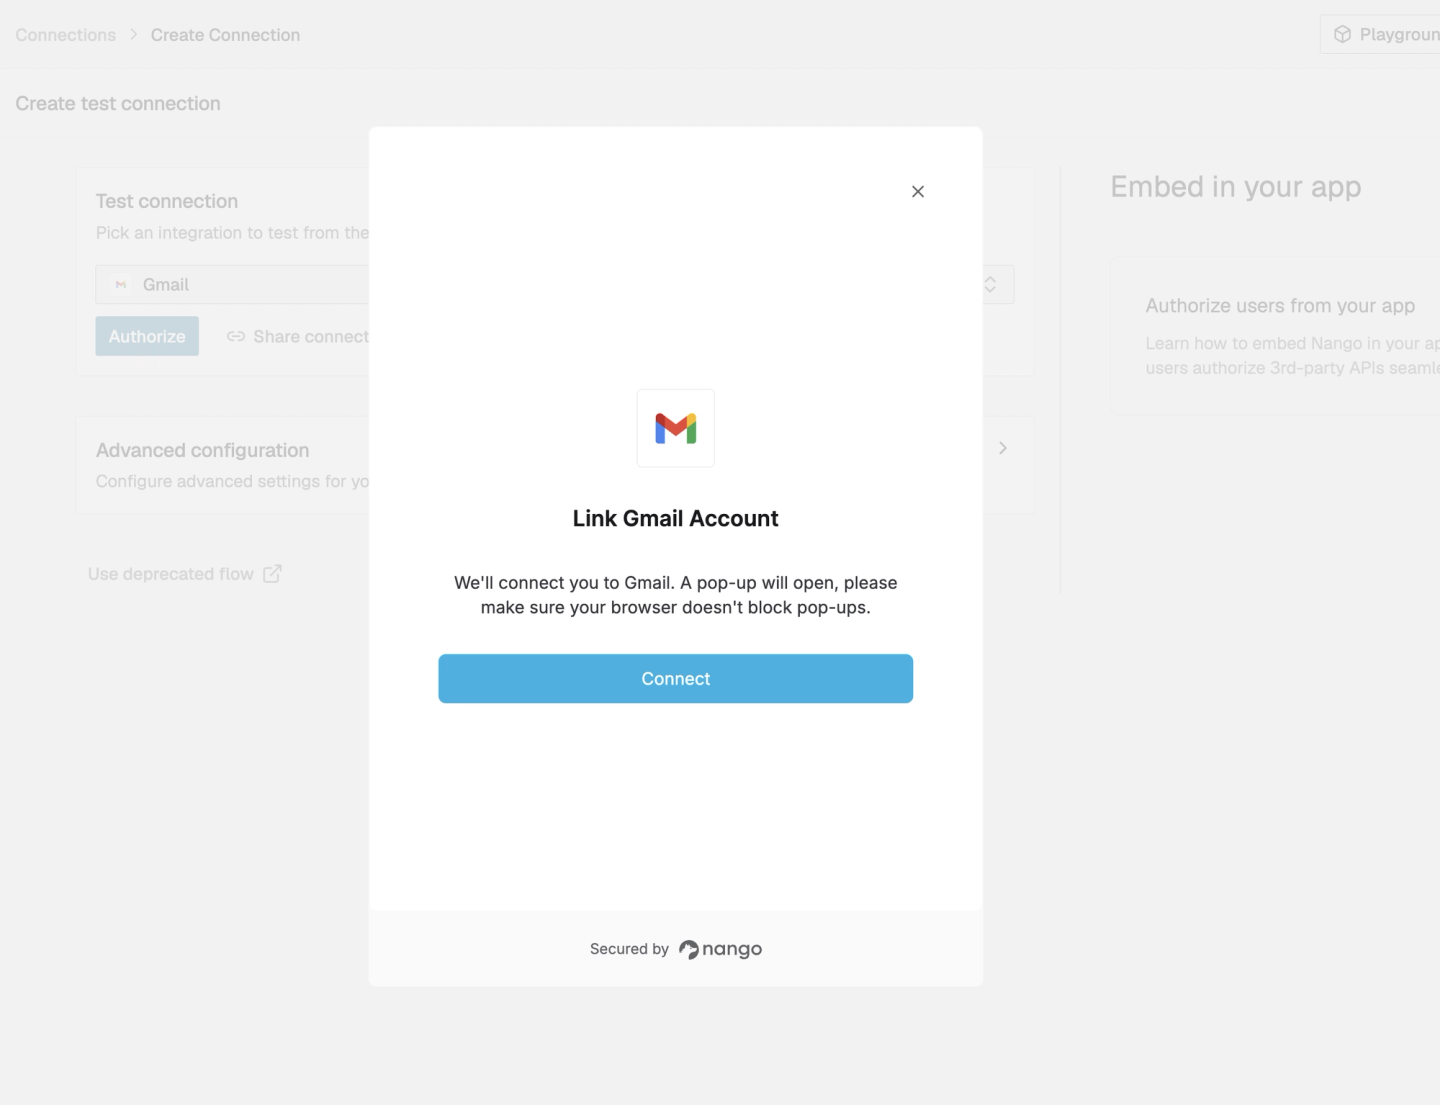
Authorize your test mailbox with read-only permission. Click Finish, then copy the connection ID under Connections.
Step 3: Build the Gmail read action
Nango provides 60+ pre-built tools (actions/syncs) for Gmail and over 7,000 tools across its 1,000+ supported APIs. But in this demo, I’ll show you how you can just as easily build a custom read action for your specific use case.
To use this connection, your backend needs session access and your CLI needs deployment access. Create two keys under dev → Environment settings → API Keys:
| Variable | Scope | Used for |
|---|---|---|
| `NANGO_API_KEY` | `environment:agent_sessions:write` | Creating and terminating sessions |
| `NANGO_SECRET_KEY_DEV` | `environment:deploy` | Deploying the actions |
The CLI reads NANGO_SECRET_KEY_DEV for the dev environment. Neither key needs permission to read provider credentials. See the scope reference.
Create .env with owner-only permissions, then fill it in your editor:
touch .env
chmod 600 .envNANGO_API_KEY=<SESSION-API-KEY>
NANGO_SECRET_KEY_DEV=<DEPLOY-API-KEY>
NANGO_CONNECTION_ID=<CONNECTION-ID-FROM-STEP-2>
OPENAI_API_KEY=<OPENAI-API-KEY>
OPENAI_MODEL=gpt-4.1-mini-2025-04-14I pinned the model snapshot for reproducibility. Another Responses API model with the same function-calling options can work.
You’ll also create a small test action called denied-probe. It makes no Gmail requests. In Step 6, you’ll use it to confirm that an action works when allowed and is blocked when excluded from a session.
Give your coding agent this prompt:
Create read-inbox-summary for google-mail-readonly. Accept no parameters.
Read up to 25 inbox messages, with pagination up to that cap, and return
{ messages: [{ id, subject, snippet }] }. Limit subjects to 200 characters
and snippets to 500.

Also create denied-probe: empty input, returns { executed: true },
no provider calls. Compile both actions and show the Gmail requests
before deployment.
If you’re adapting the companion, use this prompt to update its action. In Step 5, also update the assistant’s result validation and tool description to allow 25 messages.
Before deploying, check the inbox list request:
const { data } = await nango.get({
  endpoint: '/gmail/v1/users/me/messages',
  params: {
    labelIds: 'INBOX',
    maxResults: 25
  }
});
Gmail’s list endpoint returns message IDs and a nextPageToken when more results are available. Follow that token if needed, stopping at 25 messages. A get request for each ID retrieves the snippet and headers with a partial response.
Compile and deploy both actions from the project root:
export NANGO_CLI_UPGRADE_MODE=ignore
npx nango compile --no-dependency-update
node --env-file=.env node_modules/nango/dist/index.js deploy --action read-inbox-summary --no-dependency-update dev
node --env-file=.env node_modules/nango/dist/index.js deploy --action denied-probe --no-dependency-update dev
Wait for Compiled before deploying.
Check that both actions are enabled under dev → Integrations → google-mail-readonly → Functions:
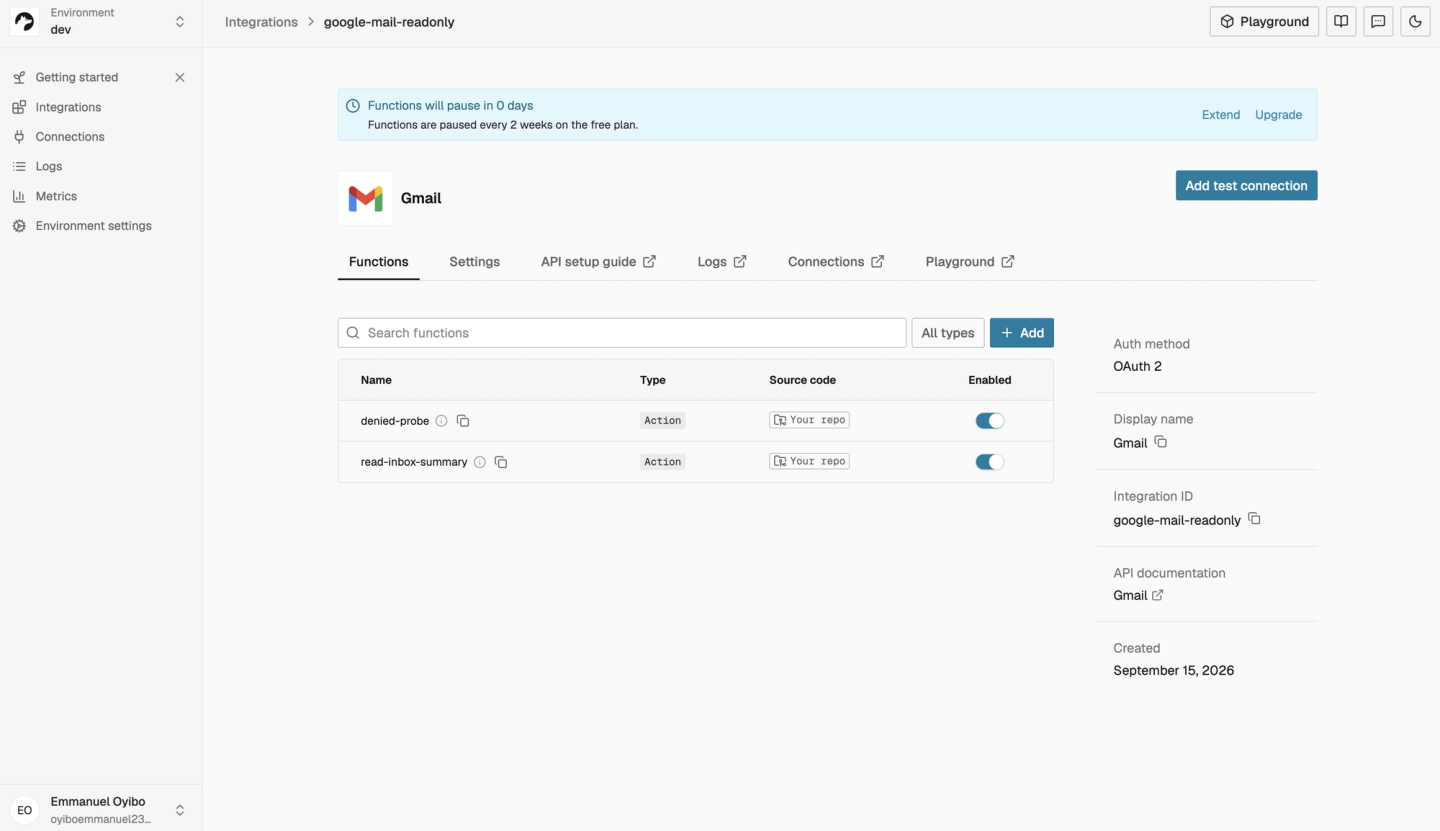
Step 4: Create a session for this mailbox
Restrict the assistant to read-inbox-summary by sending this policy to POST /sessions:
{
  "tenant": {
    "connections": {
      "pinned": [{
        "integration_id": "google-mail-readonly",
        "connection_id": "<CONNECTION-ID-FROM-ENV>"
      }]
    }
  },
  "toolset": {
    "google-mail-readonly": { "allow": { "tools": ["read-inbox-summary"] } }
  },
  "pinned_tools": { "google-mail-readonly": ["read-inbox-summary"] },
  "meta_tools": {
    "nango_tool_search": false,
    "nango_execute": false,
    "nango_proxy": false
  },
  "expires_in": "5m"
}tenant.connections.pinnedselects the one Gmail connection.toolsetpermits onlyread-inbox-summaryon that integration.pinned_toolsexposes the allowed action through MCP discovery.meta_toolsdisables search, indirect execution, and the provider proxy.expires_inlimits the session to five minutes; the backend terminates it sooner when the request finishes.
The Agent Sessions reference describes these policy fields.
This demo uses the connection ID from your local configuration. In your product, have the backend select a connection belonging to the authenticated user and pin it to the session.
These session.mjs functions create the session and connect the MCP client. The full file supplies imports, constants, and helpers: required validates environment values; api authenticates requests and returns data.
export async function createSession(
  action = 'read-inbox-summary',
  expiresIn = '5m',
  connections
) {
  // Production must resolve this connection from authenticated application identity.
  return api('/sessions', 'POST', {
    tenant: {
      connections: connections ?? {
        pinned: [{
          integration_id: integration,
          connection_id: required('NANGO_CONNECTION_ID')
        }]
      }
    },
    toolset: { [integration]: { allow: { tools: [action] } } },
    pinned_tools: { [integration]: [action] },
    meta_tools: {
      nango_tool_search: false,
      nango_execute: false,
      nango_proxy: false
    },
    expires_in: expiresIn
  });
}

export async function connectSession(session) {
  assert.equal(session.toolset[integration]?.connected, true);
  const url = new URL(session.mcp_url);
  assert.equal(url.origin, 'https://api.nango.dev');
  assert.ok(!url.username && !url.password && !url.search && !url.hash);
  const client = new Client({
    name: 'gmail-summary-demo',
    version: '1.0.0'
  });
  try {
    await client.connect(new StreamableHTTPClientTransport(url, {
      requestInit: {
        headers: { Authorization: `Bearer ${session.session_token}` },
        redirect: 'error'
      }
    }));
    return client;
  } catch (error) {
    await client.close().catch(() => {});
    throw error;
  }
}
Ask your coding agent for the complete module:
Create session.mjs with createSession, connectSession, and terminateSession
using the policy and functions above. Use NANGO_API_KEY for session API
requests. Keep credentials and session objects out of logs.
Step 5: Ask the assistant to summarize the inbox
The assistant uses the connected MCP client between two model calls. The first asks for read_inbox, which your application executes through the client. The second summarizes the subjects and snippets.
The second call has no tools available, so it cannot request another read. The runner makes one tool call per question, though the session policy permits repeated calls until expiry.
Implement OpenAI’s function-calling flow:
Create assistant.mjs to call read_inbox once through the MCP client,
then summarize only the returned subjects and snippets with OpenAI.
Accept up to 25 messages and enforce the action's field limits.
Give the summary request no tools and treat email as untrusted data.

Create agent.mjs as the CLI runner using the session helpers, OPENAI_API_KEY,
and OPENAI_MODEL. Use store:false. Always close the client and terminate
the session, including on errors. Keep credentials out of model input and logs.
This summarizeInbox excerpt follows tool discovery and validation, omitting schemas, the tool definition, and instructions. The runner’s requestModel helper adds authentication, the model, and store: false:
const input = [{
  role: 'user',
  content: question
}];
const first = await requestModel({
  instructions,
  input,
  tools: [definition],
  tool_choice: 'required',
  parallel_tool_calls: false
});
assert.equal(first.status, 'completed');
const calls = first.output.filter(item => item.type === 'function_call');
assert.equal(calls.length, 1);
const call = calls[0];
assert.equal(call.name, 'read_inbox');
emptyInput.parse(JSON.parse(call.arguments));
trace({
  tool: call.name,
  arguments: {}
});
const result = await client.callTool({
  name: toolName,
  arguments: {}
});
assert.ok(!result.isError);
const text = result.content?.find(item => item.type === 'text')?.text;
const data = output.parse(result.structuredContent ?? JSON.parse(text ?? 'null'));
trace({ message_count: data.messages.length });
// Only fields needed for summarization cross the model-provider boundary.
const modelData = {
  messages: data.messages.map(({ subject, snippet }) => ({
    subject,
    snippet
  }))
};
const final = await requestModel({
  instructions,
  input: [...input, ...first.output, {
    type: 'function_call_output',
    call_id: call.call_id,
    output: JSON.stringify(modelData)
  }],
  tools: []
});
The implementation notes include the full prompt for cleanup and error reporting.
Run the assistant:
node --env-file=.env agent.mjs "Summarize up to 25 emails in my inbox."The terminal shows the saved output from the original five-message run with synthetic test emails:
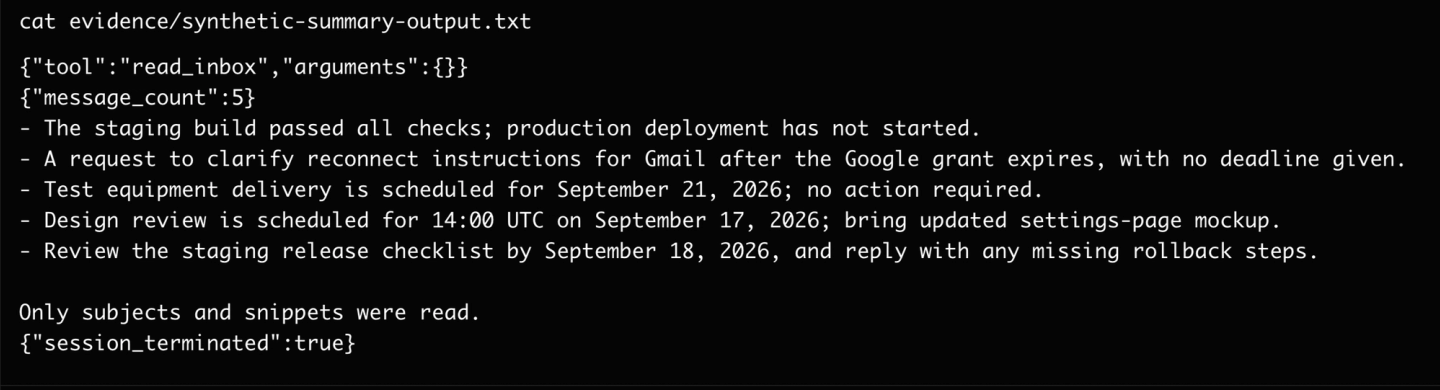
The captured requests include this tool result from the second call. The excerpt shows two of five messages, substitutes the call ID, and uses JSON.stringify to display the output string readably:
{
  type: "function_call_output",
  call_id: "<MATCHING-CALL-ID>",
  output: JSON.stringify({ messages: [
    {
      subject: "Demo: staging build passed",
      snippet: "The staging build passed all checks. Production deployment has not started. This is a synthetic tutorial message."
    },
    {
      subject: "Demo: clarify the reconnect instructions",
      snippet: "Please clarify how a user reconnects Gmail after the Google grant expires. There is no deadline for this request. This is a synthetic tutorial message."
    }
  ] })
}
The captured requests show what reaches the model: the user’s question, the tool call, and the email subjects and snippets used for summarization. Gmail OAuth tokens, the Agent Session token, and Gmail message IDs are absent from these request bodies.
Compare the complete summary with your test messages.
Step 6: Check that the session’s restrictions hold
After checking the summary, test the session restrictions directly through MCP. These checks run without the model:
Create verify.mjs to check session restrictions through MCP without OpenAI:
1. Confirm denied-probe returns { executed: true } when explicitly allowed.
2. Confirm it is rejected as an unknown tool in an inbox-only session.
3. Terminate that session and require HTTP 401 on its next tools/list request.
4. With --expiry, let a separate 60-second session expire and require HTTP 401.

Clean up sessions and exit nonzero if any check fails.
Enable the expiry check and allow just over a minute:
node --env-file=.env verify.mjs --expiryThe recorded run passed all four checks:
Control: probe executed when allowed.
Restricted session: probe excluded.
Terminated session: HTTP 401.
Expired session: HTTP 401.
These checks demonstrate how the session policy controls access. The probe runs when explicitly allowed and is rejected when excluded from the inbox-only session. Confirming that it works first establishes that the rejection comes from the restriction.
The remaining checks verify that termination and expiry each block subsequent requests. Expiry is tested separately by letting a session reach its configured end time before attempting another request.
Shipping Agent Sessions in Production
Use Nango Connect to let customers connect their accounts, and associate each connection with the authenticated user. Your backend will need the additional environment:connect_sessions:write permission.
For each task, create an Agent Session with the connections, tools, and lifetime the assistant needs. Nango stores and uses the provider’s OAuth credentials. Your backend holds the session token and uses it to authenticate MCP requests.
Keep the session ID so your backend can terminate access when the task finishes or the user’s access changes. Configure expiry to set the maximum session lifetime.
See the companion’s provider setup notes for Google OAuth requirements.
Conclusion
You’ve built a Gmail assistant that summarizes emails while keeping OAuth and session tokens out of the model’s input. Nango handles Gmail authentication, and your backend uses Agent Sessions to control the mailbox, available tools, and duration of access.
Use the Agent Sessions guide to adapt this setup to your application’s accounts and tools.
FAQs
How can an AI agent use OAuth without seeing the access token?
Let the application authenticate tool calls through Nango, which stores and uses the provider credentials. Give the model only the tool schema and the fields it needs from the result.
How do I connect an AI agent to users’ accounts securely?
Authenticate the user, verify connection ownership, and create a session limited to the required account, tools, and lifetime. Keep its token in the backend’s MCP transport and terminate the session after use.
Should OAuth tokens be passed to an LLM?
Tokens in prompts, arguments, or results become part of the model conversation, so keep them out of LLM input. Authenticate requests outside that conversation and exclude credentials from logs and traces.


