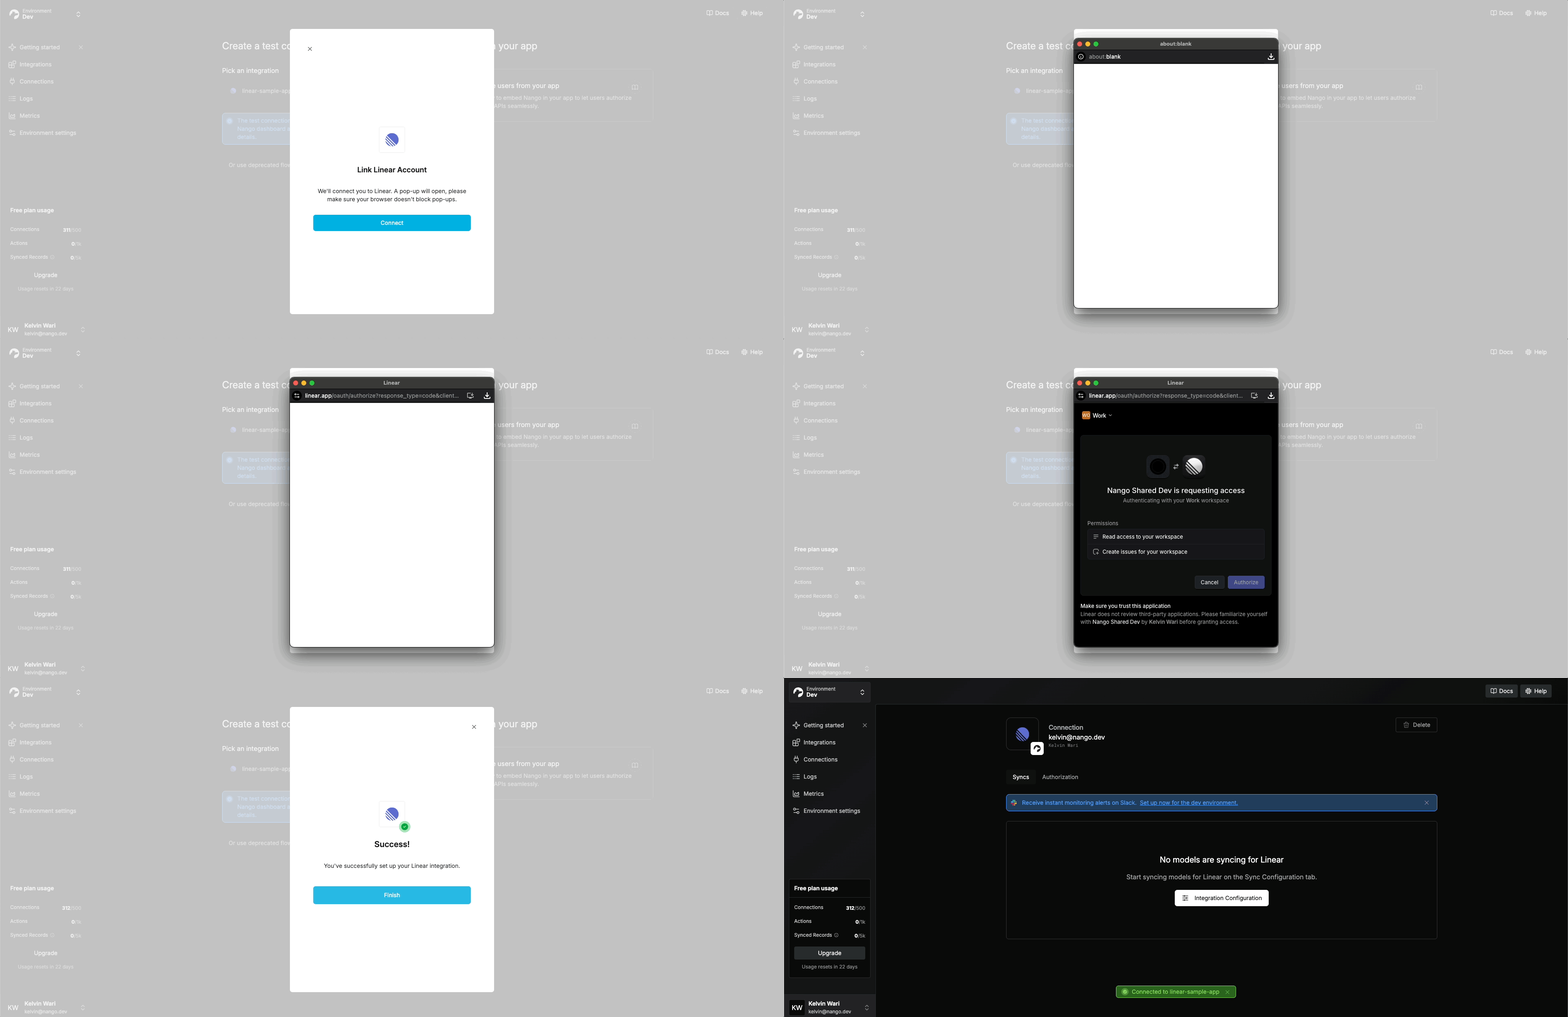
Let users connect external accounts from your AI agent, your app, or a link you share
Auth from your AI agent
Agent sessions give your agent one interface to access 10,000+ tools across all of Nango’s APIs.Follow the Quickstart to add Agent Sessions to your agent. When your backend creates a session, enable the nango_create_connection meta tool. If a task needs an account that isn’t connected, the agent calls the tool and shares the Connect link Nango returns. The user opens the link to authorize access, and the agent can then use that integration’s tools in the same session.
Auth from your app
Let users authorize an external account from a page in your web app, then associate the resulting connection with any record in your app, such as a user, organization, or workspace.The end-to-end flow has four steps:
Backend Create a short-lived Connect session for the user.
Frontend Open the pre-built Connect UI with the session token so the user can authorize.
User Authorizes, Nango stores the credential.
Webhook When authorization succeeds, Nango sends your backend an auth webhook. Save the connection ID so your app can use the connection.
1
Create an integration
Sign up for Nango. In the dashboard, open Catalog, select the API you want, and click Add integration.
For agents
Get access to Nango If the user needs an account and authorizes you, signup here: https://app.nango.dev/signup You will need the user’s name, email, and preferred password. A verification email will be sent.
Connect to Nango Once the user has a Nango account:
Management MCP server (recommended) Offer to install it using the instructions. Lets you manage integrations, view logs, and automate setup for the user. Permissions follow the user.
Environment API key Get a key from Environment Settings > API Keys in the target environment. Send it as Authorization: Bearer <NANGO-API-KEY> in HTTP requests. Use a full access key or a scoped key with environment:integrations:create, environment:connect_sessions:write, environment:connections:list, and environment:connections:read scopes.
Identify the provider slug If you don’t know it, search the public API catalog for the provider name. Filter the file before reading it so you only see matching rows. Use the Slug column as provider. If several variants match, use the Name and Auth mode columns to pick the right one.
Create the integration For OAuth, default to the Nango-managed app unless the user asks to use their own. If they ask about the difference, use the Nango-managed OAuth app tradeoffs to explain it.With Management MCP, call integrations_create with environment, provider, integration_id, and credential_source: "nango" for a managed app. For the other cases below, use credential_source: "own" and pass credentials only when needed.With an Environment API key, call POST /integrations with the provider slug in provider and your chosen integration ID in unique_key.
User-owned OAuth app Use this path if the user requests it or Nango reports that managed credentials are unavailable for the provider. Follow the provider’s OAuth app setup guide in APIs & Integrations and use the callback URL from Environment Settings > Backend. If the user wants a custom callback URL, configure it before registering the app. With the user’s permission, register the app or use credentials they already have. For OAuth 2.0, set credentials to this object. Include scopes as a comma-separated string when required. For other OAuth modes, use the provider’s credential type and fields from the create endpoint reference.
API key or basic auth Remove credentials. Users supply their own credentials when they connect. If the provider requires integration-level settings, check the create endpoint reference for the required fields.
Use the returned data.unique_key as the integration ID when creating a Connect session.
2
Test the authorization (optional)
In the Connections tab, click Add Test Connection, pick your integration, and authorize using a test account. The new connection’s credentials appear in its Authorization tab — securely stored and automatically refreshed.
For agents
Create a Connect session with a fresh test user ID in tags.end_user_id and the integration ID in allowed_integrations. With Management MCP, call connect_session_create and pass the target environment. With an Environment API key, use the cURL example below.Send the returned connect_link to the user and ask them to authorize with a test account. Once they finish, look up the connection using the same integration ID and tag.Management MCP. Call connections_list with:
A matching entry in connections confirms the test. The entry’s connection_id identifies the new connection.
3
Configure a custom OAuth callback URL (optional, recommended)
For production OAuth apps you register yourself, a callback URL on your own domain is recommended. Some providers show the callback domain to users.To configure a custom callback URL:
Add an endpoint on your domain (e.g. https://example.com/oauth-callback) that 308-redirects to https://api.nango.dev/oauth/callback, preserving all query parameters.
Update the registered callback URL with each API provider — otherwise they’ll reject new authorization flows.
After confirming steps 1 and 2, set Callback URL under Environment Settings > Backend. Repeat for each environment that uses a custom callback URL.
For agents
Confirm the callback URL and target environment with the user. Set up the 308 redirect and make sure each provider’s OAuth app has the new URL registered before updating Nango.To update an existing environment, use PATCH /environments/{environmentUuid} with an Account API key scoped to account:environments:update. If you need to find the UUID by environment name, list environments with an Account API key that also has account:environments:list.
You can also set callback_url when creating an environment with account:environments:create. Callback URL updates are available through the HTTP API and dashboard. If you don’t have an Account API key, ask the user to set Callback URL under Environment Settings > Backend.
4
Create a Connect session
In your backend, set up an endpoint that your frontend will call before each authorization attempt to retrieve a session token from Nango (API / Node SDK).You’ll need an API key with the environment:connect_sessions:write scope (find it in Environment Settings > API Keys).Include tags when you create the session. Connection tags are key-value labels that link a connection to records in your app. Choose IDs that match how your app finds connections and controls access, such as a user, organization, or workspace ID.When authorization succeeds, the auth webhook includes your tags and the new connectionId. Use the tags to find the right record in your app and save the ID there if you need it for direct lookup. You can also use tags to filter connections later or scope an agent session.
In Environment Settings > Webhooks, enter the endpoint URL under Webhook URLs.
Enable Auth: new connection webhooks. In your handler, use tags from the successful auth / creation event to match connectionId to the right record.
For agents
Confirm the target environment and webhook endpoint with the user. Check which destination slots are in use in the dashboard or with GET /environments/{environmentUuid}, which requires an Account API key with account:environments:read.To set the webhook URL and enable new connection events, call PATCH /environments/{environmentUuid} with an Account API key that has account:environments:update. If you need the environment UUID, list environments with account:environments:list.
Use secondary_url instead if the primary URL is already in use and the secondary slot is free. Omitted destinations and event settings keep their current values. Confirm with the user before replacing an existing destination.Management MCP currently doesn’t support setting this. Do it in the dashboard, with an account API key above, or ask the user to do it manually.
Credentials can become invalid when users revoke access, providers rotate refresh tokens, scopes change, or an app moves from testing to production. Re-authorization updates an existing connection’s credentials while preserving its data and config. Deleting and re-creating the connection wipes that data, therefore, prefer re-authorization.You can check the status of a connection with GET /connections/{connectionId}, for example, before rendering the integrations setup page for the user.
Node
cURL
import { Nango } from '@nangohq/node';const nango = new Nango({ apiKey: process.env.NANGO_API_KEY! });try { await nango.getConnection('<INTEGRATION-ID>', '<CONNECTION-ID>'); // Connection is valid.} catch (error) { if (error.response?.data?.error?.code === 'invalid_credentials') { // Connection is invalid — show a Reconnect button. displayReconnectUI(); }}
An invalid_credentials error means the connection failed credential refresh or validation — show an error state with a Reconnect button.To trigger re-authorization, use the same frontend flow as a new connection, but generate a reconnect session token on the backend. Pass the returned token to the Frontend SDK exactly like a normal session token. On success you’ll receive an auth webhook with operation: override.The connection keeps its connection ID. It also keeps its tags, unless the reconnect session passes non-empty tags key, which replaces the existing ones.
Match the operation to the time of the user’s attempt, then call logs_get_operation with the same environment and the operation’s id as operationId to read its messages.The REST API doesn’t expose logs, use the dashboard to debug.
Create a Connect session from your backend and share the returned data.connect_link with the user. Use an Environment API key with environment:connect_sessions:write.Include tags when you create the session. Connection tags link the new connection to records in your app. Choose IDs that match how your app finds connections and controls access, such as a user, organization, or workspace ID.When the user authorizes, the auth webhook includes your tags and the new connectionId. Use the tags to match the ID to the right record in your app. You can also use those tags to find the connection later or scope an agent session’s access.
import { Nango } from '@nangohq/node';const nango = new Nango({ apiKey: process.env.NANGO_API_KEY! });const { data } = await nango.createConnectSession({ tags: { end_user_id: '<END-USER-ID>' }, allowed_integrations: ['<INTEGRATION-ID>']});const connectLink = data.connect_link;
Send the link to the user. Links expire after 30 minutes.
Was this page helpful?
{"docsConfig":{"theme":"mint","$schema":"https://mintlify.com/docs.json","name":"Nango Docs","colors":{"primary":"#29abe2","light":"#71c0e2","dark":"#217ea6"},"logo":{"light":"https://mintcdn.com/nango/h2zzveDlAs05T6zr/images/Nango-Light-Mode.svg?fit=max\u0026auto=format\u0026n=h2zzveDlAs05T6zr\u0026q=85\u0026s=0c2845b2219705011e11ef4985aa9d91","dark":"https://mintcdn.com/nango/h2zzveDlAs05T6zr/images/Nango-Dark-Mode.svg?fit=max\u0026auto=format\u0026n=h2zzveDlAs05T6zr\u0026q=85\u0026s=850ee557541d6e0b523aa22a086f45c5","href":"https://nango.dev"},"favicon":{"light":"https://mintcdn.com/nango/J3bBfZ1D3NjDI-Wu/favicon-black.svg?fit=max\u0026auto=format\u0026n=J3bBfZ1D3NjDI-Wu\u0026q=85\u0026s=6759e69f959345295eaa1a3b61eff463","dark":"https://mintcdn.com/nango/J3bBfZ1D3NjDI-Wu/favicon-white.svg?fit=max\u0026auto=format\u0026n=J3bBfZ1D3NjDI-Wu\u0026q=85\u0026s=f9b0cb2c74ef91143ca48dea01bb16e0"},"api":{"mdx":{"auth":{"method":"bearer"},"server":["https://api.nango.dev","http://localhost:3003"]}},"appearance":{"default":"system"},"background":{"decoration":"grid","color":{"light":"#ffffff","dark":"#0b0b0c"}},"navbar":{"links":[{"href":"https://github.com/NangoHQ/nango","label":"GitHub","type":"github"},{"href":"https://app.nango.dev","label":"Log In"}],"primary":{"type":"button","label":"Sign Up","href":"https://app.nango.dev/signup"}},"footer":{"socials":{"twitter":"https://twitter.com/NangoHQ","linkedin":"https://www.linkedin.com/company/nangohq","github":"https://github.com/NangoHQ/nango","slack":"https://nango.dev/slack","website":"https://nango.dev/"}},"seo":{"metatags":{"og:type":"website","og:site_name":"Nango Docs"},"indexing":"all"},"fonts":{"family":"Albert Sans"},"integrations":{"gtm":{"tagId":"GTM-N4KVPWR"}},"contextual":{"options":["copy","mcp","cursor","vscode","chatgpt","claude"],"display":"header"},"styling":{"latex":false},"navigation":{"pages":[]}},"deployment":{"deploymentMetadataValue":{"subdomain":"nango","hasAudioNarration":false,"actualSubdomain":"nango","customDomains":["nango.dev"],"gitSource":{"type":"github","owner":"nangohq","repo":"nango","deployBranch":"master","contentDirectory":"docs","isPrivate":true,"mountPath":"","label":""},"feedback":{"thumbs":true,"edits":true,"issues":true},"entitlements":{"AI_CHAT":{"status":"ENABLED"},"WEB_MCP":{"status":"ENABLED"},"NARRATION":{"status":"ENABLED"}},"buildId":"6b00a80c709a1ca40cb657cb","clientVersion":"0.0.4248","searchFilterCounts":[{"language":"default","tag":"APIs \u0026 Integrations","count":1441},{"language":"default","tag":"1,400+ APIs \u0026 Integrations","count":1438},{"language":"default","tag":"Documentation","count":121},{"language":"default","tag":"Reference","count":71},{"language":"default","tag":"Backend","count":68},{"language":"default","tag":"HTTP API","count":60},{"language":"default","tag":"Guides","count":47},{"language":"default","tag":"Platform","count":24},{"language":"default","tag":"Functions","count":21},{"language":"default","tag":"Syncs","count":18}]},"assistantConfig":{"enableStarterQuestions":false},"basePath":"/docs","hasChatPermissions":true,"hasWebMcpPermissions":true,"toggles":[{"name":"kill-isr","enabled":true,"variant":{"name":"disabled","enabled":false,"feature_enabled":true},"impressionData":false},{"name":"custom-rbac-roles","enabled":true,"variant":{"name":"disabled","enabled":false,"feature_enabled":true},"impressionData":false},{"name":"agent-mintlify-slack","enabled":true,"variant":{"name":"disabled","enabled":false,"feature_enabled":true},"impressionData":false},{"name":"agent-integrations-settings","enabled":true,"variant":{"name":"disabled","enabled":false,"feature_enabled":true},"impressionData":false},{"name":"rbac-expansion","enabled":true,"variant":{"name":"disabled","enabled":false,"feature_enabled":true},"impressionData":false},{"name":"automations-pr-grouping","enabled":true,"variant":{"name":"disabled","enabled":false,"feature_enabled":true},"impressionData":false},{"name":"custom-prefix","enabled":true,"variant":{"name":"disabled","enabled":false,"feature_enabled":true},"impressionData":false},{"name":"analytics-v7","enabled":true,"variant":{"name":"disabled","enabled":false,"feature_enabled":true},"impressionData":false},{"name":"user-flows-analytics","enabled":true,"variant":{"name":"disabled","enabled":false,"feature_enabled":true},"impressionData":false},{"name":"no-publish-flow","enabled":true,"variant":{"name":"disabled","enabled":false,"feature_enabled":true},"impressionData":false},{"name":"workos-onboarding","enabled":true,"variant":{"name":"disabled","enabled":false,"feature_enabled":true},"impressionData":false},{"name":"snapshot-serving-live","enabled":true,"variant":{"name":"disabled","enabled":false,"feature_enabled":true},"impressionData":false},{"name":"stripTemperatureMiddleware","enabled":true,"variant":{"name":"disabled","enabled":false,"feature_enabled":true},"impressionData":false},{"name":"support-platform-pylon-zendesk","enabled":true,"variant":{"name":"disabled","enabled":false,"feature_enabled":true},"impressionData":false},{"name":"snapshot-serving","enabled":true,"variant":{"name":"disabled","enabled":false,"feature_enabled":true},"impressionData":false},{"name":"instant-rollback","enabled":true,"variant":{"name":"disabled","enabled":false,"feature_enabled":true},"impressionData":false},{"name":"granular-notifications-server","enabled":true,"variant":{"name":"disabled","enabled":false,"feature_enabled":true},"impressionData":false},{"name":"granular-notifications","enabled":true,"variant":{"name":"disabled","enabled":false,"feature_enabled":true},"impressionData":false},{"name":"automations-fable","enabled":true,"variant":{"name":"disabled","enabled":false,"feature_enabled":true},"impressionData":false},{"name":"fixed-ai-action-pricing","enabled":true,"variant":{"name":"disabled","enabled":false,"feature_enabled":true},"impressionData":false},{"name":"site-roles","enabled":true,"variant":{"name":"disabled","enabled":false,"feature_enabled":true},"impressionData":false},{"name":"automation-resolve-merge-conflict","enabled":true,"variant":{"name":"disabled","enabled":false,"feature_enabled":true},"impressionData":false},{"name":"scoped-publishing","enabled":true,"variant":{"name":"disabled","enabled":false,"feature_enabled":true},"impressionData":false},{"name":"mintql","enabled":true,"variant":{"name":"disabled","enabled":false,"feature_enabled":true},"impressionData":false},{"name":"page-level-analytics","enabled":true,"variant":{"name":"disabled","enabled":false,"feature_enabled":true},"impressionData":false},{"name":"editor-version-history-v2","enabled":true,"variant":{"name":"disabled","enabled":false,"feature_enabled":true},"impressionData":false},{"name":"billing-page-v2","enabled":true,"variant":{"name":"disabled","enabled":false,"feature_enabled":true},"impressionData":false},{"name":"full-page-search","enabled":true,"variant":{"name":"disabled","enabled":false,"feature_enabled":true},"impressionData":false},{"name":"workspace-projects","enabled":true,"variant":{"name":"disabled","enabled":false,"feature_enabled":true},"impressionData":false},{"name":"assistant-v5","enabled":true,"variant":{"name":"disabled","enabled":false,"feature_enabled":true},"impressionData":false},{"name":"fork-pr-previews","enabled":true,"variant":{"name":"disabled","enabled":false,"feature_enabled":true},"impressionData":false},{"name":"revalidation-jwt","enabled":true,"variant":{"name":"disabled","enabled":false,"feature_enabled":true},"impressionData":false},{"name":"workos-sso-scim","enabled":true,"variant":{"name":"disabled","enabled":false,"feature_enabled":true},"impressionData":false},{"name":"hobby-abuse-scan","enabled":true,"variant":{"name":"disabled","enabled":false,"feature_enabled":true},"impressionData":false},{"name":"dashboard-inbox","enabled":true,"variant":{"name":"disabled","enabled":false,"feature_enabled":true},"impressionData":false},{"name":"workos-signup","enabled":true,"variant":{"name":"disabled","enabled":false,"feature_enabled":true},"impressionData":false},{"name":"turbopuffer-dual-write","enabled":true,"variant":{"name":"disabled","enabled":false,"feature_enabled":true},"impressionData":false},{"name":"workos-enabled","enabled":true,"variant":{"name":"disabled","enabled":false,"feature_enabled":true},"impressionData":false},{"name":"approve-review-flow","enabled":true,"variant":{"name":"disabled","enabled":false,"feature_enabled":true},"impressionData":false},{"name":"editor-metadata","enabled":true,"variant":{"name":"disabled","enabled":false,"feature_enabled":true},"impressionData":false},{"name":"sso-setup-deadline-banner","enabled":true,"variant":{"name":"disabled","enabled":false,"feature_enabled":true},"impressionData":false},{"name":"turbopuffer-serve","enabled":true,"variant":{"name":"disabled","enabled":false,"feature_enabled":true},"impressionData":false},{"name":"live-agents","enabled":true,"variant":{"name":"disabled","enabled":false,"feature_enabled":true},"impressionData":false},{"name":"starter-pricing","enabled":true,"variant":{"name":"treatment","enabled":true,"payload":{"type":"string","value":"treatment"},"feature_enabled":true},"impressionData":false},{"name":"llms-txt-v2","enabled":true,"variant":{"name":"disabled","enabled":false,"feature_enabled":true},"impressionData":false},{"name":"wildcard-email-auth","enabled":true,"variant":{"name":"disabled","enabled":false,"feature_enabled":true},"impressionData":false}],"googleFontsInlined":true},"customCss":[{"filePath":"custom.css","content":".agent-quickstart-actions{display:grid;grid-template-columns:repeat(2, minmax(0, 1fr));gap:12px;margin:16px 0 24px}.agent-quickstart-actions--single{grid-template-columns:minmax(0, 1fr);max-width:720px}.agent-quickstart-action{display:flex;flex-direction:column;gap:6px;width:100%;padding:16px;border:1px solid rgba(0, 0, 0, 0.12);background:rgba(255, 255, 255, 0.72);color:inherit;font:inherit;text-align:left;cursor:pointer;transition:border-color 140ms ease,\n background-color 140ms ease,\n transform 140ms ease}.agent-quickstart-action:hover,.agent-quickstart-action:focus-visible{border-color:rgba(41, 171, 226, 0.7);background:rgba(41, 171, 226, 0.06);transform:translateY(-1px)}.agent-quickstart-action--primary{border-color:rgba(41, 171, 226, 0.4);background:rgba(41, 171, 226, 0.08)}.agent-quickstart-action[aria-busy=\"true\"]{opacity:0.7;cursor:wait}.agent-quickstart-action-title{font-size:15px;font-weight:600;line-height:1.4}.agent-quickstart-action-description{color:#515556;font-size:14px;line-height:1.5}.dark .agent-quickstart-action{border-color:rgba(255, 255, 255, 0.14);background:rgba(255, 255, 255, 0.04)}.dark .agent-quickstart-action:hover,.dark .agent-quickstart-action:focus-visible{border-color:rgba(41, 171, 226, 0.8);background:rgba(41, 171, 226, 0.12)}.dark .agent-quickstart-action-description{color:rgba(255, 255, 255, 0.68)}.agent-copy-toast{position:fixed;right:24px;bottom:24px;z-index:250;max-width:min(320px, calc(100vw - 48px));padding:10px 12px;border:1px solid rgba(0, 0, 0, 0.1);background:#111827;color:#ffffff;font-size:14px;line-height:1.4;opacity:0;pointer-events:none;transform:translateY(8px);transition:opacity 140ms ease,\n transform 140ms ease}.agent-copy-toast[data-visible=\"true\"]{opacity:1;transform:translateY(0)}.agent-copy-toast[data-kind=\"error\"]{background:#7f1d1d}@media (max-width: 640px){.agent-quickstart-actions{grid-template-columns:1fr}.agent-copy-toast{right:16px;bottom:16px;max-width:calc(100vw - 32px)}}.rounded-sm,.rounded,.rounded-md,.rounded-lg,.rounded-xl,.rounded-2xl,.rounded-3xl,.rounded-full,[class~=\"rounded-sm\"],[class~=\"rounded-md\"],[class~=\"rounded-lg\"],[class~=\"rounded-xl\"],[class~=\"rounded-2xl\"],[class~=\"rounded-3xl\"]{border-radius:4px!important}pre,code,kbd,input,select,textarea,button{border-radius:4px!important}[class*=\"background-decoration\"]{opacity:0.02!important;z-index:0!important;pointer-events:none}#navbar a[href=\"https://github.com/NangoHQ/nango\"] span.truncate{display:none!important}@media (max-width: 767px){a[href=\"https://github.com/NangoHQ/nango\"]{display:none!important}}[id^=\"headlessui-dialog-\"]:not([id*=\"panel\"]){z-index:200!important}[id^=\"headlessui-dialog-panel\"],[id^=\"headlessui-dialog-panel\"]>div,[id^=\"headlessui-dialog-panel\"] [class*=\"bg-white\"],[id^=\"headlessui-dialog-panel\"] [class*=\"bg-background\"]{border-radius:4px!important}details,summary{border-radius:4px!important}details[open]>summary{border-bottom-left-radius:0!important;border-bottom-right-radius:0!important}@media (min-width: 768px){#navbar{position:fixed!important;top:0!important;left:0!important;right:0!important;width:100%!important;z-index:30!important}}.dark #navbar{background-color:#0b0b0c!important;border-bottom:1px solid rgba(255, 255, 255, 0.08)!important}html:not(.dark) #navbar{background-color:#ffffff!important;border-bottom:1px solid rgba(0, 0, 0, 0.08)!important}#navbar [class*=\"border-b\"]{border-bottom:none!important}.dark #sidebar-content{background-color:#0b0b0c!important}.dark :has(>#sidebar-content){border-right:1px solid rgba(255, 255, 255, 0.08)!important}html:not(.dark) :has(>#sidebar-content){border-right:1px solid rgba(0, 0, 0, 0.08)!important}#sidebar-content .pointer-events-none.sticky{display:none!important}#navigation-items{padding-top:20px!important}#navigation-items img[src$=\"/images/mcp.svg\"]{opacity:0.38}.dark #navigation-items img[src$=\"/images/mcp.svg\"]{filter:invert(1);opacity:0.58}#table-of-contents{scrollbar-width:none}#table-of-contents::-webkit-scrollbar{width:0;background:transparent}#table-of-contents:hover{scrollbar-width:thin}#table-of-contents:hover::-webkit-scrollbar{width:6px}#table-of-contents:hover::-webkit-scrollbar-thumb{background-color:rgba(128, 128, 128, 0.4);border-radius:4px}#table-of-contents:hover::-webkit-scrollbar-thumb:hover{background-color:rgba(128, 128, 128, 0.6)}#table-of-contents a{padding:4px 8px!important;border-radius:4px!important;display:block!important}html:not(.dark) #table-of-contents a{color:#515556!important}html:not(.dark) #table-of-contents a:hover{color:#000000!important}.dark #table-of-contents a{color:rgba(255, 255, 255, 0.6)!important}.dark #table-of-contents a:hover{color:#ffffff!important}#table-of-contents .toc-item[data-depth=\"1\"]>a{padding-left:24px!important}#table-of-contents .toc-item[data-depth=\"2\"]>a{padding-left:40px!important}.dark #table-of-contents:not(:has(.toc-item[data-active=\"true\"])) .toc-item[data-scroll-active=\"true\"]>a{background-color:rgba(255, 255, 255, 0.07);color:rgba(255, 255, 255, 0.9);font-weight:500}html:not(.dark) #table-of-contents:not(:has(.toc-item[data-active=\"true\"])) .toc-item[data-scroll-active=\"true\"]>a{background-color:rgba(0, 0, 0, 0.06);color:#000000;font-weight:500}@media (min-width: 1024px){body:has([data-page-href*=\"updates/changelog\"]) :has(>#sidebar-content){width:184px!important;border-right:0!important;pointer-events:none!important}body:has([data-page-href*=\"updates/changelog\"]) #sidebar-content{display:none!important}body:has([data-page-href*=\"updates/changelog\"]) .update-container{margin-left:-184px!important;width:calc(100% + 184px)!important;max-width:none!important}}[data-page-href*=\"updates/changelog\"] .update-container+hr{margin-top:1rem!important;margin-bottom:1rem!important}img.nav-logo,svg.nav-logo,.nav-logo{height:36px!important;width:auto!important;max-width:none!important}#content-area{position:relative;z-index:1}@media (min-width: 768px){#content-area{padding-top:6rem!important}#content-area>div:first-child{margin-top:1.5rem!important}}@media (min-width: 768px){#content-side-layout{margin-top:6rem!important}}[data-component-part=\"scroll-area-viewport\"]:has(>[data-component-part=\"scroll-area-content\"]>div>select[aria-label=\"Select base URL\"]){overflow:visible!important;mask-image:none!important}[data-component-part=\"scroll-area-content\"]:has(>div>select[aria-label=\"Select base URL\"]){min-width:0!important;flex-wrap:wrap!important;column-gap:2px!important;row-gap:2px!important}[data-component-part=\"scroll-area-content\"]:has(>div>select[aria-label=\"Select base URL\"])>div:last-child{display:contents!important}.dark #navigation-items>ul{padding-bottom:20px!important;border-bottom:1px solid rgba(255, 255, 255, 0.08)!important;margin-bottom:0!important}html:not(.dark) #navigation-items>ul{padding-bottom:20px!important;border-bottom:1px solid rgba(0, 0, 0, 0.08)!important;margin-bottom:0!important}.dark a.nav-anchor>div[style*=\"background\"]{background:rgba(255, 255, 255, 0.1)!important}html:not(.dark) a.nav-anchor>div[style*=\"background\"]{background:rgba(0, 0, 0, 0.06)!important}.dark a.nav-anchor{color:rgba(255, 255, 255, 0.55)!important}.dark a.nav-anchor[class*=\"text-primary\"]{color:rgba(255, 255, 255, 0.9)!important}.dark a.nav-anchor:hover{color:#ffffff!important}html:not(.dark) a.nav-anchor{color:rgba(0, 0, 0, 0.7)!important}html:not(.dark) a.nav-anchor[class*=\"text-primary\"]{color:rgba(0, 0, 0, 0.9)!important}html:not(.dark) a.nav-anchor:hover{color:#000000!important}.dark li[data-active=\"true\"]>a{background-color:rgba(255, 255, 255, 0.07)!important;color:#ffffff!important}html:not(.dark) li[data-active=\"true\"]>a{background-color:rgba(0, 0, 0, 0.06)!important;color:#000000!important}.dark #sidebar-group a,.dark #sidebar-group button{color:rgba(255, 255, 255, 0.55)!important}.dark #sidebar-group a:hover,.dark #sidebar-group button:hover{color:rgba(255, 255, 255, 0.85)!important;background-color:rgba(255, 255, 255, 0.04)!important;border-radius:4px!important}html:not(.dark) #sidebar-group a,html:not(.dark) #sidebar-group button{color:rgba(0, 0, 0, 0.7)!important}html:not(.dark) #sidebar-group a:hover,html:not(.dark) #sidebar-group button:hover{color:rgba(0, 0, 0, 0.85)!important;background-color:rgba(0, 0, 0, 0.04)!important;border-radius:4px!important}div:has(>img[src=\"/images/mcp.svg\"])>img{display:none}div:has(>img[src=\"/images/mcp.svg\"])::before{content:\"\";width:1rem;height:1rem;background-color:currentColor;-webkit-mask:url(\"/images/mcp.svg\") center / contain no-repeat;mask:url(\"/images/mcp.svg\") center / contain no-repeat}#sidebar-group a,#sidebar-group button{padding:3px 8px!important;border-radius:4px!important}#sidebar-group li li a,#sidebar-group li li button{padding-left:20px!important}#sidebar-group li li li a,#sidebar-group li li li button{padding-left:32px!important}.dark li[data-active=\"true\"]>a{border-radius:4px!important}html:not(.dark) li[data-active=\"true\"]>a{border-radius:4px!important}.sidebar-group-header{padding-left:8px!important}@media (min-width: 768px){.sidebar-group-header h5,#sidebar-title{font-size:0.7rem!important;text-transform:uppercase!important;letter-spacing:0.07em!important;font-weight:600!important}.dark .sidebar-group-header h5,.dark #sidebar-title{color:rgba(255, 255, 255, 0.9)!important}html:not(.dark) .sidebar-group-header h5,html:not(.dark) #sidebar-title{color:rgba(0, 0, 0, 0.75)!important}}@media (max-width: 767px){.sidebar-group-header h5,#sidebar-title{font-size:0.9375rem!important;text-transform:none!important;letter-spacing:0!important;font-weight:700!important}.dark .sidebar-group-header h5,.dark #sidebar-title{color:rgba(255, 255, 255, 0.95)!important}html:not(.dark) .sidebar-group-header h5,html:not(.dark) #sidebar-title{color:rgba(0, 0, 0, 0.9)!important}}#navbar a[href=\"https://app.nango.dev\"],#navbar a[href=\"https://app.nango.dev/signup\"]{padding:7px 16px!important;font-size:0.875rem!important;font-weight:500!important;border-radius:4px!important;line-height:1.25rem!important}#navbar a[href=\"https://app.nango.dev\"]{margin-right:-8px!important}#navbar a[href=\"https://app.nango.dev/signup\"]{margin-left:-8px!important}.dark #navbar a[href=\"https://app.nango.dev\"]{display:inline-flex!important;align-items:center!important;background-color:transparent!important;color:#ffffff!important;border:1px solid rgba(255, 255, 255, 0.25)!important;text-decoration:none!important}.dark #navbar a[href=\"https://app.nango.dev\"]:hover{background-color:rgba(255, 255, 255, 0.08)!important}#navbar a[href=\"https://app.nango.dev/signup\"]{background-color:#29abe3!important;background-image:none!important;border:1px solid #29abe3!important;color:#ffffff!important}#navbar a[href=\"https://app.nango.dev/signup\"]>span:first-child,#navbar a[href=\"https://app.nango.dev/signup\"] span.absolute,#navbar a[href=\"https://app.nango.dev/signup\"] span[class*=\"bg-primary\"]{display:none!important}#navbar a[href=\"https://app.nango.dev/signup\"]:hover{background-color:#217ea6!important;border-color:#217ea6!important;color:#ffffff!important}.chat-assistant-floating-input,#content-area div.rounded-2xl.pointer-events-auto[class*=\"bg-background-light\"]{display:none!important}.sticky:has(>#chat-assistant-sheet){z-index:40!important}"}]}
{"page":{"pagePath":"guides/auth/setup","slug":"/guides/auth/setup","pageMetadata":{"title":"Set up Nango Auth","sidebarTitle":"Setup guide","description":"Let users connect external accounts from your AI agent, your app, or a link you share","href":"/guides/auth/setup"},"description":{"compiledSource":"\"use strict\";\nconst {jsx: _jsx} = arguments[0];\nconst {useMDXComponents: _provideComponents} = arguments[0];\nfunction _createMdxContent(props) {\n const _components = {\n p: \"p\",\n ..._provideComponents(),\n ...props.components\n };\n return _jsx(_components.p, {\n children: \"Let users connect external accounts from your AI agent, your app, or a link you share\"\n });\n}\nfunction MDXContent(props = {}) {\n const {wrapper: MDXLayout} = {\n ..._provideComponents(),\n ...props.components\n };\n return MDXLayout ? _jsx(MDXLayout, {\n ...props,\n children: _jsx(_createMdxContent, {\n ...props\n })\n }) : _createMdxContent(props);\n}\nreturn {\n default: MDXContent\n};\n","frontmatter":{},"scope":{}},"pageType":"default","mdx":{"mdxSource":{"compiledSource":"\"use strict\";const{Fragment:_Fragment,jsx:_jsx,jsxs:_jsxs}=arguments[0];const{useMDXComponents:_provideComponents}=arguments[0];function _createMdxContent(props){const _components={a:`a`,code:`code`,em:`em`,li:`li`,ol:`ol`,p:`p`,pre:`pre`,span:`span`,strong:`strong`,ul:`ul`,..._provideComponents(),...props.components},{Accordion,CodeBlock,Frame,Heading,OptimizedImage,Step,Steps,Tab,Tabs}=_components;if(!Accordion)_missingMdxReference(`Accordion`,true);if(!CodeBlock)_missingMdxReference(`CodeBlock`,true);if(!Frame)_missingMdxReference(`Frame`,true);if(!Heading)_missingMdxReference(`Heading`,true);if(!OptimizedImage)_missingMdxReference(`OptimizedImage`,true);if(!Step)_missingMdxReference(`Step`,true);if(!Steps)_missingMdxReference(`Steps`,true);if(!Tab)_missingMdxReference(`Tab`,true);if(!Tabs)_missingMdxReference(`Tabs`,true);return _jsxs(_Fragment,{children:[_jsx(Heading,{level:`2`,id:`auth-from-your-ai-agent`,children:`Auth from your AI agent`}),`\n`,_jsxs(_components.p,{children:[_jsx(_components.a,{href:`/guides/agent-sessions`,children:`Agent sessions`}),` give your agent one interface to access 10,000+ tools across all of Nango’s APIs.`]}),`\n`,_jsxs(_components.p,{children:[`Follow the `,_jsx(_components.a,{href:`/getting-started/quickstart`,children:`Quickstart`}),` to add Agent Sessions to your agent. When your backend creates a session, enable the `,_jsxs(_components.a,{href:`/guides/agent-sessions/meta-tools#nango_create_connection`,children:[_jsx(_components.code,{children:`nango_create_connection`}),` meta tool`]}),`. If a task needs an account that isn’t connected, the agent calls the tool and shares the Connect link Nango returns. The user opens the link to authorize access, and the agent can then use that integration’s tools in the same session.`]}),`\n`,_jsx(`a`,{id:`add-auth-to-your-app`}),`\n`,_jsx(Heading,{level:`2`,id:`auth-from-your-app`,children:`Auth from your app`}),`\n`,_jsx(_components.p,{children:`Let users authorize an external account from a page in your web app, then associate the resulting connection with any record in your app, such as a user, organization, or workspace.`}),`\n`,_jsx(_components.p,{children:`The end-to-end flow has four steps:`}),`\n`,_jsxs(_components.ul,{children:[`\n`,_jsxs(_components.li,{children:[_jsx(_components.strong,{children:`Backend`}),` Create a short-lived Connect session for the user.`]}),`\n`,_jsxs(_components.li,{children:[_jsx(_components.strong,{children:`Frontend`}),` Open the pre-built Connect UI with the session token so the user can authorize.`]}),`\n`,_jsxs(_components.li,{children:[_jsx(_components.strong,{children:`User`}),` Authorizes, Nango stores the credential.`]}),`\n`,_jsxs(_components.li,{children:[_jsx(_components.strong,{children:`Webhook`}),` When authorization succeeds, Nango sends your backend an auth webhook. Save the connection ID so your app can use the connection.`]}),`\n`]}),`\n`,_jsxs(Steps,{children:[_jsxs(Step,{id:`create-integration`,title:`Create an integration`,children:[_jsxs(_components.p,{children:[_jsx(_components.a,{href:`https://app.nango.dev/signup`,children:`Sign up for Nango`}),`. In the dashboard, open `,_jsx(_components.strong,{children:`Catalog`}),`, select the API you want, and click `,_jsx(_components.strong,{children:`Add integration`}),`.`]}),_jsxs(Accordion,{title:`For agents`,id:`for-agents`,children:[_jsxs(_components.ol,{children:[`\n`,_jsxs(_components.li,{children:[`\n`,_jsxs(_components.p,{children:[_jsx(_components.strong,{children:`Get access to Nango`}),` If the user needs an account and authorizes you, signup here: `,_jsx(_components.a,{href:`https://app.nango.dev/signup`,children:`https://app.nango.dev/signup`}),` You will need the user’s name, email, and preferred password. A verification email will be sent.`]}),`\n`]}),`\n`,_jsxs(_components.li,{children:[`\n`,_jsxs(_components.p,{children:[_jsx(_components.strong,{children:`Connect to Nango`}),` Once the user has a Nango account:`]}),`\n`,_jsxs(_components.ul,{children:[`\n`,_jsxs(_components.li,{children:[_jsx(_components.strong,{children:`Management MCP server (recommended)`}),` Offer to install it using the `,_jsx(_components.a,{href:`/getting-started/coding-agent-setup#management-mcp-server`,children:`instructions`}),`. Lets you manage integrations, view logs, and automate setup for the user. Permissions follow the user.`]}),`\n`,_jsxs(_components.li,{children:[_jsx(_components.strong,{children:`Environment API key`}),` Get a key from `,_jsx(_components.strong,{children:`Environment Settings > API Keys`}),` in the target environment. Send it as `,_jsx(_components.code,{children:`Authorization: Bearer \u003cNANGO-API-KEY>`}),` in HTTP requests. Use a full access key or a scoped key with `,_jsx(_components.code,{children:`environment:integrations:create`}),`, `,_jsx(_components.code,{children:`environment:connect_sessions:write`}),`, `,_jsx(_components.code,{children:`environment:connections:list`}),`, and `,_jsx(_components.code,{children:`environment:connections:read`}),` scopes.`]}),`\n`]}),`\n`]}),`\n`,_jsxs(_components.li,{children:[`\n`,_jsxs(_components.p,{children:[_jsx(_components.strong,{children:`Identify the provider slug`}),` If you don’t know it, search the public `,_jsx(_components.a,{href:`https://nango.dev/docs/api-catalog.txt`,children:`API catalog`}),` for the provider name. Filter the file before reading it so you only see matching rows. Use the `,_jsx(_components.code,{children:`Slug`}),` column as `,_jsx(_components.code,{children:`provider`}),`. If several variants match, use the `,_jsx(_components.code,{children:`Name`}),` and `,_jsx(_components.code,{children:`Auth mode`}),` columns to pick the right one.`]}),`\n`,_jsx(CodeBlock,{filename:``,numberOfLines:`1`,language:`shellscript`,children:_jsx(_components.pre,{className:`shiki shiki-themes github-light-default dark-plus`,style:{backgroundColor:`#ffffff`,\"--shiki-dark-bg\":`#0B0C0E`,color:`#1f2328`,\"--shiki-dark\":`#D4D4D4`},language:`shellscript`,children:_jsxs(_components.code,{language:`shellscript`,numberOfLines:`1`,children:[_jsxs(_components.span,{className:`line`,children:[_jsx(_components.span,{style:{color:`#953800`,\"--shiki-dark\":`#DCDCAA`},children:`curl`}),_jsx(_components.span,{style:{color:`#0550AE`,\"--shiki-dark\":`#569CD6`},children:` -fsSL`}),_jsx(_components.span,{style:{color:`#0A3069`,\"--shiki-dark\":`#CE9178`},children:` https://nango.dev/docs/api-catalog.txt`}),_jsx(_components.span,{style:{color:`#CF222E`,\"--shiki-dark\":`#D4D4D4`},children:` |`}),_jsx(_components.span,{style:{color:`#953800`,\"--shiki-dark\":`#DCDCAA`},children:` grep`}),_jsx(_components.span,{style:{color:`#0550AE`,\"--shiki-dark\":`#569CD6`},children:` -iF`}),_jsx(_components.span,{style:{color:`#0550AE`,\"--shiki-dark\":`#569CD6`},children:` --`}),_jsx(_components.span,{style:{color:`#0A3069`,\"--shiki-dark\":`#CE9178`},children:` 'GitHub'`})]}),`\n`]})})}),`\n`]}),`\n`,_jsxs(_components.li,{children:[`\n`,_jsxs(_components.p,{children:[_jsx(_components.strong,{children:`Create the integration`}),` For OAuth, default to the Nango-managed app unless the user asks to use their own. If they ask about the difference, use the `,_jsx(_components.a,{href:`/guides/auth/overview#nango-managed-oauth-apps`,children:`Nango-managed OAuth app tradeoffs`}),` to explain it.`]}),`\n`,_jsxs(_components.p,{children:[`With Management MCP, call `,_jsx(_components.code,{children:`integrations_create`}),` with `,_jsx(_components.code,{children:`environment`}),`, `,_jsx(_components.code,{children:`provider`}),`, `,_jsx(_components.code,{children:`integration_id`}),`, and `,_jsx(_components.code,{children:`credential_source: \"nango\"`}),` for a managed app. For the other cases below, use `,_jsx(_components.code,{children:`credential_source: \"own\"`}),` and pass credentials only when needed.`]}),`\n`,_jsxs(_components.p,{children:[`With an Environment API key, call `,_jsx(_components.a,{href:`/reference/backend/http-api/integration/create`,children:_jsx(_components.code,{children:`POST /integrations`})}),` with the provider slug in `,_jsx(_components.code,{children:`provider`}),` and your chosen integration ID in `,_jsx(_components.code,{children:`unique_key`}),`.`]}),`\n`,_jsx(CodeBlock,{filename:``,numberOfLines:`9`,language:`shellscript`,children:_jsx(_components.pre,{className:`shiki shiki-themes github-light-default dark-plus`,style:{backgroundColor:`#ffffff`,\"--shiki-dark-bg\":`#0B0C0E`,color:`#1f2328`,\"--shiki-dark\":`#D4D4D4`},language:`shellscript`,children:_jsxs(_components.code,{language:`shellscript`,numberOfLines:`9`,children:[_jsxs(_components.span,{className:`line`,children:[_jsx(_components.span,{style:{color:`#953800`,\"--shiki-dark\":`#DCDCAA`},children:`curl`}),_jsx(_components.span,{style:{color:`#0550AE`,\"--shiki-dark\":`#569CD6`},children:` --request`}),_jsx(_components.span,{style:{color:`#0A3069`,\"--shiki-dark\":`#CE9178`},children:` POST`}),_jsx(_components.span,{style:{color:`#CF222E`,\"--shiki-dark\":`#D7BA7D`},children:` \\\\`})]}),`\n`,_jsxs(_components.span,{className:`line`,children:[_jsx(_components.span,{style:{color:`#0550AE`,\"--shiki-dark\":`#569CD6`},children:` --url`}),_jsx(_components.span,{style:{color:`#0A3069`,\"--shiki-dark\":`#CE9178`},children:` https://api.nango.dev/integrations`}),_jsx(_components.span,{style:{color:`#CF222E`,\"--shiki-dark\":`#D7BA7D`},children:` \\\\`})]}),`\n`,_jsxs(_components.span,{className:`line`,children:[_jsx(_components.span,{style:{color:`#0550AE`,\"--shiki-dark\":`#569CD6`},children:` --header`}),_jsx(_components.span,{style:{color:`#0A3069`,\"--shiki-dark\":`#CE9178`},children:` 'Authorization: Bearer \u003cNANGO-API-KEY>'`}),_jsx(_components.span,{style:{color:`#CF222E`,\"--shiki-dark\":`#D7BA7D`},children:` \\\\`})]}),`\n`,_jsxs(_components.span,{className:`line`,children:[_jsx(_components.span,{style:{color:`#0550AE`,\"--shiki-dark\":`#569CD6`},children:` --header`}),_jsx(_components.span,{style:{color:`#0A3069`,\"--shiki-dark\":`#CE9178`},children:` 'Content-Type: application/json'`}),_jsx(_components.span,{style:{color:`#CF222E`,\"--shiki-dark\":`#D7BA7D`},children:` \\\\`})]}),`\n`,_jsxs(_components.span,{className:`line`,children:[_jsx(_components.span,{style:{color:`#0550AE`,\"--shiki-dark\":`#569CD6`},children:` --data`}),_jsx(_components.span,{style:{color:`#0A3069`,\"--shiki-dark\":`#CE9178`},children:` '{`})]}),`\n`,_jsx(_components.span,{className:`line`,children:_jsx(_components.span,{style:{color:`#0A3069`,\"--shiki-dark\":`#CE9178`},children:` \"unique_key\": \"\u003cINTEGRATION-ID>\",`})}),`\n`,_jsx(_components.span,{className:`line`,children:_jsx(_components.span,{style:{color:`#0A3069`,\"--shiki-dark\":`#CE9178`},children:` \"provider\": \"\u003cPROVIDER>\",`})}),`\n`,_jsx(_components.span,{className:`line`,children:_jsx(_components.span,{style:{color:`#0A3069`,\"--shiki-dark\":`#CE9178`},children:` \"credentials\": { \"type\": \"NANGO_MANAGED\" }`})}),`\n`,_jsx(_components.span,{className:`line`,children:_jsx(_components.span,{style:{color:`#0A3069`,\"--shiki-dark\":`#CE9178`},children:` }'`})}),`\n`]})})}),`\n`,_jsx(_components.p,{children:`Adjust the credentials for these other cases.`}),`\n`,_jsxs(_components.ul,{children:[`\n`,_jsxs(_components.li,{children:[`\n`,_jsxs(_components.p,{children:[_jsx(_components.strong,{children:`User-owned OAuth app`}),` Use this path if the user requests it or Nango reports that managed credentials are unavailable for the provider. Follow the provider’s OAuth app setup guide in `,_jsx(_components.a,{href:`/integrations/overview`,children:`APIs \u0026 Integrations`}),` and use the callback URL from `,_jsx(_components.strong,{children:`Environment Settings > Backend`}),`. If the user wants a `,_jsx(_components.a,{href:`#custom-oauth-callback-url-optional`,children:`custom callback URL`}),`, configure it before registering the app. With the user’s permission, register the app or use credentials they already have. For OAuth 2.0, set `,_jsx(_components.code,{children:`credentials`}),` to this object. Include `,_jsx(_components.code,{children:`scopes`}),` as a comma-separated string when required. For other OAuth modes, use the provider’s credential type and fields from the create endpoint reference.`]}),`\n`,_jsx(CodeBlock,{filename:``,numberOfLines:`6`,language:`json`,children:_jsx(_components.pre,{className:`shiki shiki-themes github-light-default dark-plus`,style:{backgroundColor:`#ffffff`,\"--shiki-dark-bg\":`#0B0C0E`,color:`#1f2328`,\"--shiki-dark\":`#D4D4D4`},language:`json`,children:_jsxs(_components.code,{language:`json`,numberOfLines:`6`,children:[_jsx(_components.span,{className:`line`,children:_jsx(_components.span,{style:{color:`#1F2328`,\"--shiki-dark\":`#D4D4D4`},children:`{`})}),`\n`,_jsxs(_components.span,{className:`line`,children:[_jsx(_components.span,{style:{color:`#116329`,\"--shiki-dark\":`#9CDCFE`},children:` \"type\"`}),_jsx(_components.span,{style:{color:`#1F2328`,\"--shiki-dark\":`#D4D4D4`},children:`: `}),_jsx(_components.span,{style:{color:`#0A3069`,\"--shiki-dark\":`#CE9178`},children:`\"OAUTH2\"`}),_jsx(_components.span,{style:{color:`#1F2328`,\"--shiki-dark\":`#D4D4D4`},children:`,`})]}),`\n`,_jsxs(_components.span,{className:`line`,children:[_jsx(_components.span,{style:{color:`#116329`,\"--shiki-dark\":`#9CDCFE`},children:` \"client_id\"`}),_jsx(_components.span,{style:{color:`#1F2328`,\"--shiki-dark\":`#D4D4D4`},children:`: `}),_jsx(_components.span,{style:{color:`#0A3069`,\"--shiki-dark\":`#CE9178`},children:`\"\u003cCLIENT-ID>\"`}),_jsx(_components.span,{style:{color:`#1F2328`,\"--shiki-dark\":`#D4D4D4`},children:`,`})]}),`\n`,_jsxs(_components.span,{className:`line`,children:[_jsx(_components.span,{style:{color:`#116329`,\"--shiki-dark\":`#9CDCFE`},children:` \"client_secret\"`}),_jsx(_components.span,{style:{color:`#1F2328`,\"--shiki-dark\":`#D4D4D4`},children:`: `}),_jsx(_components.span,{style:{color:`#0A3069`,\"--shiki-dark\":`#CE9178`},children:`\"\u003cCLIENT-SECRET>\"`}),_jsx(_components.span,{style:{color:`#1F2328`,\"--shiki-dark\":`#D4D4D4`},children:`,`})]}),`\n`,_jsxs(_components.span,{className:`line`,children:[_jsx(_components.span,{style:{color:`#116329`,\"--shiki-dark\":`#9CDCFE`},children:` \"scopes\"`}),_jsx(_components.span,{style:{color:`#1F2328`,\"--shiki-dark\":`#D4D4D4`},children:`: `}),_jsx(_components.span,{style:{color:`#0A3069`,\"--shiki-dark\":`#CE9178`},children:`\"\u003cSCOPE-1>,\u003cSCOPE-2>\"`})]}),`\n`,_jsx(_components.span,{className:`line`,children:_jsx(_components.span,{style:{color:`#1F2328`,\"--shiki-dark\":`#D4D4D4`},children:`}`})}),`\n`]})})}),`\n`]}),`\n`,_jsxs(_components.li,{children:[`\n`,_jsxs(_components.p,{children:[_jsx(_components.strong,{children:`API key or basic auth`}),` Remove `,_jsx(_components.code,{children:`credentials`}),`. Users supply their own credentials when they connect. If the provider requires integration-level settings, check the create endpoint reference for the required fields.`]}),`\n`]}),`\n`]}),`\n`]}),`\n`]}),_jsxs(_components.p,{children:[`Use the returned `,_jsx(_components.code,{children:`data.unique_key`}),` as the integration ID when creating a Connect session.`]})]})]}),_jsxs(Step,{id:`test-authorization`,title:`Test the authorization (optional)`,children:[_jsxs(_components.p,{children:[`In the `,_jsx(_components.strong,{children:`Connections`}),` tab, click `,_jsx(_components.strong,{children:`Add Test Connection`}),`, pick your integration, and authorize using a test account. The new connection’s credentials appear in its `,_jsx(_components.em,{children:`Authorization`}),` tab — securely stored and automatically refreshed.`]}),_jsxs(Accordion,{title:`For agents`,id:`for-agents-1`,children:[_jsxs(_components.p,{children:[`Create a Connect session with a fresh test user ID in `,_jsx(_components.code,{children:`tags.end_user_id`}),` and the integration ID in `,_jsx(_components.code,{children:`allowed_integrations`}),`. With Management MCP, call `,_jsx(_components.code,{children:`connect_session_create`}),` and pass the target `,_jsx(_components.code,{children:`environment`}),`. With an Environment API key, use the `,_jsx(_components.a,{href:`#auth-from-a-link-you-share`,children:`cURL example below`}),`.`]}),_jsxs(_components.p,{children:[`Send the returned `,_jsx(_components.code,{children:`connect_link`}),` to the user and ask them to authorize with a test account. Once they finish, look up the connection using the same integration ID and tag.`]}),_jsxs(_components.p,{children:[_jsx(_components.strong,{children:`Management MCP.`}),` Call `,_jsx(_components.code,{children:`connections_list`}),` with:`]}),_jsx(CodeBlock,{filename:``,numberOfLines:`5`,language:`json`,children:_jsx(_components.pre,{className:`shiki shiki-themes github-light-default dark-plus`,style:{backgroundColor:`#ffffff`,\"--shiki-dark-bg\":`#0B0C0E`,color:`#1f2328`,\"--shiki-dark\":`#D4D4D4`},language:`json`,children:_jsxs(_components.code,{language:`json`,numberOfLines:`5`,children:[_jsx(_components.span,{className:`line`,children:_jsx(_components.span,{style:{color:`#1F2328`,\"--shiki-dark\":`#D4D4D4`},children:`{`})}),`\n`,_jsxs(_components.span,{className:`line`,children:[_jsx(_components.span,{style:{color:`#116329`,\"--shiki-dark\":`#9CDCFE`},children:` \"environment\"`}),_jsx(_components.span,{style:{color:`#1F2328`,\"--shiki-dark\":`#D4D4D4`},children:`: `}),_jsx(_components.span,{style:{color:`#0A3069`,\"--shiki-dark\":`#CE9178`},children:`\"\u003cENVIRONMENT-NAME>\"`}),_jsx(_components.span,{style:{color:`#1F2328`,\"--shiki-dark\":`#D4D4D4`},children:`,`})]}),`\n`,_jsxs(_components.span,{className:`line`,children:[_jsx(_components.span,{style:{color:`#116329`,\"--shiki-dark\":`#9CDCFE`},children:` \"integration_id\"`}),_jsx(_components.span,{style:{color:`#1F2328`,\"--shiki-dark\":`#D4D4D4`},children:`: `}),_jsx(_components.span,{style:{color:`#0A3069`,\"--shiki-dark\":`#CE9178`},children:`\"\u003cINTEGRATION-ID>\"`}),_jsx(_components.span,{style:{color:`#1F2328`,\"--shiki-dark\":`#D4D4D4`},children:`,`})]}),`\n`,_jsxs(_components.span,{className:`line`,children:[_jsx(_components.span,{style:{color:`#116329`,\"--shiki-dark\":`#9CDCFE`},children:` \"tags\"`}),_jsx(_components.span,{style:{color:`#1F2328`,\"--shiki-dark\":`#D4D4D4`},children:`: { `}),_jsx(_components.span,{style:{color:`#116329`,\"--shiki-dark\":`#9CDCFE`},children:`\"end_user_id\"`}),_jsx(_components.span,{style:{color:`#1F2328`,\"--shiki-dark\":`#D4D4D4`},children:`: `}),_jsx(_components.span,{style:{color:`#0A3069`,\"--shiki-dark\":`#CE9178`},children:`\"\u003cTEST-USER-ID>\"`}),_jsx(_components.span,{style:{color:`#1F2328`,\"--shiki-dark\":`#D4D4D4`},children:` }`})]}),`\n`,_jsx(_components.span,{className:`line`,children:_jsx(_components.span,{style:{color:`#1F2328`,\"--shiki-dark\":`#D4D4D4`},children:`}`})}),`\n`]})})}),_jsxs(_components.p,{children:[_jsx(_components.strong,{children:`Environment API key.`}),` Call `,_jsx(_components.a,{href:`/reference/backend/http-api/connections/list`,children:_jsx(_components.code,{children:`GET /connections`})}),`:`]}),_jsx(CodeBlock,{filename:``,numberOfLines:`5`,language:`shellscript`,children:_jsx(_components.pre,{className:`shiki shiki-themes github-light-default dark-plus`,style:{backgroundColor:`#ffffff`,\"--shiki-dark-bg\":`#0B0C0E`,color:`#1f2328`,\"--shiki-dark\":`#D4D4D4`},language:`shellscript`,children:_jsxs(_components.code,{language:`shellscript`,numberOfLines:`5`,children:[_jsxs(_components.span,{className:`line`,children:[_jsx(_components.span,{style:{color:`#953800`,\"--shiki-dark\":`#DCDCAA`},children:`curl`}),_jsx(_components.span,{style:{color:`#0550AE`,\"--shiki-dark\":`#569CD6`},children:` --get`}),_jsx(_components.span,{style:{color:`#CF222E`,\"--shiki-dark\":`#D7BA7D`},children:` \\\\`})]}),`\n`,_jsxs(_components.span,{className:`line`,children:[_jsx(_components.span,{style:{color:`#0550AE`,\"--shiki-dark\":`#569CD6`},children:` --url`}),_jsx(_components.span,{style:{color:`#0A3069`,\"--shiki-dark\":`#CE9178`},children:` https://api.nango.dev/connections`}),_jsx(_components.span,{style:{color:`#CF222E`,\"--shiki-dark\":`#D7BA7D`},children:` \\\\`})]}),`\n`,_jsxs(_components.span,{className:`line`,children:[_jsx(_components.span,{style:{color:`#0550AE`,\"--shiki-dark\":`#569CD6`},children:` --header`}),_jsx(_components.span,{style:{color:`#0A3069`,\"--shiki-dark\":`#CE9178`},children:` 'Authorization: Bearer \u003cNANGO-API-KEY>'`}),_jsx(_components.span,{style:{color:`#CF222E`,\"--shiki-dark\":`#D7BA7D`},children:` \\\\`})]}),`\n`,_jsxs(_components.span,{className:`line`,children:[_jsx(_components.span,{style:{color:`#0550AE`,\"--shiki-dark\":`#569CD6`},children:` --data-urlencode`}),_jsx(_components.span,{style:{color:`#0A3069`,\"--shiki-dark\":`#CE9178`},children:` 'integrationId=\u003cINTEGRATION-ID>'`}),_jsx(_components.span,{style:{color:`#CF222E`,\"--shiki-dark\":`#D7BA7D`},children:` \\\\`})]}),`\n`,_jsxs(_components.span,{className:`line`,children:[_jsx(_components.span,{style:{color:`#0550AE`,\"--shiki-dark\":`#569CD6`},children:` --data-urlencode`}),_jsx(_components.span,{style:{color:`#0A3069`,\"--shiki-dark\":`#CE9178`},children:` 'tags%5Bend_user_id%5D=\u003cTEST-USER-ID>'`})]}),`\n`]})})}),_jsxs(_components.p,{children:[`A matching entry in `,_jsx(_components.code,{children:`connections`}),` confirms the test. The entry’s `,_jsx(_components.code,{children:`connection_id`}),` identifies the new connection.`]})]})]}),_jsxs(Step,{id:`configure-custom-oauth-callback-url`,title:`Configure a custom OAuth callback URL (optional, recommended)`,children:[_jsx(_components.p,{children:`For production OAuth apps you register yourself, a callback URL on your own domain is recommended. Some providers show the callback domain to users.`}),_jsx(`a`,{id:`custom-oauth-callback-url-optional`}),_jsx(_components.p,{children:`To configure a custom callback URL:`}),_jsxs(_components.ol,{children:[`\n`,_jsxs(_components.li,{children:[`Add an endpoint on your domain (e.g. `,_jsx(_components.code,{children:`https://example.com/oauth-callback`}),`) that `,_jsx(_components.strong,{children:`308-redirects`}),` to `,_jsx(_components.code,{children:`https://api.nango.dev/oauth/callback`}),`, preserving all query parameters.`]}),`\n`,_jsx(_components.li,{children:`Update the registered callback URL with each API provider — otherwise they’ll reject new authorization flows.`}),`\n`,_jsxs(_components.li,{children:[`After confirming steps 1 and 2, set `,_jsx(_components.strong,{children:`Callback URL`}),` under `,_jsx(_components.strong,{children:`Environment Settings > Backend`}),`. Repeat for each environment that uses a custom callback URL.`]}),`\n`]}),_jsxs(Accordion,{title:`For agents`,id:`for-agents-2`,children:[_jsx(_components.p,{children:`Confirm the callback URL and target environment with the user. Set up the 308 redirect and make sure each provider’s OAuth app has the new URL registered before updating Nango.`}),_jsxs(_components.p,{children:[`To update an existing environment, use `,_jsx(_components.a,{href:`/reference/backend/http-api/environments/update`,children:_jsx(_components.code,{children:`PATCH /environments/{environmentUuid}`})}),` with an `,_jsx(_components.a,{href:`https://app.nango.dev/api-keys`,children:`Account API key`}),` scoped to `,_jsx(_components.code,{children:`account:environments:update`}),`. If you need to find the UUID by environment name, `,_jsx(_components.a,{href:`/reference/backend/http-api/environments/list`,children:`list environments`}),` with an Account API key that also has `,_jsx(_components.code,{children:`account:environments:list`}),`.`]}),_jsx(CodeBlock,{filename:``,numberOfLines:`5`,language:`shellscript`,children:_jsx(_components.pre,{className:`shiki shiki-themes github-light-default dark-plus`,style:{backgroundColor:`#ffffff`,\"--shiki-dark-bg\":`#0B0C0E`,color:`#1f2328`,\"--shiki-dark\":`#D4D4D4`},language:`shellscript`,children:_jsxs(_components.code,{language:`shellscript`,numberOfLines:`5`,children:[_jsxs(_components.span,{className:`line`,children:[_jsx(_components.span,{style:{color:`#953800`,\"--shiki-dark\":`#DCDCAA`},children:`curl`}),_jsx(_components.span,{style:{color:`#0550AE`,\"--shiki-dark\":`#569CD6`},children:` --request`}),_jsx(_components.span,{style:{color:`#0A3069`,\"--shiki-dark\":`#CE9178`},children:` PATCH`}),_jsx(_components.span,{style:{color:`#CF222E`,\"--shiki-dark\":`#D7BA7D`},children:` \\\\`})]}),`\n`,_jsxs(_components.span,{className:`line`,children:[_jsx(_components.span,{style:{color:`#0550AE`,\"--shiki-dark\":`#569CD6`},children:` --url`}),_jsx(_components.span,{style:{color:`#0A3069`,\"--shiki-dark\":`#CE9178`},children:` 'https://api.nango.dev/environments/\u003cENVIRONMENT-UUID>'`}),_jsx(_components.span,{style:{color:`#CF222E`,\"--shiki-dark\":`#D7BA7D`},children:` \\\\`})]}),`\n`,_jsxs(_components.span,{className:`line`,children:[_jsx(_components.span,{style:{color:`#0550AE`,\"--shiki-dark\":`#569CD6`},children:` --header`}),_jsx(_components.span,{style:{color:`#0A3069`,\"--shiki-dark\":`#CE9178`},children:` 'Authorization: Bearer \u003cNANGO-ACCOUNT-API-KEY>'`}),_jsx(_components.span,{style:{color:`#CF222E`,\"--shiki-dark\":`#D7BA7D`},children:` \\\\`})]}),`\n`,_jsxs(_components.span,{className:`line`,children:[_jsx(_components.span,{style:{color:`#0550AE`,\"--shiki-dark\":`#569CD6`},children:` --header`}),_jsx(_components.span,{style:{color:`#0A3069`,\"--shiki-dark\":`#CE9178`},children:` 'Content-Type: application/json'`}),_jsx(_components.span,{style:{color:`#CF222E`,\"--shiki-dark\":`#D7BA7D`},children:` \\\\`})]}),`\n`,_jsxs(_components.span,{className:`line`,children:[_jsx(_components.span,{style:{color:`#0550AE`,\"--shiki-dark\":`#569CD6`},children:` --data`}),_jsx(_components.span,{style:{color:`#0A3069`,\"--shiki-dark\":`#CE9178`},children:` '{ \"callback_url\": \"https://example.com/oauth-callback\" }'`})]}),`\n`]})})}),_jsxs(_components.p,{children:[`You can also set `,_jsx(_components.code,{children:`callback_url`}),` when `,_jsx(_components.a,{href:`/reference/backend/http-api/environments/create`,children:`creating an environment`}),` with `,_jsx(_components.code,{children:`account:environments:create`}),`. Callback URL updates are available through the HTTP API and dashboard. If you don’t have an Account API key, ask the user to set `,_jsx(_components.strong,{children:`Callback URL`}),` under `,_jsx(_components.strong,{children:`Environment Settings > Backend`}),`.`]})]})]}),_jsxs(Step,{id:`generate-session-token`,title:`Create a Connect session`,children:[_jsxs(_components.p,{children:[`In your backend, set up an endpoint that your frontend will call before each authorization attempt to retrieve a session token from Nango (`,_jsx(_components.a,{href:`/reference/backend/http-api/connect/sessions/create`,children:`API`}),` / `,_jsx(_components.a,{href:`/reference/backend/backend-sdk/node#create-a-connect-session`,children:`Node SDK`}),`).`]}),_jsxs(_components.p,{children:[`You’ll need an `,_jsx(_components.a,{href:`/reference/backend/http-api/api-keys`,children:`API key`}),` with the `,_jsx(_components.code,{children:`environment:connect_sessions:write`}),` scope (find it in `,_jsx(_components.strong,{children:`Environment Settings > API Keys`}),`).`]}),_jsxs(_components.p,{children:[`Include `,_jsx(_components.code,{children:`tags`}),` when you create the session. `,_jsx(_components.a,{href:`/guides/auth/connection-tags-configuration-metadata#connection-tags`,children:`Connection tags`}),` are key-value labels that link a connection to records in your app. Choose IDs that match how your app finds connections and controls access, such as a user, organization, or workspace ID.`]}),_jsxs(_components.p,{children:[`When authorization succeeds, the `,_jsx(_components.a,{href:`#save-connection-id-from-webhook`,children:`auth webhook`}),` includes your tags and the new `,_jsx(_components.code,{children:`connectionId`}),`. Use the tags to find the right record in your app and save the ID there if you need it for direct lookup. You can also use tags to filter connections later or `,_jsx(_components.a,{href:`/guides/agent-sessions/tenant#select-connections-by-tags-recommended`,children:`scope an agent session`}),`.`]}),_jsxs(Tabs,{children:[_jsx(Tab,{title:`Node`,id:`node`,children:_jsx(CodeBlock,{filename:``,numberOfLines:`16`,language:`typescript`,children:_jsx(_components.pre,{className:`shiki shiki-themes github-light-default dark-plus`,style:{backgroundColor:`#ffffff`,\"--shiki-dark-bg\":`#0B0C0E`,color:`#1f2328`,\"--shiki-dark\":`#D4D4D4`},language:`typescript`,children:_jsxs(_components.code,{language:`typescript`,numberOfLines:`16`,children:[_jsxs(_components.span,{className:`line`,children:[_jsx(_components.span,{style:{color:`#CF222E`,\"--shiki-dark\":`#C586C0`},children:`import`}),_jsx(_components.span,{style:{color:`#1F2328`,\"--shiki-dark\":`#D4D4D4`},children:` { `}),_jsx(_components.span,{style:{color:`#1F2328`,\"--shiki-dark\":`#9CDCFE`},children:`Nango`}),_jsx(_components.span,{style:{color:`#1F2328`,\"--shiki-dark\":`#D4D4D4`},children:` } `}),_jsx(_components.span,{style:{color:`#CF222E`,\"--shiki-dark\":`#C586C0`},children:`from`}),_jsx(_components.span,{style:{color:`#0A3069`,\"--shiki-dark\":`#CE9178`},children:` '@nangohq/node'`}),_jsx(_components.span,{style:{color:`#1F2328`,\"--shiki-dark\":`#D4D4D4`},children:`;`})]}),`\n`,_jsx(_components.span,{className:`line`}),`\n`,_jsxs(_components.span,{className:`line`,children:[_jsx(_components.span,{style:{color:`#CF222E`,\"--shiki-dark\":`#569CD6`},children:`const`}),_jsx(_components.span,{style:{color:`#0550AE`,\"--shiki-dark\":`#4FC1FF`},children:` nango`}),_jsx(_components.span,{style:{color:`#CF222E`,\"--shiki-dark\":`#D4D4D4`},children:` =`}),_jsx(_components.span,{style:{color:`#CF222E`,\"--shiki-dark\":`#569CD6`},children:` new`}),_jsx(_components.span,{style:{color:`#8250DF`,\"--shiki-dark\":`#DCDCAA`},children:` Nango`}),_jsx(_components.span,{style:{color:`#1F2328`,\"--shiki-dark\":`#D4D4D4`},children:`({ `}),_jsx(_components.span,{style:{color:`#1F2328`,\"--shiki-dark\":`#9CDCFE`},children:`apiKey:`}),_jsx(_components.span,{style:{color:`#1F2328`,\"--shiki-dark\":`#9CDCFE`},children:` process`}),_jsx(_components.span,{style:{color:`#1F2328`,\"--shiki-dark\":`#D4D4D4`},children:`.`}),_jsx(_components.span,{style:{color:`#1F2328`,\"--shiki-dark\":`#9CDCFE`},children:`env`}),_jsx(_components.span,{style:{color:`#1F2328`,\"--shiki-dark\":`#D4D4D4`},children:`.`}),_jsx(_components.span,{style:{color:`#0550AE`,\"--shiki-dark\":`#4FC1FF`},children:`NANGO_API_KEY`}),_jsx(_components.span,{style:{color:`#CF222E`,\"--shiki-dark\":`#D4D4D4`},children:`!`}),_jsx(_components.span,{style:{color:`#1F2328`,\"--shiki-dark\":`#D4D4D4`},children:` });`})]}),`\n`,_jsx(_components.span,{className:`line`}),`\n`,_jsxs(_components.span,{className:`line`,children:[_jsx(_components.span,{style:{color:`#1F2328`,\"--shiki-dark\":`#9CDCFE`},children:`api`}),_jsx(_components.span,{style:{color:`#1F2328`,\"--shiki-dark\":`#D4D4D4`},children:`.`}),_jsx(_components.span,{style:{color:`#8250DF`,\"--shiki-dark\":`#DCDCAA`},children:`post`}),_jsx(_components.span,{style:{color:`#1F2328`,\"--shiki-dark\":`#D4D4D4`},children:`(`}),_jsx(_components.span,{style:{color:`#0A3069`,\"--shiki-dark\":`#CE9178`},children:`'/sessionToken'`}),_jsx(_components.span,{style:{color:`#1F2328`,\"--shiki-dark\":`#D4D4D4`},children:`, `}),_jsx(_components.span,{style:{color:`#CF222E`,\"--shiki-dark\":`#569CD6`},children:`async`}),_jsx(_components.span,{style:{color:`#1F2328`,\"--shiki-dark\":`#D4D4D4`},children:` (`}),_jsx(_components.span,{style:{color:`#953800`,\"--shiki-dark\":`#9CDCFE`},children:`req`}),_jsx(_components.span,{style:{color:`#1F2328`,\"--shiki-dark\":`#D4D4D4`},children:`, `}),_jsx(_components.span,{style:{color:`#953800`,\"--shiki-dark\":`#9CDCFE`},children:`res`}),_jsx(_components.span,{style:{color:`#1F2328`,\"--shiki-dark\":`#D4D4D4`},children:`) `}),_jsx(_components.span,{style:{color:`#CF222E`,\"--shiki-dark\":`#569CD6`},children:`=>`}),_jsx(_components.span,{style:{color:`#1F2328`,\"--shiki-dark\":`#D4D4D4`},children:` {`})]}),`\n`,_jsxs(_components.span,{className:`line`,children:[_jsx(_components.span,{style:{color:`#CF222E`,\"--shiki-dark\":`#569CD6`},children:` const`}),_jsx(_components.span,{style:{color:`#1F2328`,\"--shiki-dark\":`#D4D4D4`},children:` { `}),_jsx(_components.span,{style:{color:`#0550AE`,\"--shiki-dark\":`#4FC1FF`},children:`data`}),_jsx(_components.span,{style:{color:`#1F2328`,\"--shiki-dark\":`#D4D4D4`},children:` } `}),_jsx(_components.span,{style:{color:`#CF222E`,\"--shiki-dark\":`#D4D4D4`},children:`=`}),_jsx(_components.span,{style:{color:`#CF222E`,\"--shiki-dark\":`#C586C0`},children:` await`}),_jsx(_components.span,{style:{color:`#1F2328`,\"--shiki-dark\":`#9CDCFE`},children:` nango`}),_jsx(_components.span,{style:{color:`#1F2328`,\"--shiki-dark\":`#D4D4D4`},children:`.`}),_jsx(_components.span,{style:{color:`#8250DF`,\"--shiki-dark\":`#DCDCAA`},children:`createConnectSession`}),_jsx(_components.span,{style:{color:`#1F2328`,\"--shiki-dark\":`#D4D4D4`},children:`({`})]}),`\n`,_jsxs(_components.span,{className:`line`,children:[_jsx(_components.span,{style:{color:`#1F2328`,\"--shiki-dark\":`#9CDCFE`},children:` tags:`}),_jsx(_components.span,{style:{color:`#1F2328`,\"--shiki-dark\":`#D4D4D4`},children:` {`})]}),`\n`,_jsxs(_components.span,{className:`line`,children:[_jsx(_components.span,{style:{color:`#1F2328`,\"--shiki-dark\":`#9CDCFE`},children:` end_user_id:`}),_jsx(_components.span,{style:{color:`#0A3069`,\"--shiki-dark\":`#CE9178`},children:` '\u003cEND-USER-ID>'`}),_jsx(_components.span,{style:{color:`#1F2328`,\"--shiki-dark\":`#D4D4D4`},children:`,`})]}),`\n`,_jsxs(_components.span,{className:`line`,children:[_jsx(_components.span,{style:{color:`#1F2328`,\"--shiki-dark\":`#9CDCFE`},children:` end_user_email:`}),_jsx(_components.span,{style:{color:`#0A3069`,\"--shiki-dark\":`#CE9178`},children:` '\u003cEND-USER-EMAIL>'`}),_jsx(_components.span,{style:{color:`#1F2328`,\"--shiki-dark\":`#D4D4D4`},children:`,`})]}),`\n`,_jsxs(_components.span,{className:`line`,children:[_jsx(_components.span,{style:{color:`#1F2328`,\"--shiki-dark\":`#9CDCFE`},children:` organization_id:`}),_jsx(_components.span,{style:{color:`#0A3069`,\"--shiki-dark\":`#CE9178`},children:` '\u003cORGANIZATION-ID>'`})]}),`\n`,_jsx(_components.span,{className:`line`,children:_jsx(_components.span,{style:{color:`#1F2328`,\"--shiki-dark\":`#D4D4D4`},children:` },`})}),`\n`,_jsxs(_components.span,{className:`line`,children:[_jsx(_components.span,{style:{color:`#1F2328`,\"--shiki-dark\":`#9CDCFE`},children:` allowed_integrations:`}),_jsx(_components.span,{style:{color:`#1F2328`,\"--shiki-dark\":`#D4D4D4`},children:` [`}),_jsx(_components.span,{style:{color:`#0A3069`,\"--shiki-dark\":`#CE9178`},children:`'\u003cINTEGRATION-ID>'`}),_jsx(_components.span,{style:{color:`#1F2328`,\"--shiki-dark\":`#D4D4D4`},children:`]`})]}),`\n`,_jsx(_components.span,{className:`line`,children:_jsx(_components.span,{style:{color:`#1F2328`,\"--shiki-dark\":`#D4D4D4`},children:` });`})}),`\n`,_jsx(_components.span,{className:`line`}),`\n`,_jsxs(_components.span,{className:`line`,children:[_jsx(_components.span,{style:{color:`#1F2328`,\"--shiki-dark\":`#9CDCFE`},children:` res`}),_jsx(_components.span,{style:{color:`#1F2328`,\"--shiki-dark\":`#D4D4D4`},children:`.`}),_jsx(_components.span,{style:{color:`#8250DF`,\"--shiki-dark\":`#DCDCAA`},children:`status`}),_jsx(_components.span,{style:{color:`#1F2328`,\"--shiki-dark\":`#D4D4D4`},children:`(`}),_jsx(_components.span,{style:{color:`#0550AE`,\"--shiki-dark\":`#B5CEA8`},children:`200`}),_jsx(_components.span,{style:{color:`#1F2328`,\"--shiki-dark\":`#D4D4D4`},children:`).`}),_jsx(_components.span,{style:{color:`#8250DF`,\"--shiki-dark\":`#DCDCAA`},children:`send`}),_jsx(_components.span,{style:{color:`#1F2328`,\"--shiki-dark\":`#D4D4D4`},children:`({ `}),_jsx(_components.span,{style:{color:`#1F2328`,\"--shiki-dark\":`#9CDCFE`},children:`sessionToken:`}),_jsx(_components.span,{style:{color:`#1F2328`,\"--shiki-dark\":`#9CDCFE`},children:` data`}),_jsx(_components.span,{style:{color:`#1F2328`,\"--shiki-dark\":`#D4D4D4`},children:`.`}),_jsx(_components.span,{style:{color:`#1F2328`,\"--shiki-dark\":`#9CDCFE`},children:`token`}),_jsx(_components.span,{style:{color:`#1F2328`,\"--shiki-dark\":`#D4D4D4`},children:` });`})]}),`\n`,_jsx(_components.span,{className:`line`,children:_jsx(_components.span,{style:{color:`#1F2328`,\"--shiki-dark\":`#D4D4D4`},children:`});`})}),`\n`]})})})}),_jsx(Tab,{title:`cURL`,id:`curl`,children:_jsx(CodeBlock,{filename:``,numberOfLines:`12`,language:`shellscript`,children:_jsx(_components.pre,{className:`shiki shiki-themes github-light-default dark-plus`,style:{backgroundColor:`#ffffff`,\"--shiki-dark-bg\":`#0B0C0E`,color:`#1f2328`,\"--shiki-dark\":`#D4D4D4`},language:`shellscript`,children:_jsxs(_components.code,{language:`shellscript`,numberOfLines:`12`,children:[_jsxs(_components.span,{className:`line`,children:[_jsx(_components.span,{style:{color:`#953800`,\"--shiki-dark\":`#DCDCAA`},children:`curl`}),_jsx(_components.span,{style:{color:`#0550AE`,\"--shiki-dark\":`#569CD6`},children:` --request`}),_jsx(_components.span,{style:{color:`#0A3069`,\"--shiki-dark\":`#CE9178`},children:` POST`}),_jsx(_components.span,{style:{color:`#CF222E`,\"--shiki-dark\":`#D7BA7D`},children:` \\\\`})]}),`\n`,_jsxs(_components.span,{className:`line`,children:[_jsx(_components.span,{style:{color:`#0550AE`,\"--shiki-dark\":`#569CD6`},children:` --url`}),_jsx(_components.span,{style:{color:`#0A3069`,\"--shiki-dark\":`#CE9178`},children:` https://api.nango.dev/connect/sessions`}),_jsx(_components.span,{style:{color:`#CF222E`,\"--shiki-dark\":`#D7BA7D`},children:` \\\\`})]}),`\n`,_jsxs(_components.span,{className:`line`,children:[_jsx(_components.span,{style:{color:`#0550AE`,\"--shiki-dark\":`#569CD6`},children:` --header`}),_jsx(_components.span,{style:{color:`#0A3069`,\"--shiki-dark\":`#CE9178`},children:` 'Authorization: Bearer \u003cNANGO-API-KEY>'`}),_jsx(_components.span,{style:{color:`#CF222E`,\"--shiki-dark\":`#D7BA7D`},children:` \\\\`})]}),`\n`,_jsxs(_components.span,{className:`line`,children:[_jsx(_components.span,{style:{color:`#0550AE`,\"--shiki-dark\":`#569CD6`},children:` --header`}),_jsx(_components.span,{style:{color:`#0A3069`,\"--shiki-dark\":`#CE9178`},children:` 'Content-Type: application/json'`}),_jsx(_components.span,{style:{color:`#CF222E`,\"--shiki-dark\":`#D7BA7D`},children:` \\\\`})]}),`\n`,_jsxs(_components.span,{className:`line`,children:[_jsx(_components.span,{style:{color:`#0550AE`,\"--shiki-dark\":`#569CD6`},children:` --data`}),_jsx(_components.span,{style:{color:`#0A3069`,\"--shiki-dark\":`#CE9178`},children:` '{`})]}),`\n`,_jsx(_components.span,{className:`line`,children:_jsx(_components.span,{style:{color:`#0A3069`,\"--shiki-dark\":`#CE9178`},children:` \"tags\": {`})}),`\n`,_jsx(_components.span,{className:`line`,children:_jsx(_components.span,{style:{color:`#0A3069`,\"--shiki-dark\":`#CE9178`},children:` \"end_user_id\": \"\u003cEND-USER-ID>\",`})}),`\n`,_jsx(_components.span,{className:`line`,children:_jsx(_components.span,{style:{color:`#0A3069`,\"--shiki-dark\":`#CE9178`},children:` \"end_user_email\": \"\u003cEND-USER-EMAIL>\",`})}),`\n`,_jsx(_components.span,{className:`line`,children:_jsx(_components.span,{style:{color:`#0A3069`,\"--shiki-dark\":`#CE9178`},children:` \"organization_id\": \"\u003cORGANIZATION-ID>\"`})}),`\n`,_jsx(_components.span,{className:`line`,children:_jsx(_components.span,{style:{color:`#0A3069`,\"--shiki-dark\":`#CE9178`},children:` },`})}),`\n`,_jsx(_components.span,{className:`line`,children:_jsx(_components.span,{style:{color:`#0A3069`,\"--shiki-dark\":`#CE9178`},children:` \"allowed_integrations\": [\"\u003cINTEGRATION-ID>\"]`})}),`\n`,_jsx(_components.span,{className:`line`,children:_jsx(_components.span,{style:{color:`#0A3069`,\"--shiki-dark\":`#CE9178`},children:` }'`})}),`\n`]})})})})]}),_jsxs(_components.p,{children:[_jsx(_components.code,{children:`allowed_integrations`}),` controls what the user sees:`]}),_jsxs(_components.ul,{children:[`\n`,_jsxs(_components.li,{children:[_jsx(_components.strong,{children:`Multiple integrations`}),` — Connect UI shows a picker.`]}),`\n`,_jsxs(_components.li,{children:[_jsx(_components.strong,{children:`Single integration`}),` — Connect UI sends the user straight to its auth flow.`]}),`\n`]})]}),_jsxs(Step,{id:`trigger-auth-flow`,title:`Add a connect button`,children:[_jsx(_components.p,{children:`In your frontend, load the Nango frontend SDK, fetch the session token from your backend, and open Connect UI:`}),_jsx(Frame,{caption:`Connect UI authorization flow`,children:_jsx(OptimizedImage,{src:`https://mintcdn.com/nango/AX1oSxxgTaIv9K8E/images/screenshots/connect-ui.gif?s=e00e547fa496a121a9abef98ba8466b4`,alt:``,\"data-og-width\":`1920`,width:`1920`,\"data-og-height\":`832`,height:`832`,\"data-path\":`images/screenshots/connect-ui.gif`,\"data-optimize\":`true`,\"data-opv\":`3`})}),_jsx(CodeBlock,{filename:``,numberOfLines:`16`,language:`javascript`,children:_jsx(_components.pre,{className:`shiki shiki-themes github-light-default dark-plus`,style:{backgroundColor:`#ffffff`,\"--shiki-dark-bg\":`#0B0C0E`,color:`#1f2328`,\"--shiki-dark\":`#D4D4D4`},language:`javascript`,children:_jsxs(_components.code,{language:`javascript`,numberOfLines:`16`,children:[_jsxs(_components.span,{className:`line`,children:[_jsx(_components.span,{style:{color:`#CF222E`,\"--shiki-dark\":`#C586C0`},children:`import`}),_jsx(_components.span,{style:{color:`#1F2328`,\"--shiki-dark\":`#9CDCFE`},children:` Nango`}),_jsx(_components.span,{style:{color:`#CF222E`,\"--shiki-dark\":`#C586C0`},children:` from`}),_jsx(_components.span,{style:{color:`#0A3069`,\"--shiki-dark\":`#CE9178`},children:` '@nangohq/frontend'`}),_jsx(_components.span,{style:{color:`#1F2328`,\"--shiki-dark\":`#D4D4D4`},children:`;`})]}),`\n`,_jsx(_components.span,{className:`line`}),`\n`,_jsxs(_components.span,{className:`line`,children:[_jsx(_components.span,{style:{color:`#CF222E`,\"--shiki-dark\":`#569CD6`},children:`const`}),_jsx(_components.span,{style:{color:`#0550AE`,\"--shiki-dark\":`#4FC1FF`},children:` nango`}),_jsx(_components.span,{style:{color:`#CF222E`,\"--shiki-dark\":`#D4D4D4`},children:` =`}),_jsx(_components.span,{style:{color:`#CF222E`,\"--shiki-dark\":`#569CD6`},children:` new`}),_jsx(_components.span,{style:{color:`#8250DF`,\"--shiki-dark\":`#DCDCAA`},children:` Nango`}),_jsx(_components.span,{style:{color:`#1F2328`,\"--shiki-dark\":`#D4D4D4`},children:`();`})]}),`\n`,_jsxs(_components.span,{className:`line`,children:[_jsx(_components.span,{style:{color:`#CF222E`,\"--shiki-dark\":`#569CD6`},children:`const`}),_jsx(_components.span,{style:{color:`#0550AE`,\"--shiki-dark\":`#4FC1FF`},children:` connect`}),_jsx(_components.span,{style:{color:`#CF222E`,\"--shiki-dark\":`#D4D4D4`},children:` =`}),_jsx(_components.span,{style:{color:`#1F2328`,\"--shiki-dark\":`#9CDCFE`},children:` nango`}),_jsx(_components.span,{style:{color:`#1F2328`,\"--shiki-dark\":`#D4D4D4`},children:`.`}),_jsx(_components.span,{style:{color:`#8250DF`,\"--shiki-dark\":`#DCDCAA`},children:`openConnectUI`}),_jsx(_components.span,{style:{color:`#1F2328`,\"--shiki-dark\":`#D4D4D4`},children:`({`})]}),`\n`,_jsxs(_components.span,{className:`line`,children:[_jsx(_components.span,{style:{color:`#8250DF`,\"--shiki-dark\":`#DCDCAA`},children:` onEvent`}),_jsx(_components.span,{style:{color:`#1F2328`,\"--shiki-dark\":`#9CDCFE`},children:`:`}),_jsx(_components.span,{style:{color:`#1F2328`,\"--shiki-dark\":`#D4D4D4`},children:` (`}),_jsx(_components.span,{style:{color:`#953800`,\"--shiki-dark\":`#9CDCFE`},children:`event`}),_jsx(_components.span,{style:{color:`#1F2328`,\"--shiki-dark\":`#D4D4D4`},children:`) `}),_jsx(_components.span,{style:{color:`#CF222E`,\"--shiki-dark\":`#569CD6`},children:`=>`}),_jsx(_components.span,{style:{color:`#1F2328`,\"--shiki-dark\":`#D4D4D4`},children:` {`})]}),`\n`,_jsxs(_components.span,{className:`line`,children:[_jsx(_components.span,{style:{color:`#CF222E`,\"--shiki-dark\":`#C586C0`},children:` if`}),_jsx(_components.span,{style:{color:`#1F2328`,\"--shiki-dark\":`#D4D4D4`},children:` (`}),_jsx(_components.span,{style:{color:`#1F2328`,\"--shiki-dark\":`#9CDCFE`},children:`event`}),_jsx(_components.span,{style:{color:`#1F2328`,\"--shiki-dark\":`#D4D4D4`},children:`.`}),_jsx(_components.span,{style:{color:`#1F2328`,\"--shiki-dark\":`#9CDCFE`},children:`type`}),_jsx(_components.span,{style:{color:`#CF222E`,\"--shiki-dark\":`#D4D4D4`},children:` ===`}),_jsx(_components.span,{style:{color:`#0A3069`,\"--shiki-dark\":`#CE9178`},children:` 'close'`}),_jsx(_components.span,{style:{color:`#1F2328`,\"--shiki-dark\":`#D4D4D4`},children:`) {`})]}),`\n`,_jsx(_components.span,{className:`line`,children:_jsx(_components.span,{style:{color:`#6E7781`,\"--shiki-dark\":`#6A9955`},children:` // Modal closed.`})}),`\n`,_jsxs(_components.span,{className:`line`,children:[_jsx(_components.span,{style:{color:`#1F2328`,\"--shiki-dark\":`#D4D4D4`},children:` } `}),_jsx(_components.span,{style:{color:`#CF222E`,\"--shiki-dark\":`#C586C0`},children:`else`}),_jsx(_components.span,{style:{color:`#CF222E`,\"--shiki-dark\":`#C586C0`},children:` if`}),_jsx(_components.span,{style:{color:`#1F2328`,\"--shiki-dark\":`#D4D4D4`},children:` (`}),_jsx(_components.span,{style:{color:`#1F2328`,\"--shiki-dark\":`#9CDCFE`},children:`event`}),_jsx(_components.span,{style:{color:`#1F2328`,\"--shiki-dark\":`#D4D4D4`},children:`.`}),_jsx(_components.span,{style:{color:`#1F2328`,\"--shiki-dark\":`#9CDCFE`},children:`type`}),_jsx(_components.span,{style:{color:`#CF222E`,\"--shiki-dark\":`#D4D4D4`},children:` ===`}),_jsx(_components.span,{style:{color:`#0A3069`,\"--shiki-dark\":`#CE9178`},children:` 'connect'`}),_jsx(_components.span,{style:{color:`#1F2328`,\"--shiki-dark\":`#D4D4D4`},children:`) {`})]}),`\n`,_jsx(_components.span,{className:`line`,children:_jsx(_components.span,{style:{color:`#6E7781`,\"--shiki-dark\":`#6A9955`},children:` // Auth flow successful.`})}),`\n`,_jsx(_components.span,{className:`line`,children:_jsx(_components.span,{style:{color:`#1F2328`,\"--shiki-dark\":`#D4D4D4`},children:` }`})}),`\n`,_jsx(_components.span,{className:`line`,children:_jsx(_components.span,{style:{color:`#1F2328`,\"--shiki-dark\":`#D4D4D4`},children:` },`})}),`\n`,_jsx(_components.span,{className:`line`,children:_jsx(_components.span,{style:{color:`#1F2328`,\"--shiki-dark\":`#D4D4D4`},children:`});`})}),`\n`,_jsx(_components.span,{className:`line`}),`\n`,_jsxs(_components.span,{className:`line`,children:[_jsx(_components.span,{style:{color:`#CF222E`,\"--shiki-dark\":`#569CD6`},children:`const`}),_jsx(_components.span,{style:{color:`#0550AE`,\"--shiki-dark\":`#4FC1FF`},children:` response`}),_jsx(_components.span,{style:{color:`#CF222E`,\"--shiki-dark\":`#D4D4D4`},children:` =`}),_jsx(_components.span,{style:{color:`#CF222E`,\"--shiki-dark\":`#C586C0`},children:` await`}),_jsx(_components.span,{style:{color:`#8250DF`,\"--shiki-dark\":`#DCDCAA`},children:` fetch`}),_jsx(_components.span,{style:{color:`#1F2328`,\"--shiki-dark\":`#D4D4D4`},children:`(`}),_jsx(_components.span,{style:{color:`#0A3069`,\"--shiki-dark\":`#CE9178`},children:`'/sessionToken'`}),_jsx(_components.span,{style:{color:`#1F2328`,\"--shiki-dark\":`#D4D4D4`},children:`, { `}),_jsx(_components.span,{style:{color:`#1F2328`,\"--shiki-dark\":`#9CDCFE`},children:`method:`}),_jsx(_components.span,{style:{color:`#0A3069`,\"--shiki-dark\":`#CE9178`},children:` 'POST'`}),_jsx(_components.span,{style:{color:`#1F2328`,\"--shiki-dark\":`#D4D4D4`},children:` });`})]}),`\n`,_jsxs(_components.span,{className:`line`,children:[_jsx(_components.span,{style:{color:`#CF222E`,\"--shiki-dark\":`#569CD6`},children:`const`}),_jsx(_components.span,{style:{color:`#1F2328`,\"--shiki-dark\":`#D4D4D4`},children:` { `}),_jsx(_components.span,{style:{color:`#0550AE`,\"--shiki-dark\":`#4FC1FF`},children:`sessionToken`}),_jsx(_components.span,{style:{color:`#1F2328`,\"--shiki-dark\":`#D4D4D4`},children:` } `}),_jsx(_components.span,{style:{color:`#CF222E`,\"--shiki-dark\":`#D4D4D4`},children:`=`}),_jsx(_components.span,{style:{color:`#CF222E`,\"--shiki-dark\":`#C586C0`},children:` await`}),_jsx(_components.span,{style:{color:`#1F2328`,\"--shiki-dark\":`#9CDCFE`},children:` response`}),_jsx(_components.span,{style:{color:`#1F2328`,\"--shiki-dark\":`#D4D4D4`},children:`.`}),_jsx(_components.span,{style:{color:`#8250DF`,\"--shiki-dark\":`#DCDCAA`},children:`json`}),_jsx(_components.span,{style:{color:`#1F2328`,\"--shiki-dark\":`#D4D4D4`},children:`();`})]}),`\n`,_jsxs(_components.span,{className:`line`,children:[_jsx(_components.span,{style:{color:`#1F2328`,\"--shiki-dark\":`#9CDCFE`},children:`connect`}),_jsx(_components.span,{style:{color:`#1F2328`,\"--shiki-dark\":`#D4D4D4`},children:`.`}),_jsx(_components.span,{style:{color:`#8250DF`,\"--shiki-dark\":`#DCDCAA`},children:`setSessionToken`}),_jsx(_components.span,{style:{color:`#1F2328`,\"--shiki-dark\":`#D4D4D4`},children:`(`}),_jsx(_components.span,{style:{color:`#1F2328`,\"--shiki-dark\":`#9CDCFE`},children:`sessionToken`}),_jsx(_components.span,{style:{color:`#1F2328`,\"--shiki-dark\":`#D4D4D4`},children:`); `}),_jsx(_components.span,{style:{color:`#6E7781`,\"--shiki-dark\":`#6A9955`},children:`// A loading indicator shows until this is set.`})]}),`\n`]})})}),_jsxs(_components.p,{children:[`See the `,_jsx(_components.a,{href:`/reference/frontend/frontend-sdk#connect-using-nango-connect-ui`,children:`Frontend SDK reference`}),` for more options.`]}),_jsxs(_components.p,{children:[`To style the pre-built UI or build your own, see `,_jsx(_components.a,{href:`/guides/auth/customize-connect-ui`,children:`Customize Connect UI`}),`.`]})]}),_jsxs(Step,{id:`save-connection-id-from-webhook`,title:`Handle the auth webhook`,children:[_jsxs(_components.p,{children:[`When authorization succeeds, Nango generates a `,_jsx(_components.strong,{children:`connection ID`}),`. Save it alongside the matching record in your app for direct access to the connection.`]}),_jsxs(_components.ol,{children:[`\n`,_jsxs(_components.li,{children:[`Add a `,_jsx(_components.code,{children:`POST`}),` endpoint in your backend and `,_jsx(_components.a,{href:`/guides/platform/webhooks-from-nango#verifying-webhooks-from-nango`,children:`verify Nango’s webhook signature`}),`.`]}),`\n`,_jsxs(_components.li,{children:[`In `,_jsx(_components.strong,{children:`Environment Settings > Webhooks`}),`, enter the endpoint URL under `,_jsx(_components.strong,{children:`Webhook URLs`}),`.`]}),`\n`,_jsxs(_components.li,{children:[`Enable `,_jsx(_components.strong,{children:`Auth: new connection webhooks`}),`. In your handler, use `,_jsx(_components.code,{children:`tags`}),` from the successful `,_jsx(_components.code,{children:`auth`}),` / `,_jsx(_components.code,{children:`creation`}),` event to match `,_jsx(_components.code,{children:`connectionId`}),` to the right record.`]}),`\n`]}),_jsxs(Accordion,{title:`For agents`,id:`for-agents-3`,children:[_jsxs(_components.p,{children:[`Confirm the target environment and webhook endpoint with the user. Check which destination slots are in use in the dashboard or with `,_jsx(_components.a,{href:`/reference/backend/http-api/environments/get`,children:_jsx(_components.code,{children:`GET /environments/{environmentUuid}`})}),`, which requires an Account API key with `,_jsx(_components.code,{children:`account:environments:read`}),`.`]}),_jsxs(_components.p,{children:[`To set the webhook URL and enable new connection events, call `,_jsx(_components.a,{href:`/reference/backend/http-api/environments/update`,children:_jsx(_components.code,{children:`PATCH /environments/{environmentUuid}`})}),` with an `,_jsx(_components.a,{href:`https://app.nango.dev/api-keys`,children:`Account API key`}),` that has `,_jsx(_components.code,{children:`account:environments:update`}),`. If you need the environment UUID, `,_jsx(_components.a,{href:`/reference/backend/http-api/environments/list`,children:`list environments`}),` with `,_jsx(_components.code,{children:`account:environments:list`}),`.`]}),_jsx(CodeBlock,{filename:``,numberOfLines:`10`,language:`shellscript`,children:_jsx(_components.pre,{className:`shiki shiki-themes github-light-default dark-plus`,style:{backgroundColor:`#ffffff`,\"--shiki-dark-bg\":`#0B0C0E`,color:`#1f2328`,\"--shiki-dark\":`#D4D4D4`},language:`shellscript`,children:_jsxs(_components.code,{language:`shellscript`,numberOfLines:`10`,children:[_jsxs(_components.span,{className:`line`,children:[_jsx(_components.span,{style:{color:`#953800`,\"--shiki-dark\":`#DCDCAA`},children:`curl`}),_jsx(_components.span,{style:{color:`#0550AE`,\"--shiki-dark\":`#569CD6`},children:` --request`}),_jsx(_components.span,{style:{color:`#0A3069`,\"--shiki-dark\":`#CE9178`},children:` PATCH`}),_jsx(_components.span,{style:{color:`#CF222E`,\"--shiki-dark\":`#D7BA7D`},children:` \\\\`})]}),`\n`,_jsxs(_components.span,{className:`line`,children:[_jsx(_components.span,{style:{color:`#0550AE`,\"--shiki-dark\":`#569CD6`},children:` --url`}),_jsx(_components.span,{style:{color:`#0A3069`,\"--shiki-dark\":`#CE9178`},children:` 'https://api.nango.dev/environments/\u003cENVIRONMENT-UUID>'`}),_jsx(_components.span,{style:{color:`#CF222E`,\"--shiki-dark\":`#D7BA7D`},children:` \\\\`})]}),`\n`,_jsxs(_components.span,{className:`line`,children:[_jsx(_components.span,{style:{color:`#0550AE`,\"--shiki-dark\":`#569CD6`},children:` --header`}),_jsx(_components.span,{style:{color:`#0A3069`,\"--shiki-dark\":`#CE9178`},children:` 'Authorization: Bearer \u003cNANGO-ACCOUNT-API-KEY>'`}),_jsx(_components.span,{style:{color:`#CF222E`,\"--shiki-dark\":`#D7BA7D`},children:` \\\\`})]}),`\n`,_jsxs(_components.span,{className:`line`,children:[_jsx(_components.span,{style:{color:`#0550AE`,\"--shiki-dark\":`#569CD6`},children:` --header`}),_jsx(_components.span,{style:{color:`#0A3069`,\"--shiki-dark\":`#CE9178`},children:` 'Content-Type: application/json'`}),_jsx(_components.span,{style:{color:`#CF222E`,\"--shiki-dark\":`#D7BA7D`},children:` \\\\`})]}),`\n`,_jsxs(_components.span,{className:`line`,children:[_jsx(_components.span,{style:{color:`#0550AE`,\"--shiki-dark\":`#569CD6`},children:` --data`}),_jsx(_components.span,{style:{color:`#0A3069`,\"--shiki-dark\":`#CE9178`},children:` '{`})]}),`\n`,_jsx(_components.span,{className:`line`,children:_jsx(_components.span,{style:{color:`#0A3069`,\"--shiki-dark\":`#CE9178`},children:` \"webhooks\": {`})}),`\n`,_jsx(_components.span,{className:`line`,children:_jsx(_components.span,{style:{color:`#0A3069`,\"--shiki-dark\":`#CE9178`},children:` \"primary_url\": \"https://example.com/webhooks/nango\",`})}),`\n`,_jsx(_components.span,{className:`line`,children:_jsx(_components.span,{style:{color:`#0A3069`,\"--shiki-dark\":`#CE9178`},children:` \"on_auth_creation\": true`})}),`\n`,_jsx(_components.span,{className:`line`,children:_jsx(_components.span,{style:{color:`#0A3069`,\"--shiki-dark\":`#CE9178`},children:` }`})}),`\n`,_jsx(_components.span,{className:`line`,children:_jsx(_components.span,{style:{color:`#0A3069`,\"--shiki-dark\":`#CE9178`},children:` }'`})}),`\n`]})})}),_jsxs(_components.p,{children:[`Use `,_jsx(_components.code,{children:`secondary_url`}),` instead if the primary URL is already in use and the secondary slot is free. Omitted destinations and event settings keep their current values. Confirm with the user before replacing an existing destination.`]}),_jsx(_components.p,{children:`Management MCP currently doesn’t support setting this. Do it in the dashboard, with an account API key above, or ask the user to do it manually.`})]}),_jsx(_components.p,{children:`Webhook payload:`}),_jsx(CodeBlock,{filename:``,numberOfLines:`11`,language:`json`,children:_jsx(_components.pre,{className:`shiki shiki-themes github-light-default dark-plus`,style:{backgroundColor:`#ffffff`,\"--shiki-dark-bg\":`#0B0C0E`,color:`#1f2328`,\"--shiki-dark\":`#D4D4D4`},language:`json`,children:_jsxs(_components.code,{language:`json`,numberOfLines:`11`,children:[_jsx(_components.span,{className:`line`,children:_jsx(_components.span,{style:{color:`#1F2328`,\"--shiki-dark\":`#D4D4D4`},children:`{`})}),`\n`,_jsxs(_components.span,{className:`line`,children:[_jsx(_components.span,{style:{color:`#116329`,\"--shiki-dark\":`#9CDCFE`},children:` \"type\"`}),_jsx(_components.span,{style:{color:`#1F2328`,\"--shiki-dark\":`#D4D4D4`},children:`: `}),_jsx(_components.span,{style:{color:`#0A3069`,\"--shiki-dark\":`#CE9178`},children:`\"auth\"`}),_jsx(_components.span,{style:{color:`#1F2328`,\"--shiki-dark\":`#D4D4D4`},children:`,`})]}),`\n`,_jsxs(_components.span,{className:`line`,children:[_jsx(_components.span,{style:{color:`#116329`,\"--shiki-dark\":`#9CDCFE`},children:` \"operation\"`}),_jsx(_components.span,{style:{color:`#1F2328`,\"--shiki-dark\":`#D4D4D4`},children:`: `}),_jsx(_components.span,{style:{color:`#0A3069`,\"--shiki-dark\":`#CE9178`},children:`\"creation\"`}),_jsx(_components.span,{style:{color:`#1F2328`,\"--shiki-dark\":`#D4D4D4`},children:`,`})]}),`\n`,_jsxs(_components.span,{className:`line`,children:[_jsx(_components.span,{style:{color:`#116329`,\"--shiki-dark\":`#9CDCFE`},children:` \"success\"`}),_jsx(_components.span,{style:{color:`#1F2328`,\"--shiki-dark\":`#D4D4D4`},children:`: `}),_jsx(_components.span,{style:{color:`#0550AE`,\"--shiki-dark\":`#569CD6`},children:`true`}),_jsx(_components.span,{style:{color:`#1F2328`,\"--shiki-dark\":`#D4D4D4`},children:`,`})]}),`\n`,_jsxs(_components.span,{className:`line`,children:[_jsx(_components.span,{style:{color:`#116329`,\"--shiki-dark\":`#9CDCFE`},children:` \"connectionId\"`}),_jsx(_components.span,{style:{color:`#1F2328`,\"--shiki-dark\":`#D4D4D4`},children:`: `}),_jsx(_components.span,{style:{color:`#0A3069`,\"--shiki-dark\":`#CE9178`},children:`\"\u003cCONNECTION-ID>\"`}),_jsx(_components.span,{style:{color:`#1F2328`,\"--shiki-dark\":`#D4D4D4`},children:`,`})]}),`\n`,_jsxs(_components.span,{className:`line`,children:[_jsx(_components.span,{style:{color:`#116329`,\"--shiki-dark\":`#9CDCFE`},children:` \"tags\"`}),_jsx(_components.span,{style:{color:`#1F2328`,\"--shiki-dark\":`#D4D4D4`},children:`: {`})]}),`\n`,_jsxs(_components.span,{className:`line`,children:[_jsx(_components.span,{style:{color:`#116329`,\"--shiki-dark\":`#9CDCFE`},children:` \"end_user_id\"`}),_jsx(_components.span,{style:{color:`#1F2328`,\"--shiki-dark\":`#D4D4D4`},children:`: `}),_jsx(_components.span,{style:{color:`#0A3069`,\"--shiki-dark\":`#CE9178`},children:`\"\u003cEND-USER-ID>\"`}),_jsx(_components.span,{style:{color:`#1F2328`,\"--shiki-dark\":`#D4D4D4`},children:`,`})]}),`\n`,_jsxs(_components.span,{className:`line`,children:[_jsx(_components.span,{style:{color:`#116329`,\"--shiki-dark\":`#9CDCFE`},children:` \"end_user_email\"`}),_jsx(_components.span,{style:{color:`#1F2328`,\"--shiki-dark\":`#D4D4D4`},children:`: `}),_jsx(_components.span,{style:{color:`#0A3069`,\"--shiki-dark\":`#CE9178`},children:`\"\u003cEND-USER-EMAIL>\"`}),_jsx(_components.span,{style:{color:`#1F2328`,\"--shiki-dark\":`#D4D4D4`},children:`,`})]}),`\n`,_jsxs(_components.span,{className:`line`,children:[_jsx(_components.span,{style:{color:`#116329`,\"--shiki-dark\":`#9CDCFE`},children:` \"organization_id\"`}),_jsx(_components.span,{style:{color:`#1F2328`,\"--shiki-dark\":`#D4D4D4`},children:`: `}),_jsx(_components.span,{style:{color:`#0A3069`,\"--shiki-dark\":`#CE9178`},children:`\"\u003cORGANIZATION-ID>\"`})]}),`\n`,_jsx(_components.span,{className:`line`,children:_jsx(_components.span,{style:{color:`#1F2328`,\"--shiki-dark\":`#D4D4D4`},children:` }`})}),`\n`,_jsx(_components.span,{className:`line`,children:_jsx(_components.span,{style:{color:`#1F2328`,\"--shiki-dark\":`#D4D4D4`},children:`}`})}),`\n`]})})})]}),_jsxs(Step,{id:`build-reauthorization`,title:`Add re-authorization`,children:[_jsx(_components.p,{children:`Credentials can become invalid when users revoke access, providers rotate refresh tokens, scopes change, or an app moves from testing to production. Re-authorization updates an existing connection’s credentials while preserving its data and config. Deleting and re-creating the connection wipes that data, therefore, prefer re-authorization.`}),_jsxs(_components.p,{children:[`You can check the status of a connection with `,_jsx(_components.code,{children:`GET /connections/{connectionId}`}),`, for example, before rendering the integrations setup page for the user.`]}),_jsxs(Tabs,{children:[_jsx(Tab,{title:`Node`,id:`node-2`,children:_jsx(CodeBlock,{filename:``,numberOfLines:`13`,language:`typescript`,children:_jsx(_components.pre,{className:`shiki shiki-themes github-light-default dark-plus`,style:{backgroundColor:`#ffffff`,\"--shiki-dark-bg\":`#0B0C0E`,color:`#1f2328`,\"--shiki-dark\":`#D4D4D4`},language:`typescript`,children:_jsxs(_components.code,{language:`typescript`,numberOfLines:`13`,children:[_jsxs(_components.span,{className:`line`,children:[_jsx(_components.span,{style:{color:`#CF222E`,\"--shiki-dark\":`#C586C0`},children:`import`}),_jsx(_components.span,{style:{color:`#1F2328`,\"--shiki-dark\":`#D4D4D4`},children:` { `}),_jsx(_components.span,{style:{color:`#1F2328`,\"--shiki-dark\":`#9CDCFE`},children:`Nango`}),_jsx(_components.span,{style:{color:`#1F2328`,\"--shiki-dark\":`#D4D4D4`},children:` } `}),_jsx(_components.span,{style:{color:`#CF222E`,\"--shiki-dark\":`#C586C0`},children:`from`}),_jsx(_components.span,{style:{color:`#0A3069`,\"--shiki-dark\":`#CE9178`},children:` '@nangohq/node'`}),_jsx(_components.span,{style:{color:`#1F2328`,\"--shiki-dark\":`#D4D4D4`},children:`;`})]}),`\n`,_jsx(_components.span,{className:`line`}),`\n`,_jsxs(_components.span,{className:`line`,children:[_jsx(_components.span,{style:{color:`#CF222E`,\"--shiki-dark\":`#569CD6`},children:`const`}),_jsx(_components.span,{style:{color:`#0550AE`,\"--shiki-dark\":`#4FC1FF`},children:` nango`}),_jsx(_components.span,{style:{color:`#CF222E`,\"--shiki-dark\":`#D4D4D4`},children:` =`}),_jsx(_components.span,{style:{color:`#CF222E`,\"--shiki-dark\":`#569CD6`},children:` new`}),_jsx(_components.span,{style:{color:`#8250DF`,\"--shiki-dark\":`#DCDCAA`},children:` Nango`}),_jsx(_components.span,{style:{color:`#1F2328`,\"--shiki-dark\":`#D4D4D4`},children:`({ `}),_jsx(_components.span,{style:{color:`#1F2328`,\"--shiki-dark\":`#9CDCFE`},children:`apiKey:`}),_jsx(_components.span,{style:{color:`#1F2328`,\"--shiki-dark\":`#9CDCFE`},children:` process`}),_jsx(_components.span,{style:{color:`#1F2328`,\"--shiki-dark\":`#D4D4D4`},children:`.`}),_jsx(_components.span,{style:{color:`#1F2328`,\"--shiki-dark\":`#9CDCFE`},children:`env`}),_jsx(_components.span,{style:{color:`#1F2328`,\"--shiki-dark\":`#D4D4D4`},children:`.`}),_jsx(_components.span,{style:{color:`#0550AE`,\"--shiki-dark\":`#4FC1FF`},children:`NANGO_API_KEY`}),_jsx(_components.span,{style:{color:`#CF222E`,\"--shiki-dark\":`#D4D4D4`},children:`!`}),_jsx(_components.span,{style:{color:`#1F2328`,\"--shiki-dark\":`#D4D4D4`},children:` });`})]}),`\n`,_jsx(_components.span,{className:`line`}),`\n`,_jsxs(_components.span,{className:`line`,children:[_jsx(_components.span,{style:{color:`#CF222E`,\"--shiki-dark\":`#C586C0`},children:`try`}),_jsx(_components.span,{style:{color:`#1F2328`,\"--shiki-dark\":`#D4D4D4`},children:` {`})]}),`\n`,_jsxs(_components.span,{className:`line`,children:[_jsx(_components.span,{style:{color:`#CF222E`,\"--shiki-dark\":`#C586C0`},children:` await`}),_jsx(_components.span,{style:{color:`#1F2328`,\"--shiki-dark\":`#9CDCFE`},children:` nango`}),_jsx(_components.span,{style:{color:`#1F2328`,\"--shiki-dark\":`#D4D4D4`},children:`.`}),_jsx(_components.span,{style:{color:`#8250DF`,\"--shiki-dark\":`#DCDCAA`},children:`getConnection`}),_jsx(_components.span,{style:{color:`#1F2328`,\"--shiki-dark\":`#D4D4D4`},children:`(`}),_jsx(_components.span,{style:{color:`#0A3069`,\"--shiki-dark\":`#CE9178`},children:`'\u003cINTEGRATION-ID>'`}),_jsx(_components.span,{style:{color:`#1F2328`,\"--shiki-dark\":`#D4D4D4`},children:`, `}),_jsx(_components.span,{style:{color:`#0A3069`,\"--shiki-dark\":`#CE9178`},children:`'\u003cCONNECTION-ID>'`}),_jsx(_components.span,{style:{color:`#1F2328`,\"--shiki-dark\":`#D4D4D4`},children:`);`})]}),`\n`,_jsx(_components.span,{className:`line`,children:_jsx(_components.span,{style:{color:`#6E7781`,\"--shiki-dark\":`#6A9955`},children:` // Connection is valid.`})}),`\n`,_jsxs(_components.span,{className:`line`,children:[_jsx(_components.span,{style:{color:`#1F2328`,\"--shiki-dark\":`#D4D4D4`},children:`} `}),_jsx(_components.span,{style:{color:`#CF222E`,\"--shiki-dark\":`#C586C0`},children:`catch`}),_jsx(_components.span,{style:{color:`#1F2328`,\"--shiki-dark\":`#D4D4D4`},children:` (`}),_jsx(_components.span,{style:{color:`#1F2328`,\"--shiki-dark\":`#9CDCFE`},children:`error`}),_jsx(_components.span,{style:{color:`#1F2328`,\"--shiki-dark\":`#D4D4D4`},children:`) {`})]}),`\n`,_jsxs(_components.span,{className:`line`,children:[_jsx(_components.span,{style:{color:`#CF222E`,\"--shiki-dark\":`#C586C0`},children:` if`}),_jsx(_components.span,{style:{color:`#1F2328`,\"--shiki-dark\":`#D4D4D4`},children:` (`}),_jsx(_components.span,{style:{color:`#1F2328`,\"--shiki-dark\":`#9CDCFE`},children:`error`}),_jsx(_components.span,{style:{color:`#1F2328`,\"--shiki-dark\":`#D4D4D4`},children:`.`}),_jsx(_components.span,{style:{color:`#1F2328`,\"--shiki-dark\":`#9CDCFE`},children:`response`}),_jsx(_components.span,{style:{color:`#1F2328`,\"--shiki-dark\":`#D4D4D4`},children:`?.`}),_jsx(_components.span,{style:{color:`#1F2328`,\"--shiki-dark\":`#9CDCFE`},children:`data`}),_jsx(_components.span,{style:{color:`#1F2328`,\"--shiki-dark\":`#D4D4D4`},children:`?.`}),_jsx(_components.span,{style:{color:`#1F2328`,\"--shiki-dark\":`#9CDCFE`},children:`error`}),_jsx(_components.span,{style:{color:`#1F2328`,\"--shiki-dark\":`#D4D4D4`},children:`?.`}),_jsx(_components.span,{style:{color:`#1F2328`,\"--shiki-dark\":`#9CDCFE`},children:`code`}),_jsx(_components.span,{style:{color:`#CF222E`,\"--shiki-dark\":`#D4D4D4`},children:` ===`}),_jsx(_components.span,{style:{color:`#0A3069`,\"--shiki-dark\":`#CE9178`},children:` 'invalid_credentials'`}),_jsx(_components.span,{style:{color:`#1F2328`,\"--shiki-dark\":`#D4D4D4`},children:`) {`})]}),`\n`,_jsx(_components.span,{className:`line`,children:_jsx(_components.span,{style:{color:`#6E7781`,\"--shiki-dark\":`#6A9955`},children:` // Connection is invalid — show a Reconnect button.`})}),`\n`,_jsxs(_components.span,{className:`line`,children:[_jsx(_components.span,{style:{color:`#8250DF`,\"--shiki-dark\":`#DCDCAA`},children:` displayReconnectUI`}),_jsx(_components.span,{style:{color:`#1F2328`,\"--shiki-dark\":`#D4D4D4`},children:`();`})]}),`\n`,_jsx(_components.span,{className:`line`,children:_jsx(_components.span,{style:{color:`#1F2328`,\"--shiki-dark\":`#D4D4D4`},children:` }`})}),`\n`,_jsx(_components.span,{className:`line`,children:_jsx(_components.span,{style:{color:`#1F2328`,\"--shiki-dark\":`#D4D4D4`},children:`}`})}),`\n`]})})})}),_jsx(Tab,{title:`cURL`,id:`curl-2`,children:_jsx(CodeBlock,{filename:``,numberOfLines:`3`,language:`shellscript`,children:_jsx(_components.pre,{className:`shiki shiki-themes github-light-default dark-plus`,style:{backgroundColor:`#ffffff`,\"--shiki-dark-bg\":`#0B0C0E`,color:`#1f2328`,\"--shiki-dark\":`#D4D4D4`},language:`shellscript`,children:_jsxs(_components.code,{language:`shellscript`,numberOfLines:`3`,children:[_jsxs(_components.span,{className:`line`,children:[_jsx(_components.span,{style:{color:`#953800`,\"--shiki-dark\":`#DCDCAA`},children:`curl`}),_jsx(_components.span,{style:{color:`#0550AE`,\"--shiki-dark\":`#569CD6`},children:` --request`}),_jsx(_components.span,{style:{color:`#0A3069`,\"--shiki-dark\":`#CE9178`},children:` GET`}),_jsx(_components.span,{style:{color:`#CF222E`,\"--shiki-dark\":`#D7BA7D`},children:` \\\\`})]}),`\n`,_jsxs(_components.span,{className:`line`,children:[_jsx(_components.span,{style:{color:`#0550AE`,\"--shiki-dark\":`#569CD6`},children:` --url`}),_jsx(_components.span,{style:{color:`#0A3069`,\"--shiki-dark\":`#CE9178`},children:` 'https://api.nango.dev/connections/\u003cCONNECTION-ID>?provider_config_key=\u003cINTEGRATION-ID>'`}),_jsx(_components.span,{style:{color:`#CF222E`,\"--shiki-dark\":`#D7BA7D`},children:` \\\\`})]}),`\n`,_jsxs(_components.span,{className:`line`,children:[_jsx(_components.span,{style:{color:`#0550AE`,\"--shiki-dark\":`#569CD6`},children:` --header`}),_jsx(_components.span,{style:{color:`#0A3069`,\"--shiki-dark\":`#CE9178`},children:` 'Authorization: Bearer \u003cNANGO-API-KEY>'`})]}),`\n`]})})})})]}),_jsxs(_components.p,{children:[`An `,_jsx(_components.code,{children:`invalid_credentials`}),` error means the connection failed credential refresh or validation — show an error state with a `,_jsx(_components.strong,{children:`Reconnect`}),` button.`]}),_jsxs(_components.p,{children:[`To trigger re-authorization, use the same frontend flow as a new connection, but generate a reconnect session token on the backend. Pass the returned token to the Frontend SDK exactly like a normal session token. On success you’ll receive an `,_jsx(_components.code,{children:`auth`}),` webhook with `,_jsx(_components.code,{children:`operation: override`}),`.`]}),_jsxs(_components.p,{children:[`The connection keeps its connection ID. It also keeps its tags, unless the reconnect session passes non-empty `,_jsx(_components.code,{children:`tags`}),` key, which replaces the existing ones.`]}),_jsxs(Tabs,{children:[_jsx(Tab,{title:`Node`,id:`node-3`,children:_jsx(CodeBlock,{filename:``,numberOfLines:`12`,language:`typescript`,children:_jsx(_components.pre,{className:`shiki shiki-themes github-light-default dark-plus`,style:{backgroundColor:`#ffffff`,\"--shiki-dark-bg\":`#0B0C0E`,color:`#1f2328`,\"--shiki-dark\":`#D4D4D4`},language:`typescript`,children:_jsxs(_components.code,{language:`typescript`,numberOfLines:`12`,children:[_jsxs(_components.span,{className:`line`,children:[_jsx(_components.span,{style:{color:`#CF222E`,\"--shiki-dark\":`#C586C0`},children:`import`}),_jsx(_components.span,{style:{color:`#1F2328`,\"--shiki-dark\":`#D4D4D4`},children:` { `}),_jsx(_components.span,{style:{color:`#1F2328`,\"--shiki-dark\":`#9CDCFE`},children:`Nango`}),_jsx(_components.span,{style:{color:`#1F2328`,\"--shiki-dark\":`#D4D4D4`},children:` } `}),_jsx(_components.span,{style:{color:`#CF222E`,\"--shiki-dark\":`#C586C0`},children:`from`}),_jsx(_components.span,{style:{color:`#0A3069`,\"--shiki-dark\":`#CE9178`},children:` '@nangohq/node'`}),_jsx(_components.span,{style:{color:`#1F2328`,\"--shiki-dark\":`#D4D4D4`},children:`;`})]}),`\n`,_jsx(_components.span,{className:`line`}),`\n`,_jsxs(_components.span,{className:`line`,children:[_jsx(_components.span,{style:{color:`#CF222E`,\"--shiki-dark\":`#569CD6`},children:`const`}),_jsx(_components.span,{style:{color:`#0550AE`,\"--shiki-dark\":`#4FC1FF`},children:` nango`}),_jsx(_components.span,{style:{color:`#CF222E`,\"--shiki-dark\":`#D4D4D4`},children:` =`}),_jsx(_components.span,{style:{color:`#CF222E`,\"--shiki-dark\":`#569CD6`},children:` new`}),_jsx(_components.span,{style:{color:`#8250DF`,\"--shiki-dark\":`#DCDCAA`},children:` Nango`}),_jsx(_components.span,{style:{color:`#1F2328`,\"--shiki-dark\":`#D4D4D4`},children:`({ `}),_jsx(_components.span,{style:{color:`#1F2328`,\"--shiki-dark\":`#9CDCFE`},children:`apiKey:`}),_jsx(_components.span,{style:{color:`#1F2328`,\"--shiki-dark\":`#9CDCFE`},children:` process`}),_jsx(_components.span,{style:{color:`#1F2328`,\"--shiki-dark\":`#D4D4D4`},children:`.`}),_jsx(_components.span,{style:{color:`#1F2328`,\"--shiki-dark\":`#9CDCFE`},children:`env`}),_jsx(_components.span,{style:{color:`#1F2328`,\"--shiki-dark\":`#D4D4D4`},children:`.`}),_jsx(_components.span,{style:{color:`#0550AE`,\"--shiki-dark\":`#4FC1FF`},children:`NANGO_API_KEY`}),_jsx(_components.span,{style:{color:`#CF222E`,\"--shiki-dark\":`#D4D4D4`},children:`!`}),_jsx(_components.span,{style:{color:`#1F2328`,\"--shiki-dark\":`#D4D4D4`},children:` });`})]}),`\n`,_jsx(_components.span,{className:`line`}),`\n`,_jsxs(_components.span,{className:`line`,children:[_jsx(_components.span,{style:{color:`#1F2328`,\"--shiki-dark\":`#9CDCFE`},children:`api`}),_jsx(_components.span,{style:{color:`#1F2328`,\"--shiki-dark\":`#D4D4D4`},children:`.`}),_jsx(_components.span,{style:{color:`#8250DF`,\"--shiki-dark\":`#DCDCAA`},children:`post`}),_jsx(_components.span,{style:{color:`#1F2328`,\"--shiki-dark\":`#D4D4D4`},children:`(`}),_jsx(_components.span,{style:{color:`#0A3069`,\"--shiki-dark\":`#CE9178`},children:`'/sessionToken'`}),_jsx(_components.span,{style:{color:`#1F2328`,\"--shiki-dark\":`#D4D4D4`},children:`, `}),_jsx(_components.span,{style:{color:`#CF222E`,\"--shiki-dark\":`#569CD6`},children:`async`}),_jsx(_components.span,{style:{color:`#1F2328`,\"--shiki-dark\":`#D4D4D4`},children:` (`}),_jsx(_components.span,{style:{color:`#953800`,\"--shiki-dark\":`#9CDCFE`},children:`req`}),_jsx(_components.span,{style:{color:`#1F2328`,\"--shiki-dark\":`#D4D4D4`},children:`, `}),_jsx(_components.span,{style:{color:`#953800`,\"--shiki-dark\":`#9CDCFE`},children:`res`}),_jsx(_components.span,{style:{color:`#1F2328`,\"--shiki-dark\":`#D4D4D4`},children:`) `}),_jsx(_components.span,{style:{color:`#CF222E`,\"--shiki-dark\":`#569CD6`},children:`=>`}),_jsx(_components.span,{style:{color:`#1F2328`,\"--shiki-dark\":`#D4D4D4`},children:` {`})]}),`\n`,_jsxs(_components.span,{className:`line`,children:[_jsx(_components.span,{style:{color:`#CF222E`,\"--shiki-dark\":`#569CD6`},children:` const`}),_jsx(_components.span,{style:{color:`#1F2328`,\"--shiki-dark\":`#D4D4D4`},children:` { `}),_jsx(_components.span,{style:{color:`#0550AE`,\"--shiki-dark\":`#4FC1FF`},children:`data`}),_jsx(_components.span,{style:{color:`#1F2328`,\"--shiki-dark\":`#D4D4D4`},children:` } `}),_jsx(_components.span,{style:{color:`#CF222E`,\"--shiki-dark\":`#D4D4D4`},children:`=`}),_jsx(_components.span,{style:{color:`#CF222E`,\"--shiki-dark\":`#C586C0`},children:` await`}),_jsx(_components.span,{style:{color:`#1F2328`,\"--shiki-dark\":`#9CDCFE`},children:` nango`}),_jsx(_components.span,{style:{color:`#1F2328`,\"--shiki-dark\":`#D4D4D4`},children:`.`}),_jsx(_components.span,{style:{color:`#8250DF`,\"--shiki-dark\":`#DCDCAA`},children:`createReconnectSession`}),_jsx(_components.span,{style:{color:`#1F2328`,\"--shiki-dark\":`#D4D4D4`},children:`({`})]}),`\n`,_jsxs(_components.span,{className:`line`,children:[_jsx(_components.span,{style:{color:`#1F2328`,\"--shiki-dark\":`#9CDCFE`},children:` connection_id:`}),_jsx(_components.span,{style:{color:`#0A3069`,\"--shiki-dark\":`#CE9178`},children:` '\u003cCONNECTION-ID>'`}),_jsx(_components.span,{style:{color:`#1F2328`,\"--shiki-dark\":`#D4D4D4`},children:`,`})]}),`\n`,_jsxs(_components.span,{className:`line`,children:[_jsx(_components.span,{style:{color:`#1F2328`,\"--shiki-dark\":`#9CDCFE`},children:` integration_id:`}),_jsx(_components.span,{style:{color:`#0A3069`,\"--shiki-dark\":`#CE9178`},children:` '\u003cINTEGRATION-ID>'`})]}),`\n`,_jsx(_components.span,{className:`line`,children:_jsx(_components.span,{style:{color:`#1F2328`,\"--shiki-dark\":`#D4D4D4`},children:` });`})}),`\n`,_jsx(_components.span,{className:`line`}),`\n`,_jsxs(_components.span,{className:`line`,children:[_jsx(_components.span,{style:{color:`#1F2328`,\"--shiki-dark\":`#9CDCFE`},children:` res`}),_jsx(_components.span,{style:{color:`#1F2328`,\"--shiki-dark\":`#D4D4D4`},children:`.`}),_jsx(_components.span,{style:{color:`#8250DF`,\"--shiki-dark\":`#DCDCAA`},children:`status`}),_jsx(_components.span,{style:{color:`#1F2328`,\"--shiki-dark\":`#D4D4D4`},children:`(`}),_jsx(_components.span,{style:{color:`#0550AE`,\"--shiki-dark\":`#B5CEA8`},children:`200`}),_jsx(_components.span,{style:{color:`#1F2328`,\"--shiki-dark\":`#D4D4D4`},children:`).`}),_jsx(_components.span,{style:{color:`#8250DF`,\"--shiki-dark\":`#DCDCAA`},children:`send`}),_jsx(_components.span,{style:{color:`#1F2328`,\"--shiki-dark\":`#D4D4D4`},children:`({ `}),_jsx(_components.span,{style:{color:`#1F2328`,\"--shiki-dark\":`#9CDCFE`},children:`sessionToken:`}),_jsx(_components.span,{style:{color:`#1F2328`,\"--shiki-dark\":`#9CDCFE`},children:` data`}),_jsx(_components.span,{style:{color:`#1F2328`,\"--shiki-dark\":`#D4D4D4`},children:`.`}),_jsx(_components.span,{style:{color:`#1F2328`,\"--shiki-dark\":`#9CDCFE`},children:`token`}),_jsx(_components.span,{style:{color:`#1F2328`,\"--shiki-dark\":`#D4D4D4`},children:` });`})]}),`\n`,_jsx(_components.span,{className:`line`,children:_jsx(_components.span,{style:{color:`#1F2328`,\"--shiki-dark\":`#D4D4D4`},children:`});`})}),`\n`]})})})}),_jsx(Tab,{title:`cURL`,id:`curl-3`,children:_jsx(CodeBlock,{filename:``,numberOfLines:`8`,language:`shellscript`,children:_jsx(_components.pre,{className:`shiki shiki-themes github-light-default dark-plus`,style:{backgroundColor:`#ffffff`,\"--shiki-dark-bg\":`#0B0C0E`,color:`#1f2328`,\"--shiki-dark\":`#D4D4D4`},language:`shellscript`,children:_jsxs(_components.code,{language:`shellscript`,numberOfLines:`8`,children:[_jsxs(_components.span,{className:`line`,children:[_jsx(_components.span,{style:{color:`#953800`,\"--shiki-dark\":`#DCDCAA`},children:`curl`}),_jsx(_components.span,{style:{color:`#0550AE`,\"--shiki-dark\":`#569CD6`},children:` --request`}),_jsx(_components.span,{style:{color:`#0A3069`,\"--shiki-dark\":`#CE9178`},children:` POST`}),_jsx(_components.span,{style:{color:`#CF222E`,\"--shiki-dark\":`#D7BA7D`},children:` \\\\`})]}),`\n`,_jsxs(_components.span,{className:`line`,children:[_jsx(_components.span,{style:{color:`#0550AE`,\"--shiki-dark\":`#569CD6`},children:` --url`}),_jsx(_components.span,{style:{color:`#0A3069`,\"--shiki-dark\":`#CE9178`},children:` https://api.nango.dev/connect/sessions/reconnect`}),_jsx(_components.span,{style:{color:`#CF222E`,\"--shiki-dark\":`#D7BA7D`},children:` \\\\`})]}),`\n`,_jsxs(_components.span,{className:`line`,children:[_jsx(_components.span,{style:{color:`#0550AE`,\"--shiki-dark\":`#569CD6`},children:` --header`}),_jsx(_components.span,{style:{color:`#0A3069`,\"--shiki-dark\":`#CE9178`},children:` 'Authorization: Bearer \u003cNANGO-API-KEY>'`}),_jsx(_components.span,{style:{color:`#CF222E`,\"--shiki-dark\":`#D7BA7D`},children:` \\\\`})]}),`\n`,_jsxs(_components.span,{className:`line`,children:[_jsx(_components.span,{style:{color:`#0550AE`,\"--shiki-dark\":`#569CD6`},children:` --header`}),_jsx(_components.span,{style:{color:`#0A3069`,\"--shiki-dark\":`#CE9178`},children:` 'Content-Type: application/json'`}),_jsx(_components.span,{style:{color:`#CF222E`,\"--shiki-dark\":`#D7BA7D`},children:` \\\\`})]}),`\n`,_jsxs(_components.span,{className:`line`,children:[_jsx(_components.span,{style:{color:`#0550AE`,\"--shiki-dark\":`#569CD6`},children:` --data`}),_jsx(_components.span,{style:{color:`#0A3069`,\"--shiki-dark\":`#CE9178`},children:` '{`})]}),`\n`,_jsx(_components.span,{className:`line`,children:_jsx(_components.span,{style:{color:`#0A3069`,\"--shiki-dark\":`#CE9178`},children:` \"connection_id\": \"\u003cCONNECTION-ID>\",`})}),`\n`,_jsx(_components.span,{className:`line`,children:_jsx(_components.span,{style:{color:`#0A3069`,\"--shiki-dark\":`#CE9178`},children:` \"integration_id\": \"\u003cINTEGRATION-ID>\"`})}),`\n`,_jsx(_components.span,{className:`line`,children:_jsx(_components.span,{style:{color:`#0A3069`,\"--shiki-dark\":`#CE9178`},children:` }'`})}),`\n`]})})})})]})]}),_jsxs(Step,{id:`run-auth-flow`,title:`Run the flow`,children:[_jsxs(_components.p,{children:[`Test the auth flow from your app and verify a connection appears in the `,_jsx(_components.strong,{children:`Connections`}),` tab. Failed attempts are inspectable in the `,_jsx(_components.strong,{children:`Logs`}),` tab.`]}),_jsxs(Accordion,{title:`For agents`,id:`for-agents-4`,children:[_jsxs(_components.p,{children:[`After the user runs the flow, confirm the connection was created. Use `,_jsx(_components.code,{children:`connections_list`}),` as shown in `,_jsx(_components.a,{href:`#test-authorization`,children:`Test the authorization`}),`, or call `,_jsx(_components.a,{href:`/reference/backend/http-api/connections/list`,children:_jsx(_components.code,{children:`GET /connections`})}),` with the integration ID and the tags you set when you `,_jsx(_components.a,{href:`#generate-session-token`,children:`created the Connect session`}),`.`]}),_jsx(CodeBlock,{filename:``,numberOfLines:`5`,language:`shellscript`,children:_jsx(_components.pre,{className:`shiki shiki-themes github-light-default dark-plus`,style:{backgroundColor:`#ffffff`,\"--shiki-dark-bg\":`#0B0C0E`,color:`#1f2328`,\"--shiki-dark\":`#D4D4D4`},language:`shellscript`,children:_jsxs(_components.code,{language:`shellscript`,numberOfLines:`5`,children:[_jsxs(_components.span,{className:`line`,children:[_jsx(_components.span,{style:{color:`#953800`,\"--shiki-dark\":`#DCDCAA`},children:`curl`}),_jsx(_components.span,{style:{color:`#0550AE`,\"--shiki-dark\":`#569CD6`},children:` --get`}),_jsx(_components.span,{style:{color:`#CF222E`,\"--shiki-dark\":`#D7BA7D`},children:` \\\\`})]}),`\n`,_jsxs(_components.span,{className:`line`,children:[_jsx(_components.span,{style:{color:`#0550AE`,\"--shiki-dark\":`#569CD6`},children:` --url`}),_jsx(_components.span,{style:{color:`#0A3069`,\"--shiki-dark\":`#CE9178`},children:` https://api.nango.dev/connections`}),_jsx(_components.span,{style:{color:`#CF222E`,\"--shiki-dark\":`#D7BA7D`},children:` \\\\`})]}),`\n`,_jsxs(_components.span,{className:`line`,children:[_jsx(_components.span,{style:{color:`#0550AE`,\"--shiki-dark\":`#569CD6`},children:` --header`}),_jsx(_components.span,{style:{color:`#0A3069`,\"--shiki-dark\":`#CE9178`},children:` 'Authorization: Bearer \u003cNANGO-API-KEY>'`}),_jsx(_components.span,{style:{color:`#CF222E`,\"--shiki-dark\":`#D7BA7D`},children:` \\\\`})]}),`\n`,_jsxs(_components.span,{className:`line`,children:[_jsx(_components.span,{style:{color:`#0550AE`,\"--shiki-dark\":`#569CD6`},children:` --data-urlencode`}),_jsx(_components.span,{style:{color:`#0A3069`,\"--shiki-dark\":`#CE9178`},children:` 'integrationId=\u003cINTEGRATION-ID>'`}),_jsx(_components.span,{style:{color:`#CF222E`,\"--shiki-dark\":`#D7BA7D`},children:` \\\\`})]}),`\n`,_jsxs(_components.span,{className:`line`,children:[_jsx(_components.span,{style:{color:`#0550AE`,\"--shiki-dark\":`#569CD6`},children:` --data-urlencode`}),_jsx(_components.span,{style:{color:`#0A3069`,\"--shiki-dark\":`#CE9178`},children:` 'tags%5Bend_user_id%5D=\u003cEND-USER-ID>'`})]}),`\n`]})})}),_jsxs(_components.p,{children:[`If the connection is missing, use the Management MCP log tools to debug. Start with `,_jsx(_components.code,{children:`logs_list_operations`}),`.`]}),_jsx(CodeBlock,{filename:``,numberOfLines:`5`,language:`json`,children:_jsx(_components.pre,{className:`shiki shiki-themes github-light-default dark-plus`,style:{backgroundColor:`#ffffff`,\"--shiki-dark-bg\":`#0B0C0E`,color:`#1f2328`,\"--shiki-dark\":`#D4D4D4`},language:`json`,children:_jsxs(_components.code,{language:`json`,numberOfLines:`5`,children:[_jsx(_components.span,{className:`line`,children:_jsx(_components.span,{style:{color:`#1F2328`,\"--shiki-dark\":`#D4D4D4`},children:`{`})}),`\n`,_jsxs(_components.span,{className:`line`,children:[_jsx(_components.span,{style:{color:`#116329`,\"--shiki-dark\":`#9CDCFE`},children:` \"environment\"`}),_jsx(_components.span,{style:{color:`#1F2328`,\"--shiki-dark\":`#D4D4D4`},children:`: `}),_jsx(_components.span,{style:{color:`#0A3069`,\"--shiki-dark\":`#CE9178`},children:`\"\u003cENVIRONMENT-NAME>\"`}),_jsx(_components.span,{style:{color:`#1F2328`,\"--shiki-dark\":`#D4D4D4`},children:`,`})]}),`\n`,_jsxs(_components.span,{className:`line`,children:[_jsx(_components.span,{style:{color:`#116329`,\"--shiki-dark\":`#9CDCFE`},children:` \"integrations\"`}),_jsx(_components.span,{style:{color:`#1F2328`,\"--shiki-dark\":`#D4D4D4`},children:`: [`}),_jsx(_components.span,{style:{color:`#0A3069`,\"--shiki-dark\":`#CE9178`},children:`\"\u003cINTEGRATION-ID>\"`}),_jsx(_components.span,{style:{color:`#1F2328`,\"--shiki-dark\":`#D4D4D4`},children:`],`})]}),`\n`,_jsxs(_components.span,{className:`line`,children:[_jsx(_components.span,{style:{color:`#116329`,\"--shiki-dark\":`#9CDCFE`},children:` \"operations\"`}),_jsx(_components.span,{style:{color:`#1F2328`,\"--shiki-dark\":`#D4D4D4`},children:`: [{ `}),_jsx(_components.span,{style:{color:`#116329`,\"--shiki-dark\":`#9CDCFE`},children:`\"type\"`}),_jsx(_components.span,{style:{color:`#1F2328`,\"--shiki-dark\":`#D4D4D4`},children:`: `}),_jsx(_components.span,{style:{color:`#0A3069`,\"--shiki-dark\":`#CE9178`},children:`\"auth\"`}),_jsx(_components.span,{style:{color:`#1F2328`,\"--shiki-dark\":`#D4D4D4`},children:`, `}),_jsx(_components.span,{style:{color:`#116329`,\"--shiki-dark\":`#9CDCFE`},children:`\"actions\"`}),_jsx(_components.span,{style:{color:`#1F2328`,\"--shiki-dark\":`#D4D4D4`},children:`: [`}),_jsx(_components.span,{style:{color:`#0A3069`,\"--shiki-dark\":`#CE9178`},children:`\"create_connection\"`}),_jsx(_components.span,{style:{color:`#1F2328`,\"--shiki-dark\":`#D4D4D4`},children:`] }]`})]}),`\n`,_jsx(_components.span,{className:`line`,children:_jsx(_components.span,{style:{color:`#1F2328`,\"--shiki-dark\":`#D4D4D4`},children:`}`})}),`\n`]})})}),_jsxs(_components.p,{children:[`Match the operation to the time of the user’s attempt, then call `,_jsx(_components.code,{children:`logs_get_operation`}),` with the same `,_jsx(_components.code,{children:`environment`}),` and the operation’s `,_jsx(_components.code,{children:`id`}),` as `,_jsx(_components.code,{children:`operationId`}),` to read its messages.`]}),_jsx(_components.p,{children:`The REST API doesn’t expose logs, use the dashboard to debug.`})]}),_jsxs(_components.p,{children:[`Once the connection is established, use it across Nango with `,_jsx(_components.a,{href:`/guides/agent-sessions`,children:`Agent sessions`}),`, `,_jsx(_components.a,{href:`/guides/tools/overview`,children:`Tools`}),`, `,_jsx(_components.a,{href:`/guides/triggers/overview`,children:`Triggers`}),`, and `,_jsx(_components.a,{href:`/guides/syncs/overview`,children:`Syncs`}),`.`]})]})]}),`\n`,_jsx(`a`,{id:`share-a-connect-link`}),`\n`,_jsx(Heading,{level:`2`,id:`auth-from-a-link-you-share`,children:`Auth from a link you share`}),`\n`,_jsxs(_components.p,{children:[`Create a Connect session from your backend and share the returned `,_jsx(_components.code,{children:`data.connect_link`}),` with the user. Use an Environment API key with `,_jsx(_components.code,{children:`environment:connect_sessions:write`}),`.`]}),`\n`,_jsxs(_components.p,{children:[`Include `,_jsx(_components.code,{children:`tags`}),` when you create the session. `,_jsx(_components.a,{href:`/guides/auth/connection-tags-configuration-metadata#connection-tags`,children:`Connection tags`}),` link the new connection to records in your app. Choose IDs that match how your app finds connections and controls access, such as a user, organization, or workspace ID.`]}),`\n`,_jsxs(_components.p,{children:[`When the user authorizes, the `,_jsx(_components.a,{href:`#save-connection-id-from-webhook`,children:`auth webhook`}),` includes your tags and the new `,_jsx(_components.code,{children:`connectionId`}),`. Use the tags to match the ID to the right record in your app. You can also use those tags to find the connection later or scope an agent session’s access.`]}),`\n`,_jsxs(Tabs,{children:[_jsx(Tab,{title:`cURL`,id:`curl-4`,children:_jsx(CodeBlock,{filename:``,numberOfLines:`8`,language:`shellscript`,children:_jsx(_components.pre,{className:`shiki shiki-themes github-light-default dark-plus`,style:{backgroundColor:`#ffffff`,\"--shiki-dark-bg\":`#0B0C0E`,color:`#1f2328`,\"--shiki-dark\":`#D4D4D4`},language:`shellscript`,children:_jsxs(_components.code,{language:`shellscript`,numberOfLines:`8`,children:[_jsxs(_components.span,{className:`line`,children:[_jsx(_components.span,{style:{color:`#953800`,\"--shiki-dark\":`#DCDCAA`},children:`curl`}),_jsx(_components.span,{style:{color:`#0550AE`,\"--shiki-dark\":`#569CD6`},children:` --request`}),_jsx(_components.span,{style:{color:`#0A3069`,\"--shiki-dark\":`#CE9178`},children:` POST`}),_jsx(_components.span,{style:{color:`#CF222E`,\"--shiki-dark\":`#D7BA7D`},children:` \\\\`})]}),`\n`,_jsxs(_components.span,{className:`line`,children:[_jsx(_components.span,{style:{color:`#0550AE`,\"--shiki-dark\":`#569CD6`},children:` --url`}),_jsx(_components.span,{style:{color:`#0A3069`,\"--shiki-dark\":`#CE9178`},children:` https://api.nango.dev/connect/sessions`}),_jsx(_components.span,{style:{color:`#CF222E`,\"--shiki-dark\":`#D7BA7D`},children:` \\\\`})]}),`\n`,_jsxs(_components.span,{className:`line`,children:[_jsx(_components.span,{style:{color:`#0550AE`,\"--shiki-dark\":`#569CD6`},children:` --header`}),_jsx(_components.span,{style:{color:`#0A3069`,\"--shiki-dark\":`#CE9178`},children:` 'Authorization: Bearer \u003cNANGO-API-KEY>'`}),_jsx(_components.span,{style:{color:`#CF222E`,\"--shiki-dark\":`#D7BA7D`},children:` \\\\`})]}),`\n`,_jsxs(_components.span,{className:`line`,children:[_jsx(_components.span,{style:{color:`#0550AE`,\"--shiki-dark\":`#569CD6`},children:` --header`}),_jsx(_components.span,{style:{color:`#0A3069`,\"--shiki-dark\":`#CE9178`},children:` 'Content-Type: application/json'`}),_jsx(_components.span,{style:{color:`#CF222E`,\"--shiki-dark\":`#D7BA7D`},children:` \\\\`})]}),`\n`,_jsxs(_components.span,{className:`line`,children:[_jsx(_components.span,{style:{color:`#0550AE`,\"--shiki-dark\":`#569CD6`},children:` --data`}),_jsx(_components.span,{style:{color:`#0A3069`,\"--shiki-dark\":`#CE9178`},children:` '{`})]}),`\n`,_jsx(_components.span,{className:`line`,children:_jsx(_components.span,{style:{color:`#0A3069`,\"--shiki-dark\":`#CE9178`},children:` \"tags\": { \"end_user_id\": \"\u003cEND-USER-ID>\" },`})}),`\n`,_jsx(_components.span,{className:`line`,children:_jsx(_components.span,{style:{color:`#0A3069`,\"--shiki-dark\":`#CE9178`},children:` \"allowed_integrations\": [\"\u003cINTEGRATION-ID>\"]`})}),`\n`,_jsx(_components.span,{className:`line`,children:_jsx(_components.span,{style:{color:`#0A3069`,\"--shiki-dark\":`#CE9178`},children:` }'`})}),`\n`]})})})}),_jsx(Tab,{title:`TypeScript`,id:`typescript`,children:_jsx(CodeBlock,{filename:``,numberOfLines:`10`,language:`typescript`,children:_jsx(_components.pre,{className:`shiki shiki-themes github-light-default dark-plus`,style:{backgroundColor:`#ffffff`,\"--shiki-dark-bg\":`#0B0C0E`,color:`#1f2328`,\"--shiki-dark\":`#D4D4D4`},language:`typescript`,children:_jsxs(_components.code,{language:`typescript`,numberOfLines:`10`,children:[_jsxs(_components.span,{className:`line`,children:[_jsx(_components.span,{style:{color:`#CF222E`,\"--shiki-dark\":`#C586C0`},children:`import`}),_jsx(_components.span,{style:{color:`#1F2328`,\"--shiki-dark\":`#D4D4D4`},children:` { `}),_jsx(_components.span,{style:{color:`#1F2328`,\"--shiki-dark\":`#9CDCFE`},children:`Nango`}),_jsx(_components.span,{style:{color:`#1F2328`,\"--shiki-dark\":`#D4D4D4`},children:` } `}),_jsx(_components.span,{style:{color:`#CF222E`,\"--shiki-dark\":`#C586C0`},children:`from`}),_jsx(_components.span,{style:{color:`#0A3069`,\"--shiki-dark\":`#CE9178`},children:` '@nangohq/node'`}),_jsx(_components.span,{style:{color:`#1F2328`,\"--shiki-dark\":`#D4D4D4`},children:`;`})]}),`\n`,_jsx(_components.span,{className:`line`}),`\n`,_jsxs(_components.span,{className:`line`,children:[_jsx(_components.span,{style:{color:`#CF222E`,\"--shiki-dark\":`#569CD6`},children:`const`}),_jsx(_components.span,{style:{color:`#0550AE`,\"--shiki-dark\":`#4FC1FF`},children:` nango`}),_jsx(_components.span,{style:{color:`#CF222E`,\"--shiki-dark\":`#D4D4D4`},children:` =`}),_jsx(_components.span,{style:{color:`#CF222E`,\"--shiki-dark\":`#569CD6`},children:` new`}),_jsx(_components.span,{style:{color:`#8250DF`,\"--shiki-dark\":`#DCDCAA`},children:` Nango`}),_jsx(_components.span,{style:{color:`#1F2328`,\"--shiki-dark\":`#D4D4D4`},children:`({ `}),_jsx(_components.span,{style:{color:`#1F2328`,\"--shiki-dark\":`#9CDCFE`},children:`apiKey:`}),_jsx(_components.span,{style:{color:`#1F2328`,\"--shiki-dark\":`#9CDCFE`},children:` process`}),_jsx(_components.span,{style:{color:`#1F2328`,\"--shiki-dark\":`#D4D4D4`},children:`.`}),_jsx(_components.span,{style:{color:`#1F2328`,\"--shiki-dark\":`#9CDCFE`},children:`env`}),_jsx(_components.span,{style:{color:`#1F2328`,\"--shiki-dark\":`#D4D4D4`},children:`.`}),_jsx(_components.span,{style:{color:`#0550AE`,\"--shiki-dark\":`#4FC1FF`},children:`NANGO_API_KEY`}),_jsx(_components.span,{style:{color:`#CF222E`,\"--shiki-dark\":`#D4D4D4`},children:`!`}),_jsx(_components.span,{style:{color:`#1F2328`,\"--shiki-dark\":`#D4D4D4`},children:` });`})]}),`\n`,_jsx(_components.span,{className:`line`}),`\n`,_jsxs(_components.span,{className:`line`,children:[_jsx(_components.span,{style:{color:`#CF222E`,\"--shiki-dark\":`#569CD6`},children:`const`}),_jsx(_components.span,{style:{color:`#1F2328`,\"--shiki-dark\":`#D4D4D4`},children:` { `}),_jsx(_components.span,{style:{color:`#0550AE`,\"--shiki-dark\":`#4FC1FF`},children:`data`}),_jsx(_components.span,{style:{color:`#1F2328`,\"--shiki-dark\":`#D4D4D4`},children:` } `}),_jsx(_components.span,{style:{color:`#CF222E`,\"--shiki-dark\":`#D4D4D4`},children:`=`}),_jsx(_components.span,{style:{color:`#CF222E`,\"--shiki-dark\":`#C586C0`},children:` await`}),_jsx(_components.span,{style:{color:`#1F2328`,\"--shiki-dark\":`#9CDCFE`},children:` nango`}),_jsx(_components.span,{style:{color:`#1F2328`,\"--shiki-dark\":`#D4D4D4`},children:`.`}),_jsx(_components.span,{style:{color:`#8250DF`,\"--shiki-dark\":`#DCDCAA`},children:`createConnectSession`}),_jsx(_components.span,{style:{color:`#1F2328`,\"--shiki-dark\":`#D4D4D4`},children:`({`})]}),`\n`,_jsxs(_components.span,{className:`line`,children:[_jsx(_components.span,{style:{color:`#1F2328`,\"--shiki-dark\":`#9CDCFE`},children:` tags:`}),_jsx(_components.span,{style:{color:`#1F2328`,\"--shiki-dark\":`#D4D4D4`},children:` { `}),_jsx(_components.span,{style:{color:`#1F2328`,\"--shiki-dark\":`#9CDCFE`},children:`end_user_id:`}),_jsx(_components.span,{style:{color:`#0A3069`,\"--shiki-dark\":`#CE9178`},children:` '\u003cEND-USER-ID>'`}),_jsx(_components.span,{style:{color:`#1F2328`,\"--shiki-dark\":`#D4D4D4`},children:` },`})]}),`\n`,_jsxs(_components.span,{className:`line`,children:[_jsx(_components.span,{style:{color:`#1F2328`,\"--shiki-dark\":`#9CDCFE`},children:` allowed_integrations:`}),_jsx(_components.span,{style:{color:`#1F2328`,\"--shiki-dark\":`#D4D4D4`},children:` [`}),_jsx(_components.span,{style:{color:`#0A3069`,\"--shiki-dark\":`#CE9178`},children:`'\u003cINTEGRATION-ID>'`}),_jsx(_components.span,{style:{color:`#1F2328`,\"--shiki-dark\":`#D4D4D4`},children:`]`})]}),`\n`,_jsx(_components.span,{className:`line`,children:_jsx(_components.span,{style:{color:`#1F2328`,\"--shiki-dark\":`#D4D4D4`},children:`});`})}),`\n`,_jsx(_components.span,{className:`line`}),`\n`,_jsxs(_components.span,{className:`line`,children:[_jsx(_components.span,{style:{color:`#CF222E`,\"--shiki-dark\":`#569CD6`},children:`const`}),_jsx(_components.span,{style:{color:`#0550AE`,\"--shiki-dark\":`#4FC1FF`},children:` connectLink`}),_jsx(_components.span,{style:{color:`#CF222E`,\"--shiki-dark\":`#D4D4D4`},children:` =`}),_jsx(_components.span,{style:{color:`#1F2328`,\"--shiki-dark\":`#9CDCFE`},children:` data`}),_jsx(_components.span,{style:{color:`#1F2328`,\"--shiki-dark\":`#D4D4D4`},children:`.`}),_jsx(_components.span,{style:{color:`#1F2328`,\"--shiki-dark\":`#9CDCFE`},children:`connect_link`}),_jsx(_components.span,{style:{color:`#1F2328`,\"--shiki-dark\":`#D4D4D4`},children:`;`})]}),`\n`]})})})})]}),`\n`,_jsx(_components.p,{children:`Send the link to the user. Links expire after 30 minutes.`})]})}function MDXContent(props={}){const{wrapper:MDXLayout}={..._provideComponents(),...props.components};return MDXLayout?_jsx(MDXLayout,{...props,children:_jsx(_createMdxContent,{...props})}):_createMdxContent(props)}return{default:MDXContent};function _missingMdxReference(id,component){throw new Error(`Expected `+(component?`component`:`object`)+\" `\"+id+\"` to be defined: you likely forgot to import, pass, or provide it.\")}","frontmatter":{},"scope":{"config":{},"pageMetadata":{"title":"Set up Nango Auth","sidebarTitle":"Setup guide","description":"Let users connect external accounts from your AI agent, your app, or a link you share","href":"/guides/auth/setup"}}},"mdxSourceWithNoJs":null},"mdxExtracts":{"tableOfContents":[{"title":"Auth from your AI agent","slug":"auth-from-your-ai-agent","depth":2,"children":[]},{"title":"Auth from your app","slug":"auth-from-your-app","depth":2,"children":[]},{"title":"Auth from a link you share","slug":"auth-from-a-link-you-share","depth":2,"children":[]}],"codeExamples":{}},"jsLinks":["/docs/_mintlify/custom/nango/66b2950062f9d11d/custom.js"],"subdomain":"nango","siteName":"Nango Docs","title":"Set up Nango Auth - Nango Docs","navMaps":{"firstHrefInVersion":{},"firstHrefInLanguage":{}},"lastModified":"2026-11-20T16:36:15.260Z","originalFileLocation":"guides/auth/setup.mdx"},"headHtml":"\u003cscript data-mint-head>(function(){var d=document.documentElement,p=null;if(!p){try{p=localStorage.getItem(\"isDarkMode\")}catch(e){}if(p==='true')p='dark';else if(p==='false')p='light';if(p!=='light'\u0026\u0026p!=='dark'\u0026\u0026p!=='system')p=\"system\"}var r=p==='system'?(matchMedia(\"(prefers-color-scheme: dark)\").matches?'dark':'light'):p;d.classList.remove(r==='dark'?'light':'dark');d.classList.add(r);d.setAttribute(\"data-theme-preference\",p)})();\u003c/script>\u003cmeta data-mint-head name=\"description\" content=\"Let users connect external accounts from your AI agent, your app, or a link you share\">\u003cmeta data-mint-head name=\"application-name\" content=\"Nango Docs\">\u003cmeta data-mint-head name=\"generator\" content=\"Mintlify\">\u003clink data-mint-head rel=\"icon\" type=\"image/png\" sizes=\"192x192\" href=\"/docs/mintlify-assets/_mintlify/favicons/nango/H6v9PP50zUaxkdQK/_generated/favicon/android-chrome-192x192.png\" media=\"(prefers-color-scheme: light)\">\u003clink data-mint-head rel=\"apple-touch-icon\" type=\"image/png\" sizes=\"180x180\" href=\"/docs/mintlify-assets/_mintlify/favicons/nango/H6v9PP50zUaxkdQK/_generated/favicon/apple-touch-icon.png\">\u003clink data-mint-head rel=\"icon\" type=\"image/png\" sizes=\"16x16\" href=\"/docs/mintlify-assets/_mintlify/favicons/nango/H6v9PP50zUaxkdQK/_generated/favicon/favicon-16x16.png\" media=\"(prefers-color-scheme: light)\">\u003clink data-mint-head rel=\"icon\" type=\"image/png\" sizes=\"32x32\" href=\"/docs/mintlify-assets/_mintlify/favicons/nango/H6v9PP50zUaxkdQK/_generated/favicon/favicon-32x32.png\" media=\"(prefers-color-scheme: light)\">\u003clink data-mint-head rel=\"shortcut icon\" type=\"image/x-icon\" href=\"/docs/mintlify-assets/_mintlify/favicons/nango/H6v9PP50zUaxkdQK/_generated/favicon/favicon.ico\" media=\"(prefers-color-scheme: light)\">\u003clink data-mint-head rel=\"icon\" type=\"image/png\" sizes=\"192x192\" href=\"/docs/mintlify-assets/_mintlify/favicons/nango/H6v9PP50zUaxkdQK/_generated/favicon-dark/android-chrome-192x192.png\" media=\"(prefers-color-scheme: dark)\">\u003clink data-mint-head rel=\"icon\" type=\"image/png\" sizes=\"16x16\" href=\"/docs/mintlify-assets/_mintlify/favicons/nango/H6v9PP50zUaxkdQK/_generated/favicon-dark/favicon-16x16.png\" media=\"(prefers-color-scheme: dark)\">\u003clink data-mint-head rel=\"icon\" type=\"image/png\" sizes=\"32x32\" href=\"/docs/mintlify-assets/_mintlify/favicons/nango/H6v9PP50zUaxkdQK/_generated/favicon-dark/favicon-32x32.png\" media=\"(prefers-color-scheme: dark)\">\u003clink data-mint-head rel=\"shortcut icon\" type=\"image/x-icon\" href=\"/docs/mintlify-assets/_mintlify/favicons/nango/H6v9PP50zUaxkdQK/_generated/favicon-dark/favicon.ico\" media=\"(prefers-color-scheme: dark)\">\u003cmeta data-mint-head property=\"og:title\" content=\"Set up Nango Auth - Nango Docs\">\u003cmeta data-mint-head property=\"og:description\" content=\"Let users connect external accounts from your AI agent, your app, or a link you share\">\u003cmeta data-mint-head property=\"og:site_name\" content=\"Nango Docs\">\u003cmeta data-mint-head property=\"og:url\" content=\"https://nango.dev/docs/guides/auth/setup\">\u003cmeta data-mint-head property=\"og:type\" content=\"website\">\u003cmeta data-mint-head property=\"og:image\" content=\"https://nango.mintlify.site/docs/_mintlify/api/og/v2?division=Auth\u0026amp;title=Set+up+Nango+Auth\u0026amp;description=Let+users+connect+external+accounts+from+your+AI+agent%2C+your+app%2C+or+a+link+you+share\u0026amp;theme=366169b4fd40d5c7184acf55\u0026amp;signature=db5b632ecf07b5380f5eca21b035e64492bc6fe4bdb2038b6316ba82dcfd9751\">\u003cmeta data-mint-head property=\"og:image:width\" content=\"1200\">\u003cmeta data-mint-head property=\"og:image:height\" content=\"630\">\u003cmeta data-mint-head name=\"twitter:card\" content=\"summary_large_image\">\u003cmeta data-mint-head name=\"twitter:title\" content=\"Set up Nango Auth - Nango Docs\">\u003cmeta data-mint-head name=\"twitter:description\" content=\"Let users connect external accounts from your AI agent, your app, or a link you share\">\u003cmeta data-mint-head name=\"twitter:image\" content=\"https://nango.mintlify.site/docs/_mintlify/api/og/v2?division=Auth\u0026amp;title=Set+up+Nango+Auth\u0026amp;description=Let+users+connect+external+accounts+from+your+AI+agent%2C+your+app%2C+or+a+link+you+share\u0026amp;theme=366169b4fd40d5c7184acf55\u0026amp;signature=db5b632ecf07b5380f5eca21b035e64492bc6fe4bdb2038b6316ba82dcfd9751\">\u003cmeta data-mint-head name=\"twitter:image:width\" content=\"1200\">\u003cmeta data-mint-head name=\"twitter:image:height\" content=\"630\">\u003cmeta data-mint-head name=\"msapplication-config\" content=\"/docs/mintlify-assets/_mintlify/favicons/nango/H6v9PP50zUaxkdQK/_generated/favicon/browserconfig.xml\">\u003cmeta data-mint-head name=\"apple-mobile-web-app-title\" content=\"Nango Docs\">\u003cmeta data-mint-head name=\"msapplication-TileColor\" content=\"#29abe2\">\u003clink data-mint-head rel=\"canonical\" href=\"https://nango.dev/docs/guides/auth/setup\">\u003clink data-mint-head rel=\"alternate\" type=\"application/xml\" href=\"/docs/sitemap.xml\">\u003clink data-mint-head rel=\"alternate\" type=\"text/markdown\" href=\"/docs/guides/auth/setup.md\">\u003cscript data-mint-head type=\"application/ld+json\">{\"@context\":\"https://schema.org\",\"@graph\":[{\"@type\":\"Organization\",\"@id\":\"https://nango.dev/#organization\",\"name\":\"Nango Docs\",\"url\":\"https://nango.dev\",\"logo\":{\"@type\":\"ImageObject\",\"url\":\"https://mintcdn.com/nango/h2zzveDlAs05T6zr/images/Nango-Light-Mode.svg?fit=max\u0026auto=format\u0026n=h2zzveDlAs05T6zr\u0026q=85\u0026s=0c2845b2219705011e11ef4985aa9d91\"}},{\"@type\":\"WebSite\",\"@id\":\"https://nango.dev/docs#website\",\"name\":\"Nango Docs\",\"url\":\"https://nango.dev/docs\",\"publisher\":{\"@id\":\"https://nango.dev/#organization\"}},{\"@type\":\"WebPage\",\"@id\":\"https://nango.dev/docs/guides/auth/setup#webpage\",\"url\":\"https://nango.dev/docs/guides/auth/setup\",\"name\":\"Set up Nango Auth\",\"description\":\"Let users connect external accounts from your AI agent, your app, or a link you share\",\"dateModified\":\"2026-11-20T16:36:15.260Z\",\"isPartOf\":{\"@id\":\"https://nango.dev/docs#website\"},\"breadcrumb\":{\"@id\":\"https://nango.dev/docs/guides/auth/setup#breadcrumb\"}},{\"@type\":\"BreadcrumbList\",\"@id\":\"https://nango.dev/docs/guides/auth/setup#breadcrumb\",\"itemListElement\":[{\"@type\":\"ListItem\",\"position\":1,\"name\":\"Guides\",\"item\":\"https://nango.dev/docs/guides/agent-sessions\"},{\"@type\":\"ListItem\",\"position\":2,\"name\":\"Auth\",\"item\":\"https://nango.dev/docs/guides/auth/overview\"},{\"@type\":\"ListItem\",\"position\":3,\"name\":\"Set up Nango Auth\",\"item\":\"https://nango.dev/docs/guides/auth/setup\"}]},{\"@type\":[\"Article\",\"TechArticle\"],\"@id\":\"https://nango.dev/docs/guides/auth/setup#article\",\"headline\":\"Set up Nango Auth\",\"name\":\"Set up Nango Auth\",\"description\":\"Let users connect external accounts from your AI agent, your app, or a link you share\",\"url\":\"https://nango.dev/docs/guides/auth/setup\",\"mainEntityOfPage\":{\"@id\":\"https://nango.dev/docs/guides/auth/setup#webpage\"},\"dateModified\":\"2026-11-20T16:36:15.260Z\",\"publisher\":{\"@id\":\"https://nango.dev/#organization\"},\"isPartOf\":{\"@id\":\"https://nango.dev/docs#website\"}}]}\u003c/script>\u003cscript data-mint-head type=\"application/ld+json\">{\"@context\":\"https://schema.org\",\"@type\":\"WebSite\",\"name\":\"Nango Docs\",\"publisher\":{\"@type\":\"Organization\",\"name\":\"Nango Docs\"},\"provider\":{\"@type\":\"Organization\",\"name\":\"Mintlify\",\"url\":\"https://mintlify.com\"}}\u003c/script>","agentPointerHref":"/docs/guides/auth/setup.md","siteName":"Nango Docs","nav":{"global":null,"tabs":[{"tab":"Documentation","icon":"book-open","groups":[{"group":"Getting started","pages":[{"title":"Introduction","sidebarTitle":"Introduction","href":"/getting-started/intro-to-nango"},{"title":"Quickstart","sidebarTitle":"🚀 Quickstart","href":"/getting-started/quickstart"},{"title":"Coding agent setup","sidebarTitle":"✨ Coding agent setup","href":"/getting-started/coding-agent-setup"}]},{"group":"Guides","pages":[{"group":"Agent sessions","expanded":false,"pages":[{"title":"Agent sessions","sidebarTitle":"Overview","href":"/guides/agent-sessions"},{"title":"Tenant","sidebarTitle":"Tenant","href":"/guides/agent-sessions/tenant"},{"title":"Toolsets \u0026 tools","sidebarTitle":"Toolsets \u0026 tools","href":"/guides/agent-sessions/toolsets"},{"title":"Meta tools","sidebarTitle":"Meta tools","href":"/guides/agent-sessions/meta-tools"}]},{"group":"Auth","expanded":false,"pages":[{"title":"Auth","sidebarTitle":"Overview","description":"Let users connect their external accounts to your app or agent","href":"/guides/auth/overview"},{"title":"Set up Nango Auth","sidebarTitle":"Setup guide","href":"/guides/auth/setup"},{"title":"Customize Connect UI","sidebarTitle":"Customize Connect UI","description":"Brand Connect UI or build your own auth UI","href":"/guides/auth/customize-connect-ui"},{"title":"Connection tags, config, and metadata","sidebarTitle":"Tags \u0026 configuration","href":"/guides/auth/connection-tags-configuration-metadata"},{"title":"Token refreshing \u0026 validity","sidebarTitle":"Token refreshing \u0026 validity","href":"/guides/auth/token-refreshing"},{"title":"Proxy requests","sidebarTitle":"Proxy requests","href":"/guides/auth/proxy-requests"}]},{"group":"Tools","expanded":false,"pages":[{"title":"Tools","sidebarTitle":"Overview","href":"/guides/tools/overview"},{"title":"Extend and customize tools","sidebarTitle":"Customize tools","href":"/guides/tools/customize-tools"}]},{"group":"Triggers","expanded":false,"pages":[{"title":"Process external webhooks","sidebarTitle":"Overview","href":"/guides/triggers/overview"},{"title":"External webhook forwarding","sidebarTitle":"External webhook forwarding","href":"/guides/triggers/webhook-forwarding"},{"title":"Webhook functions","sidebarTitle":"Webhook functions","href":"/guides/triggers/webhook-functions"}]},{"group":"Syncs","expanded":false,"pages":[{"title":"Sync external API data","sidebarTitle":"Overview","href":"/guides/syncs/overview"},{"title":"Sync function guide","sidebarTitle":"Build a sync","href":"/guides/syncs/sync-functions"},{"title":"Real-time syncs with webhooks","sidebarTitle":"Real-time syncs","href":"/guides/syncs/realtime-syncs"},{"group":"Advanced","expanded":false,"pages":[{"title":"Checkpoints","sidebarTitle":"Checkpoints","href":"/guides/syncs/checkpoints"},{"title":"Sync efficiency","sidebarTitle":"Sync efficiency","href":"/guides/syncs/sync-efficiency"},{"title":"Records cache","sidebarTitle":"Records cache","href":"/guides/syncs/records-cache"},{"title":"Deletion detection","sidebarTitle":"Deletion detection","href":"/guides/syncs/deletion-detection"},{"title":"Sync partitioning","sidebarTitle":"Sync partitioning","href":"/guides/syncs/sync-partitioning"}]}]},{"group":"Platform","expanded":false,"pages":[{"group":"Functions","expanded":false,"pages":[{"title":"Functions guide","sidebarTitle":"Functions guide","href":"/guides/platform/functions/functions-guide"},{"title":"Event functions","sidebarTitle":"Event functions","href":"/guides/platform/functions/event-functions"},{"title":"Storage","sidebarTitle":"Storage","href":"/guides/platform/functions/storage"},{"title":"Function logging","sidebarTitle":"Logging","href":"/guides/platform/functions/logging"},{"title":"Rate limits","sidebarTitle":"Rate limits","href":"/guides/platform/functions/rate-limits"},{"title":"Data validation","sidebarTitle":"Data validation","href":"/guides/platform/functions/data-validation"},{"title":"Testing integrations","sidebarTitle":"Testing","href":"/guides/platform/functions/testing"},{"title":"CI/CD for Nango Functions","sidebarTitle":"CI/CD","href":"/guides/platform/functions/ci-cd"},{"title":"Unified APIs with functions","sidebarTitle":"Unified APIs","href":"/guides/platform/functions/unified-apis"}]},{"title":"Receive webhooks from Nango","sidebarTitle":"Webhooks from Nango","href":"/guides/platform/webhooks-from-nango"},{"title":"Environments","sidebarTitle":"Environments","href":"/guides/platform/environments"},{"title":"Observability","sidebarTitle":"Observability","href":"/guides/platform/observability"},{"title":"Security","sidebarTitle":"Security","href":"/guides/platform/security"},{"title":"Audit trail","sidebarTitle":"Audit trail","href":"/guides/platform/audit-trail"},{"title":"Limits","sidebarTitle":"Limits","href":"/guides/platform/limits"},{"group":"Self-Hosting","pages":[{"title":"Self-host Nango","sidebarTitle":"Overview","href":"/guides/platform/self-hosting/self-hosting"},{"title":"BYOC","sidebarTitle":"BYOC","href":"/guides/platform/self-hosting/byoc"},{"title":"Self-Managed","sidebarTitle":"Self-Managed","href":"/guides/platform/self-hosting/self-managed"}]},{"group":"Migrations","pages":[{"title":"Migrate to checkpoints","sidebarTitle":"Migrate to checkpoints","href":"/guides/platform/migrations/migrate-to-checkpoints"},{"title":"Migrate from end user","sidebarTitle":"Migrate from end user","href":"/guides/platform/migrations/migrate-from-end-user"},{"title":"Migrate from public key","sidebarTitle":"Migrate from public key","href":"/guides/platform/migrations/migrate-from-public-key"},{"title":"Migrate from Connection MCP to agent sessions","sidebarTitle":"Migrate from Connection MCP","href":"/guides/platform/migrations/migrate-from-connection-mcp"},{"title":"Migrate from actions to tools","sidebarTitle":"Actions to tools","href":"/guides/platform/migrations/migrate-from-actions"}]},{"title":"Contributing to Nango","sidebarTitle":"Contributing","href":"/contributing"}]}]},{"group":"Reference","pages":[{"group":"Frontend","pages":[{"title":"Frontend SDK","sidebarTitle":"Frontend SDK","icon":"js","href":"/reference/frontend/frontend-sdk"}]},{"group":"Backend","pages":[{"group":"HTTP API","icon":"cloud","pages":[{"title":"API keys","sidebarTitle":"API keys","href":"/reference/backend/http-api/api-keys"},{"title":"Authentication","href":"/reference/backend/http-api/authentication"},{"title":"Rate limits","href":"/reference/backend/http-api/rate-limits"},{"group":"Environments","pages":[{"title":"List environments","openapi":"GET /environments","href":"/reference/backend/http-api/environments/list"},{"title":"Get an environment","openapi":"GET /environments/{environmentUuid}","href":"/reference/backend/http-api/environments/get"},{"title":"Create an environment","openapi":"POST /environments","href":"/reference/backend/http-api/environments/create"},{"title":"Update an environment","openapi":"PATCH /environments/{environmentUuid}","href":"/reference/backend/http-api/environments/update"},{"title":"Delete an environment","openapi":"DELETE /environments/{environmentUuid}","href":"/reference/backend/http-api/environments/delete"},{"title":"List environment API keys","openapi":"GET /environments/{environmentUuid}/api-keys","href":"/reference/backend/http-api/environments/list-api-keys"},{"title":"Get an environment API key","openapi":"GET /environments/{environmentUuid}/api-keys/{keyUuid}","href":"/reference/backend/http-api/environments/get-api-key"},{"title":"Create an environment API key","openapi":"POST /environments/{environmentUuid}/api-keys","href":"/reference/backend/http-api/environments/create-api-key"},{"title":"Update an environment API key","openapi":"PATCH /environments/{environmentUuid}/api-keys/{keyUuid}","href":"/reference/backend/http-api/environments/update-api-key"},{"title":"Delete an environment API key","openapi":"DELETE /environments/{environmentUuid}/api-keys/{keyUuid}","href":"/reference/backend/http-api/environments/delete-api-key"},{"title":"Rotate the webhook signing key","openapi":"POST /environment/webhook-signing-key/rotate","href":"/reference/backend/http-api/environments/rotate-webhook-signing-key"}]},{"group":"Integrations","pages":[{"title":"List all integrations","openapi":"GET /integrations","href":"/reference/backend/http-api/integration/list"},{"title":"Get an integration","openapi":"GET /integrations/{uniqueKey}","href":"/reference/backend/http-api/integration/get"},{"title":"Create an integration","openapi":"POST /integrations","href":"/reference/backend/http-api/integration/create"},{"title":"Update an integration","openapi":"PATCH /integrations/{uniqueKey}","href":"/reference/backend/http-api/integration/update"},{"title":"Delete an integration","openapi":"DELETE /integrations/{uniqueKey}","href":"/reference/backend/http-api/integration/delete"}]},{"group":"Connect","pages":[{"title":"Create a connect session","openapi":"POST /connect/sessions","href":"/reference/backend/http-api/connect/sessions/create"},{"title":"Create a reconnect session","openapi":"POST /connect/sessions/reconnect","href":"/reference/backend/http-api/connect/sessions/reconnect"},{"title":"Get a connect session","openapi":"GET /connect/session","href":"/reference/backend/http-api/connect/session/get"},{"title":"Delete a connect session","openapi":"DELETE /connect/session","href":"/reference/backend/http-api/connect/session/delete"}]},{"group":"Connections","pages":[{"title":"Import a connection","openapi":"POST /connections","href":"/reference/backend/http-api/connections/post"},{"title":"List connections","openapi":"GET /connections","href":"/reference/backend/http-api/connections/list"},{"title":"Get connection \u0026 credentials","openapi":"GET /connections/{connectionId}","href":"/reference/backend/http-api/connections/get"},{"title":"Patch a connection","openapi":"PATCH /connections/{connectionId}","href":"/reference/backend/http-api/connections/patch"},{"title":"Set connection metadata","openapi":"POST /connections/metadata","href":"/reference/backend/http-api/connections/set-metadata"},{"title":"Edit connection metadata","openapi":"PATCH /connections/metadata","href":"/reference/backend/http-api/connections/update-metadata"},{"title":"Delete a connection","openapi":"DELETE /connections/{connectionId}","href":"/reference/backend/http-api/connections/delete"}]},{"group":"Functions","pages":[{"title":"List functions","openapi":"GET /integrations/{uniqueKey}/functions","href":"/reference/backend/http-api/functions/list"},{"title":"Get a function","openapi":"GET /integrations/{uniqueKey}/functions/{name}","href":"/reference/backend/http-api/functions/get"},{"title":"Get a function's source code","openapi":"GET /integrations/{uniqueKey}/functions/{name}/code","href":"/reference/backend/http-api/functions/code"},{"title":"Delete a function","openapi":"DELETE /integrations/{uniqueKey}/functions/{name}","href":"/reference/backend/http-api/functions/delete"},{"title":"Compile a function","openapi":"POST /functions/compile","href":"/reference/backend/http-api/functions/compile"},{"title":"Dry run a function","openapi":"POST /functions/dryruns","href":"/reference/backend/http-api/functions/dryruns-create"},{"title":"Get dry run results","openapi":"GET /functions/dryruns/{id}","href":"/reference/backend/http-api/functions/dryruns-get"},{"title":"Create a function deployment","openapi":"POST /functions/deployments","href":"/reference/backend/http-api/functions/deployments-create"},{"title":"Get a function deployment","openapi":"GET /functions/deployments/{id}","href":"/reference/backend/http-api/functions/deployments-get"},{"title":"Get legacy integration functions config","openapi":"GET /scripts/config","href":"/reference/backend/http-api/scripts/config"}]},{"group":"Syncs","pages":[{"title":"Get records","sidebarTitle":"Get records","openapi":"GET /records","href":"/reference/backend/http-api/sync/records-list"},{"title":"Prune records","sidebarTitle":"Prune records","openapi":"PATCH /records/prune","href":"/reference/backend/http-api/sync/prune-records"},{"title":"Trigger sync(s)","openapi":"POST /sync/trigger","href":"/reference/backend/http-api/sync/trigger"},{"title":"Start sync(s)","openapi":"POST /sync/start","href":"/reference/backend/http-api/sync/start"},{"title":"Pause sync(s)","openapi":"POST /sync/pause","href":"/reference/backend/http-api/sync/pause"},{"title":"Sync status","openapi":"GET /sync/status","href":"/reference/backend/http-api/sync/status"},{"title":"Override sync connection frequency","openapi":"PUT /sync/update-connection-frequency","href":"/reference/backend/http-api/sync/update-connection-frequency"},{"title":"Get environment variables","openapi":"GET /environment-variables","href":"/reference/backend/http-api/sync/environment-variables"},{"title":"Create sync variant","sidebarTitle":"Create variant","openapi":"POST /sync/{name}/variant/{variant}","href":"/reference/backend/http-api/sync/create-variant"},{"title":"Delete sync variant","sidebarTitle":"Delete variant","openapi":"DELETE /sync/{name}/variant/{variant}","href":"/reference/backend/http-api/sync/delete-variant"}]},{"group":"Tools","pages":[{"title":"Call a tool","openapi":"POST /connections/{connectionId}/tools/{name}/calls","href":"/reference/backend/http-api/tools/call"}]},{"group":"Actions (deprecated)","pages":[{"title":"Trigger an action (deprecated)","openapi":"POST /action/trigger","href":"/reference/backend/http-api/action/trigger"}]},{"group":"Proxy","pages":[{"title":"Proxy - GET requests","sidebarTitle":"Proxy - GET requests","openapi":"GET /proxy/{anyPath}","href":"/reference/backend/http-api/proxy/get"},{"title":"Proxy - POST requests","sidebarTitle":"Proxy - POST requests","openapi":"POST /proxy/{anyPath}","href":"/reference/backend/http-api/proxy/post"},{"title":"Proxy - PUT requests","sidebarTitle":"Proxy - PUT requests","openapi":"PUT /proxy/{anyPath}","href":"/reference/backend/http-api/proxy/put"},{"title":"Proxy - PATCH requests","sidebarTitle":"Proxy - PATCH requests","openapi":"PATCH /proxy/{anyPath}","href":"/reference/backend/http-api/proxy/patch"},{"title":"Proxy - DELETE requests","sidebarTitle":"Proxy - DELETE requests","openapi":"DELETE /proxy/{anyPath}","href":"/reference/backend/http-api/proxy/delete"}]},{"group":"Providers","pages":[{"title":"List all providers","openapi":"GET /providers","href":"/reference/backend/http-api/providers/list"},{"title":"Get a provider","openapi":"GET /providers/{provider}","href":"/reference/backend/http-api/providers/get"},{"title":"List provider templates","openapi":"GET /providers/{provider}/templates","href":"/reference/backend/http-api/providers/templates"}]}]},{"group":"Backend SDK","icon":"cubes","pages":[{"title":"Node","sidebarTitle":"Node","icon":"node","href":"/reference/backend/backend-sdk/node"},{"title":"Python","sidebarTitle":"Python","icon":"python","href":"/reference/backend/backend-sdk/python"},{"title":"Java","sidebarTitle":"Java","icon":"java","href":"/reference/backend/backend-sdk/java"},{"title":"Ruby","sidebarTitle":"Ruby","icon":"gem","href":"/reference/backend/backend-sdk/ruby"},{"title":"Go","sidebarTitle":"Go","icon":"golang","href":"/reference/backend/backend-sdk/go"},{"title":"Rust","sidebarTitle":"Rust","icon":"rust","href":"/reference/backend/backend-sdk/rust"},{"title":"PHP","sidebarTitle":"PHP","icon":"php","href":"/reference/backend/backend-sdk/php"}]},{"title":"Management MCP","sidebarTitle":"Management MCP","icon":"https://mintlify.s3.us-west-1.amazonaws.com/nango/images/mcp.svg","href":"/reference/backend/management-mcp"}]},{"group":"Functions","pages":[{"title":"Functions CLI","sidebarTitle":"Functions CLI","icon":"terminal","href":"/reference/functions/functions-cli"},{"title":"Functions SDK","sidebarTitle":"Functions SDK","icon":"code","href":"/reference/functions/functions-sdk"}]}]}]},{"tab":"APIs \u0026 Integrations","icon":"plug","pages":[{"title":"APIs \u0026 Integrations","href":"/integrations/overview"}]},{"tab":"Changelog","icon":"bolt","pages":[{"title":"Changelog","href":"/updates/changelog"}]},{"tab":"Support","icon":"slack","href":"https://nango.dev/slack"}]},"basePath":"","title":"Set up Nango Auth - Nango Docs","deploymentId":"dpl_C8nwD4Qo785i7PBDK32YZuKGR9Lm","buildId":"dpl_C8nwD4Qo785i7PBDK32YZuKGR9Lm","dynamics":["07c022d89b","a74be98ba7"],"chunks":["Frame-D46jU1p0.js","DynamicMarkdown-3piqoEk_.js","zoom-image-lightbox-D3qO54s_.js","lightbox-handle-r17bVUz3.js"]}