Custom objects are user-defined data models that extend a CRM or ERP beyond its standard schema. When your enterprise customers connect their CRMs and ERPs, they expect your product to handle this custom data. Not just standard contacts and deals, but custom objects like Implementation_Tracker__c in Salesforce, custom subscription objects in HubSpot, and custom record types in NetSuite. Every customer’s schema is different, and your API integrations need to adapt to each one.
This guide walks through three steps to building integrations that handle custom objects and field mappings: discovering what exists on the customer’s schema, letting them configure how data maps into your product, and syncing it reliably at scale. For a comparison of platforms that help with this, see the best embedded integrations platform for custom objects and field mappings.
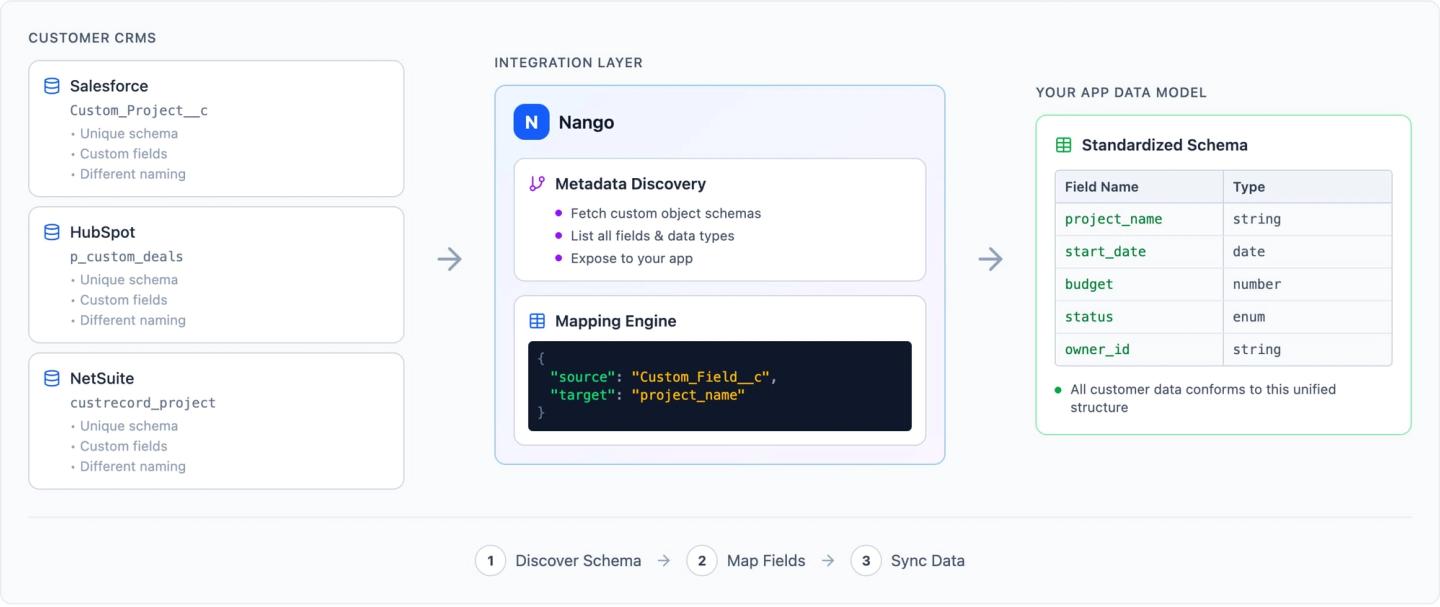
Step 1: Discover the customer’s schema
Before you can sync a custom object, you need to know it exists. Every CRM and ERP exposes a metadata API that lets you list available objects and inspect their fields. The pattern is the same across systems:
- List objects to discover what the customer has defined (standard and custom).
- Describe each object to get field names, labels, types, picklist values, and relationships.
For example, in Salesforce, custom objects are identified by the __c suffix and discovered via the DescribeGlobal endpoint. HubSpot exposes custom objects through its Object Schemas API, and custom properties on standard objects via the Properties API.
Caching and refreshing schema metadata:
Schema metadata changes infrequently, but checking it on every sync wastes API calls. Cache the schema per customer and refresh on a schedule (hourly or daily).
Not every system supports push notifications for schema changes. Some (like HubSpot) offer webhook subscriptions for property changes, but most (including Salesforce and NetSuite) require you to poll the metadata API and diff against your cached version.
Step 2: Let customers configure field mappings
Once you know the customer’s schema, they need a way to select which custom objects and fields to sync, and how to map them to your product’s data model. This mapping is rarely straightforward.
Implementation approaches
There are three broad approaches to implementing field mapping logic, each with different tradeoffs:
- Declarative mapping (UI-based) lets users configure source-to-target field pairs through a UI or configuration file. This is the simplest model and what most integration platforms (Merge, Paragon, Ampersand) offer out of the box. It works well for 1:1 field mappings but breaks down when transformations get complex.
- Per-field code transformers attach a small function to each field mapping. The function handles type coercion, formatting, or simple merges. This gives more flexibility than pure declarative mapping while keeping each transformation isolated and testable.
- Full code-level transformation treats the entire mapping as a function that takes a source record and returns a target record. This is the most flexible approach and the only one that handles complex cases cleanly: conditional logic, cross-field dependencies, and multi-step transformations. The tradeoff is that it requires code, not just configuration. However, AI Coding Agents can now make this quick and easy to implement. In practice, custom objects push you toward code-level transformation quickly. A customer’s schema often has fields that need conditional logic or cross-field dependencies that declarative mapping can’t express. Ideally, your platform supports a mix: declarative for simple cases, code for the rest.
Common mapping patterns
- 1:1 field mapping is the simplest case. A customer’s
Region__cfield in Salesforce maps directly to aregionfield in your product. - Merging multiple fields is common in practice. A customer might need
First_Name__candLast_Name__ccombined into afull_name, orStreet__c,City__c, andState__cconcatenated into anaddressfield. - Enum mapping handles cases where a customer’s picklist values need to map to a fixed set of values in your system. Their Salesforce picklist has “Enterprise”, “Mid-Market”, “SMB”, while your product expects “tier_1”, “tier_2”, “tier_3”.
- Type coercion is unavoidable. A field might be a string in Salesforce but a number in your system, or a multi-select picklist that needs to be converted to an array.
Key design decisions
- Required vs. optional fields: Your mapping UI should indicate to customers which target fields must be mapped before the integration can run.
- Default values: Decide whether unmapped or empty source fields use a default value, skip the record, or flag it as incomplete.
- Per-customer storage: Every customer has a different schema, so each customer’s mapping configuration must be stored separately and applied at sync time. For example, Customer A might map their Salesforce
Region__cfield to yourregionfield, while Customer B maps a completely different custom field.
A simple way to store this is as a JSON object per customer:
{
  "objectName": "Account",
  "fieldMapping": {
    "Region__c": "region",
    "Customer_Tier__c": "tier",
    "Annual_Revenue__c": "revenue"
  }
}- This tells the sync which source object to query (
objectName) and how to translate each source field to a target field in your product (fieldMapping). For more complex cases (merges, enum translations, type coercion), extend the structure with a mapping type and additional parameters per field.
Step 3: Sync custom object data at scale
Custom object datasets in enterprise orgs can be large. A Salesforce org tracking manufacturing orders might have millions of records in a single custom object. Your sync needs to handle pagination, incremental updates, and failures gracefully.
Incremental sync
Full syncs are expensive. Use incremental sync to fetch only records that have changed since the last run. Most CRMs and ERPs support filtering by a last-modified timestamp. The general pattern is: query for records with a modified date after your last sync checkpoint, paginate through the results, and store the latest timestamp for the next run.
Rate limits
Every provider enforces rate limits, and your sync logic needs to respect them or risk throttling mid-export. Rate limits vary widely: some systems cap requests per second, others per day, and some limit concurrent connections. Build retry logic with backoff, and consider separating initial bulk loads from ongoing incremental syncs so a large first sync doesn’t exhaust the customer’s API budget.
Durable execution and checkpointing
A sync that processes millions of records can fail midway through due to network errors, rate limits, or timeouts. Without durability, you have to restart from the beginning.
Durable execution (sometimes called durable functions) is the pattern of persisting a function’s progress so it can resume after failure. In the context of data syncs, this means saving a checkpoint after each batch: the last processed record ID, the latest timestamp, or a cursor. If the sync crashes, it resumes from the last checkpoint instead of reprocessing everything.
Where custom object integrations break
- Schema drift: Customers rename fields (
Region__cbecomesSales_Region__c), add required fields, or delete objects your sync depends on. Poll the metadata API on a schedule, diff against your cached schema, and surface changes. A sync should fail with a clear error rather than silently dropping data. - Permission gaps: Your integration’s OAuth token inherits the authorizing user’s permissions. If that user can’t see a custom object, the describe call won’t return it. The user who authorizes the integration needs read access to all custom objects and fields being synced.
- Large initial syncs exhausting API budgets: A single custom object can hold 500,000+ records with 50 fields each. Show customers an estimated record count before the first sync. Use Bulk API for initial loads and switch to incremental sync for ongoing updates.
- Sandbox schemas diverging from production: Salesforce full-copy sandboxes replicate the production schema but contain limited data. Developer sandboxes have the schema but almost no data. Test your schema discovery and field mapping logic against production-like configurations before going live.
Writing data back to custom objects
The steps above focus on reading custom object data from a CRM or ERP into your product. In practice, most integrations also need to write data back: updating a deal stage, creating a record in a custom object, or pushing enriched data from your product into the customer’s CRM.
The field mapping works in reverse. Your product’s internal fields map back to the customer’s custom fields using the same per-customer configuration. The same challenges apply: type coercion, required field validation, and enum translation all need to be handled in the opposite direction.
Key differences from reads:
- Conflict resolution: If both your product and the CRM can modify the same record, you need a strategy for handling conflicts. Common approaches include last-write-wins, field-level merge, or flagging conflicts for the customer to resolve.
- Validation before write: The target system may enforce constraints (required fields, picklist values, field-level security) that your source data doesn’t satisfy. Validate against the cached schema before attempting the write, and surface clear errors when a record can’t be mapped.
- Partial failures: A batch write may succeed for some records and fail for others. Track per-record success/failure and retry only the failed records.
Implementing custom CRM/ERP object syncs with Nango
Nango is an open-source, code-first integration platform that provides a unified interface for auth, data syncs, tool calls, and webhooks across 900+ APIs. Integrations are defined as functions in your codebase, deployed through CI/CD, and can be built or modified with any AI coding agent.
Here’s how to implement the full three-step pattern end-to-end with Nango. Let’s take a concrete example: a SaaS analytics platform that needs to sync custom CRM data from each customer’s Salesforce org.
1. Create a free Nango account
Sign up for a free Nango account. The free tier supports development and testing with no time limit.
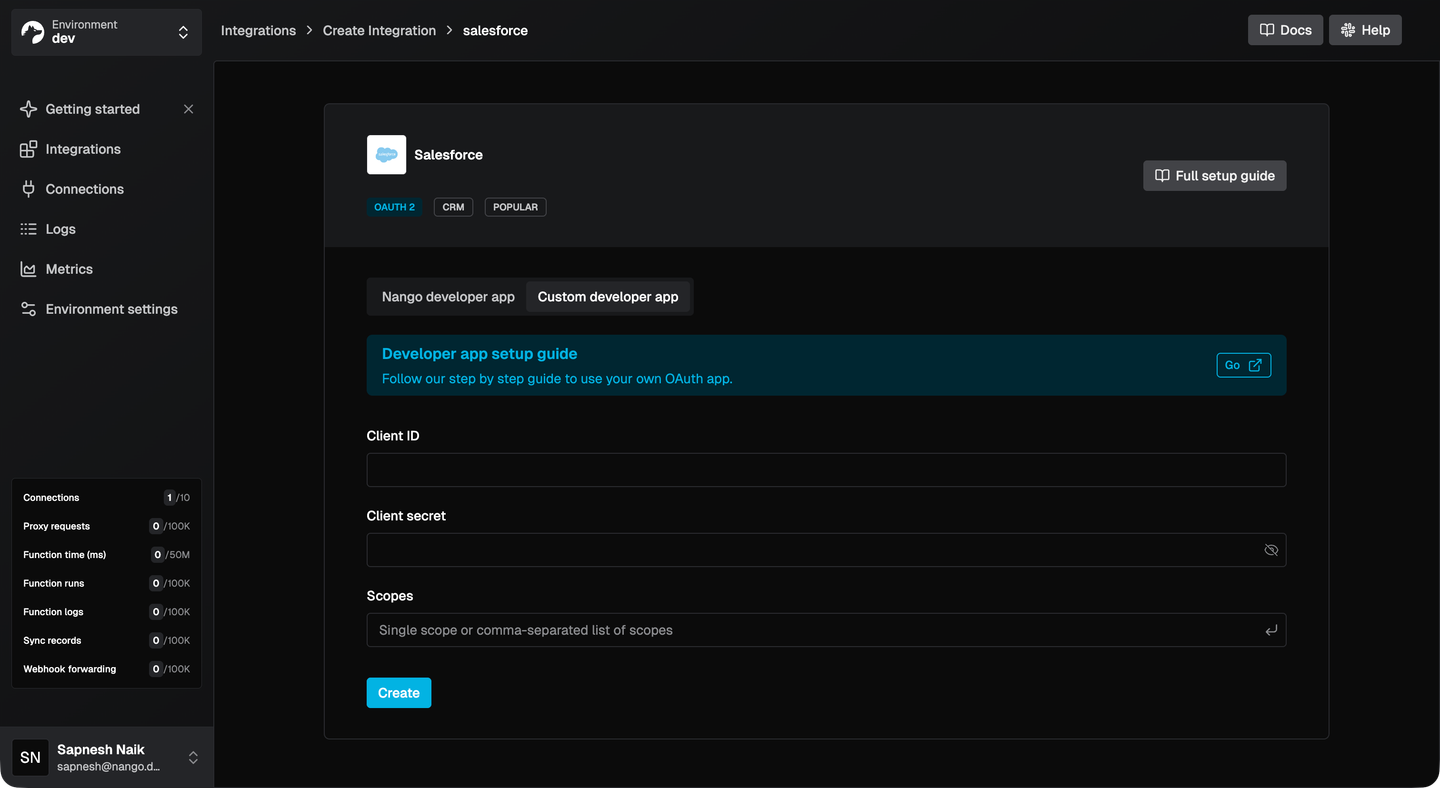
2. Configure Salesforce as an integration
In the Nango dashboard, go to Integrations > Configure New Integration and select Salesforce. Enter the Client ID and Client Secret from your Salesforce Connected App. If you don’t have your own Connected App credentials yet, you can use Nango’s built-in developer credentials to get started quickly and swap them in later.
Nango has pre-built auth for 900+ APIs, so adding other CRMs or ERPs later follows the same flow.
3. Let customers connect their Salesforce org
Install the Nango SDKs (npm install @nangohq/frontend @nangohq/node) and add Nango Connect to your frontend. This opens a pre-built auth UI where your customers authorize their Salesforce org.
Backend: Create a connect session:
import { Nango } from '@nangohq/node';
const nango = new Nango({ secretKey: process.env.NANGO_SECRET_KEY });

const { data } = await nango.createConnectSession({
  end_user: { id: '<END-USER-ID>', email: '<EMAIL>' },
  organization: { id: '<ORG-ID>' },
  allowed_integrations: ['salesforce']
});
res.json({ sessionToken: data.token });
Frontend: Open the Connect UI:
import Nango from '@nangohq/frontend';
const nango = new Nango({ connectSessionToken: sessionToken });

nango.openConnectUI({
  onEvent: (event) => {
    if (event.type === 'connect') { /* auth successful, proceed to schema discovery */ }
  }
});
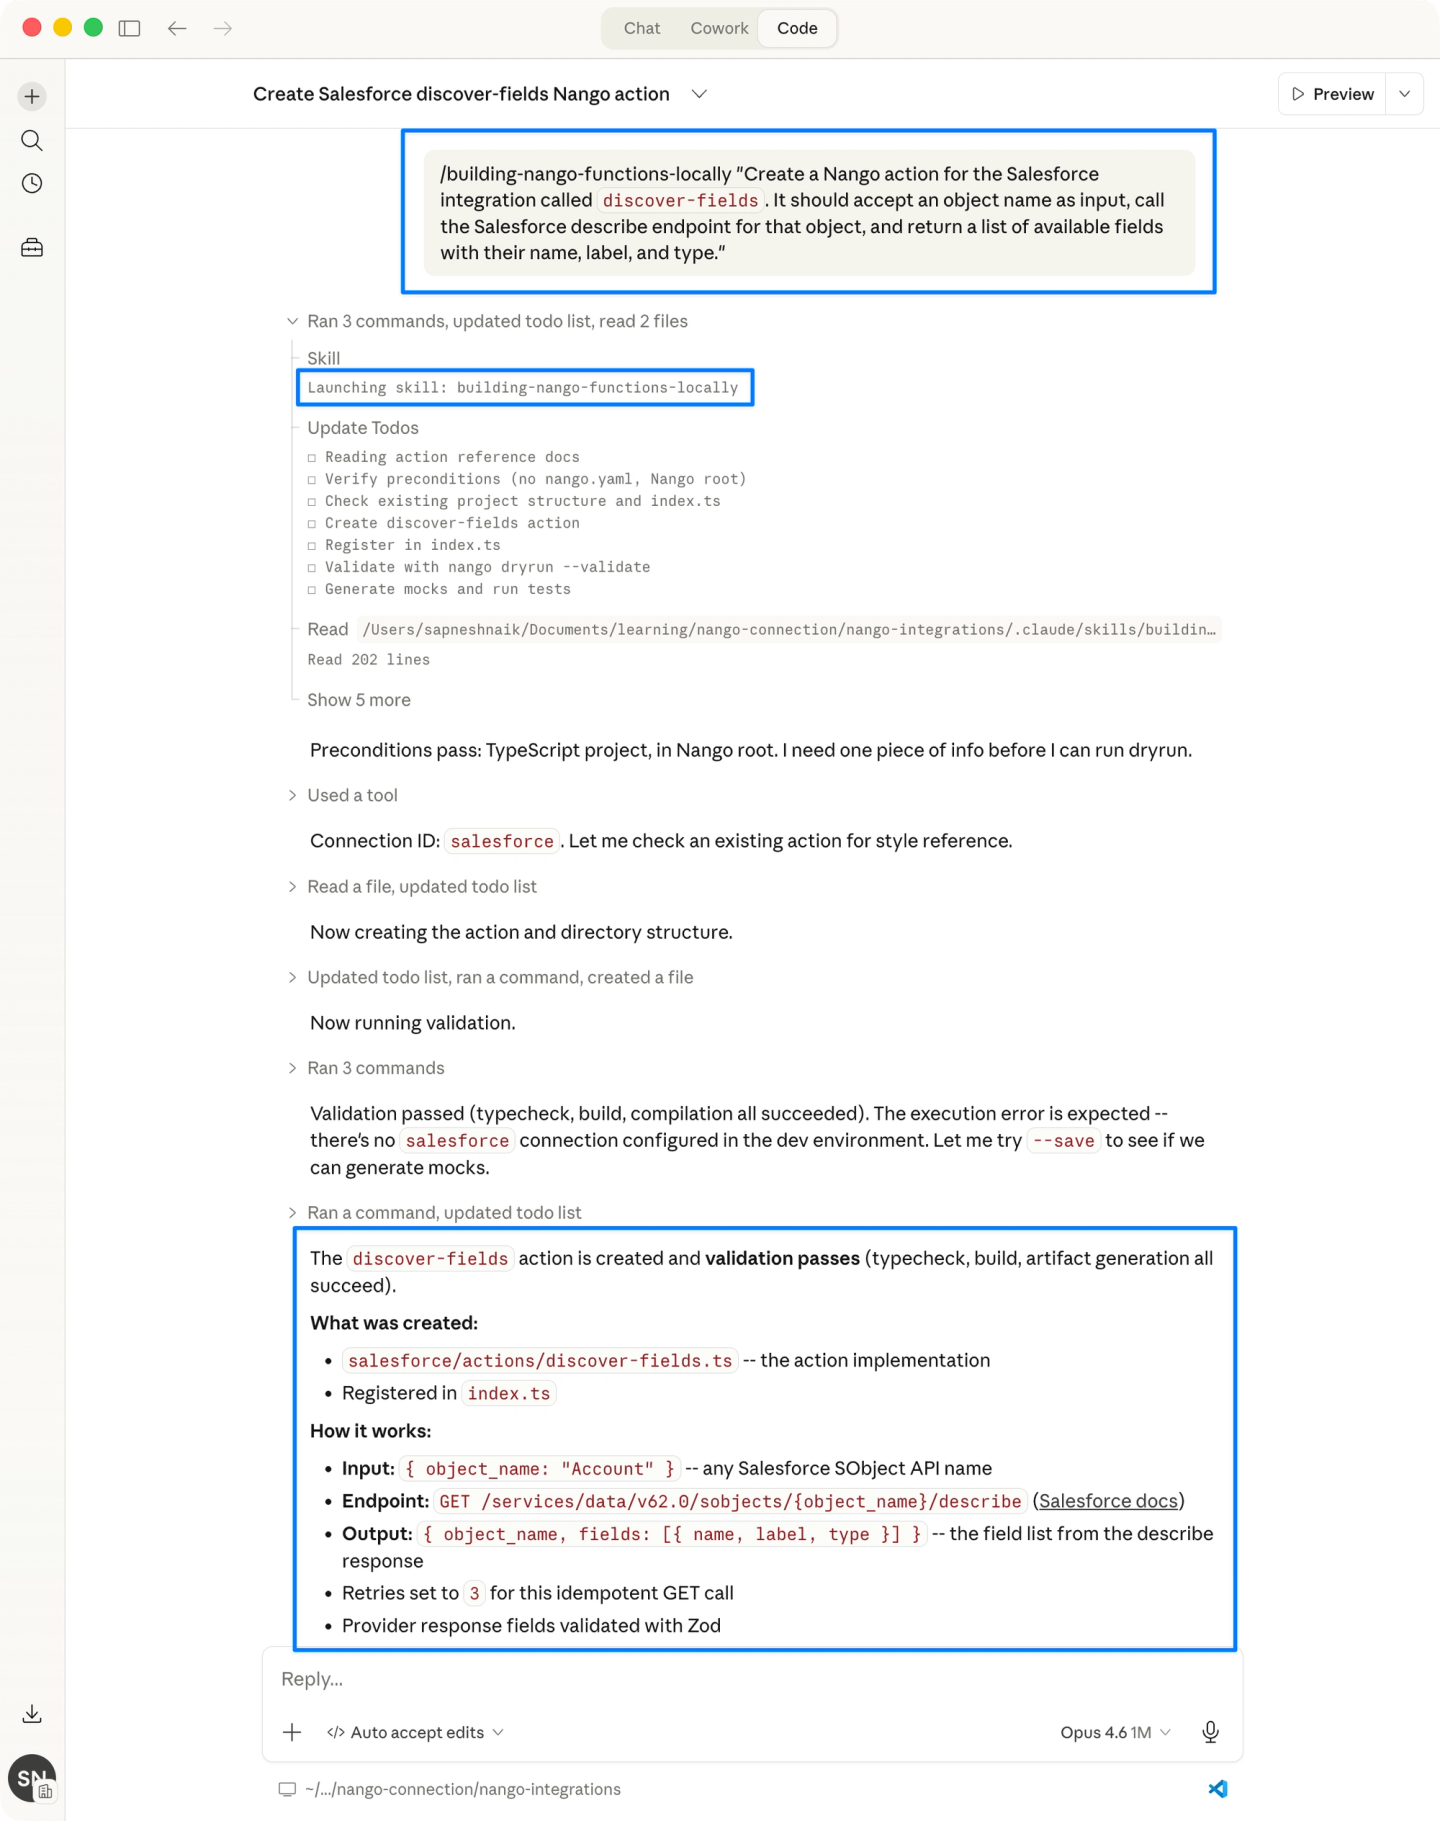
4. Discover the customer’s schema
Use the Nango CLI to scaffold an action that discovers the customer’s Salesforce schema. If you’re using the Nango AI Integration Builder with Claude Code, Cursor, or similar, you can generate the action with a prompt like:
“Create a Nango action for the Salesforce integration called discover-fields. It should accept an object name as input, call the Salesforce describe endpoint for that object, and return a list of available fields with their name, label, and type.”The generated action will look something like this:
export default createAction({
  input: z.object({ objectName: z.string() }),
  output: z.object({
    fields: z.array(z.object({
      name: z.string(),
      label: z.string(),
      type: z.string()
    }))
  }),
  exec: async (nango, input) => {
    const res = await nango.get({
      endpoint: `/services/data/v59.0/sobjects/${input.objectName}/describe`
    });
    return {
      fields: res.data.fields.map((f: any) => ({
        name: f.name, label: f.label, type: f.type
      }))
    };
  }
});
Trigger the action from your backend to get the customer’s available fields:
const result = await nango.triggerAction('salesforce', '<CONNECTION_ID>', 'discover-fields', {
  objectName: 'Implementation_Tracker__c'
});
Use the returned fields to populate a field mapping UI in your product. Show the customer’s Salesforce fields on one side and your product’s target fields on the other, letting them select how each field maps.
5. Store the customer’s field mapping as connection metadata
This is the key pattern for custom object integrations: every customer has a different schema, so each customer’s mapping must be stored separately and applied at sync time. Nango solves this with connection metadata, a per-connection key-value store that your sync functions can read at runtime.
After the customer configures their mapping in your UI, save it on their connection:
await nango.setMetadata('salesforce', '<CONNECTION_ID>', {
  fieldMapping: { 'Region__c': 'region', 'Customer_Tier__c': 'tier', 'Status__c': 'status' },
  objectName: 'Implementation_Tracker__c'
});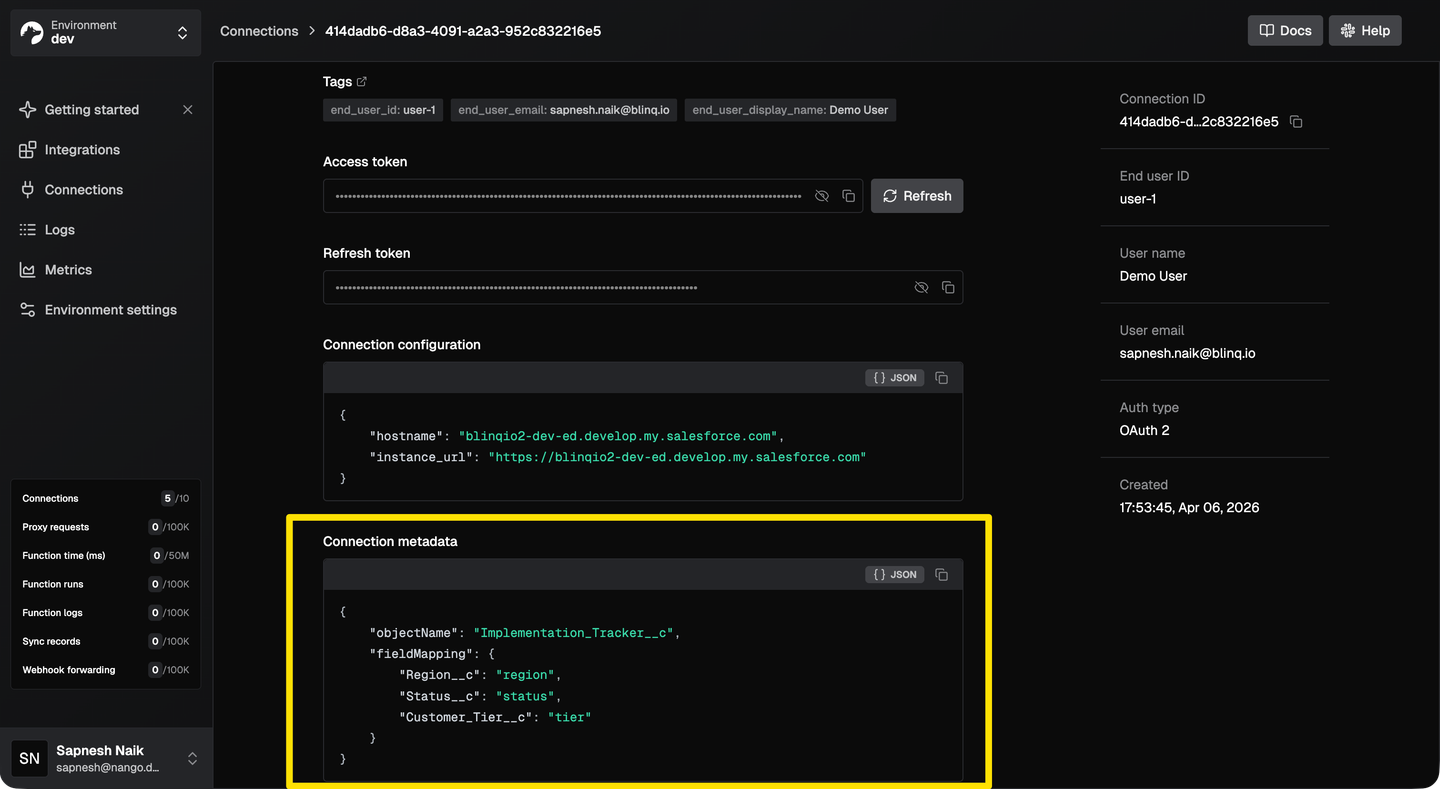
Customer A might map their Salesforce Region__c to your region field, while Customer B maps a completely different custom field. Connection metadata keeps each customer’s configuration isolated, and the sync function reads it at runtime to apply the right transformation.
6. Create a durable sync with checkpointing
Use the Nango CLI to scaffold a sync, or generate it with the AI Integration Builder:
Prompt:
“Create a Nango sync for the Salesforce integration called sync-custom-objects. It should read the field mapping and object name from connection metadata, query Salesforce using SOQL with incremental sync via LastModifiedDate, apply the field mapping to transform records, and use checkpointing for resumability.”The generated sync with durable checkpointing:
export default createSync({
  frequency: 'every hour',
  checkpoint: z.object({ lastModifiedISO: z.string() }),
  exec: async (nango) => {
    const metadata = await nango.getMetadata();
    const { fieldMapping, objectName } = metadata;
    const checkpoint = await nango.getCheckpoint();

    const records = await fetchRecords(nango, objectName, checkpoint?.lastModifiedISO);
    const mapped = records.map(record => {
      const result: Record<string, any> = {};
      for (const [source, target] of Object.entries(fieldMapping)) {
        result[target] = record[source];
      }
      return result;
    });

    await nango.batchSave(mapped, 'CrmRecord');
    await nango.saveCheckpoint({ lastModifiedISO: records.at(-1).lastModifiedISO });
  }
});
If the sync fails midway through a large export, it resumes from the last checkpoint. Each customer’s sync runs in isolation, so one enterprise customer’s large sync won’t affect others.
7. Retrieve synced data in your app
Pull synced records into your application using the Node SDK:
const { records, next_cursor } = await nango.listRecords({
  providerConfigKey: 'salesforce',
  connectionId: '<CONNECTION_ID>',
  model: 'CrmRecord'
});
Records include _nango_metadata with last_modified_at, first_seen_at, and deleted_at fields. Pass cursor on subsequent calls to fetch only records that changed since your last read.
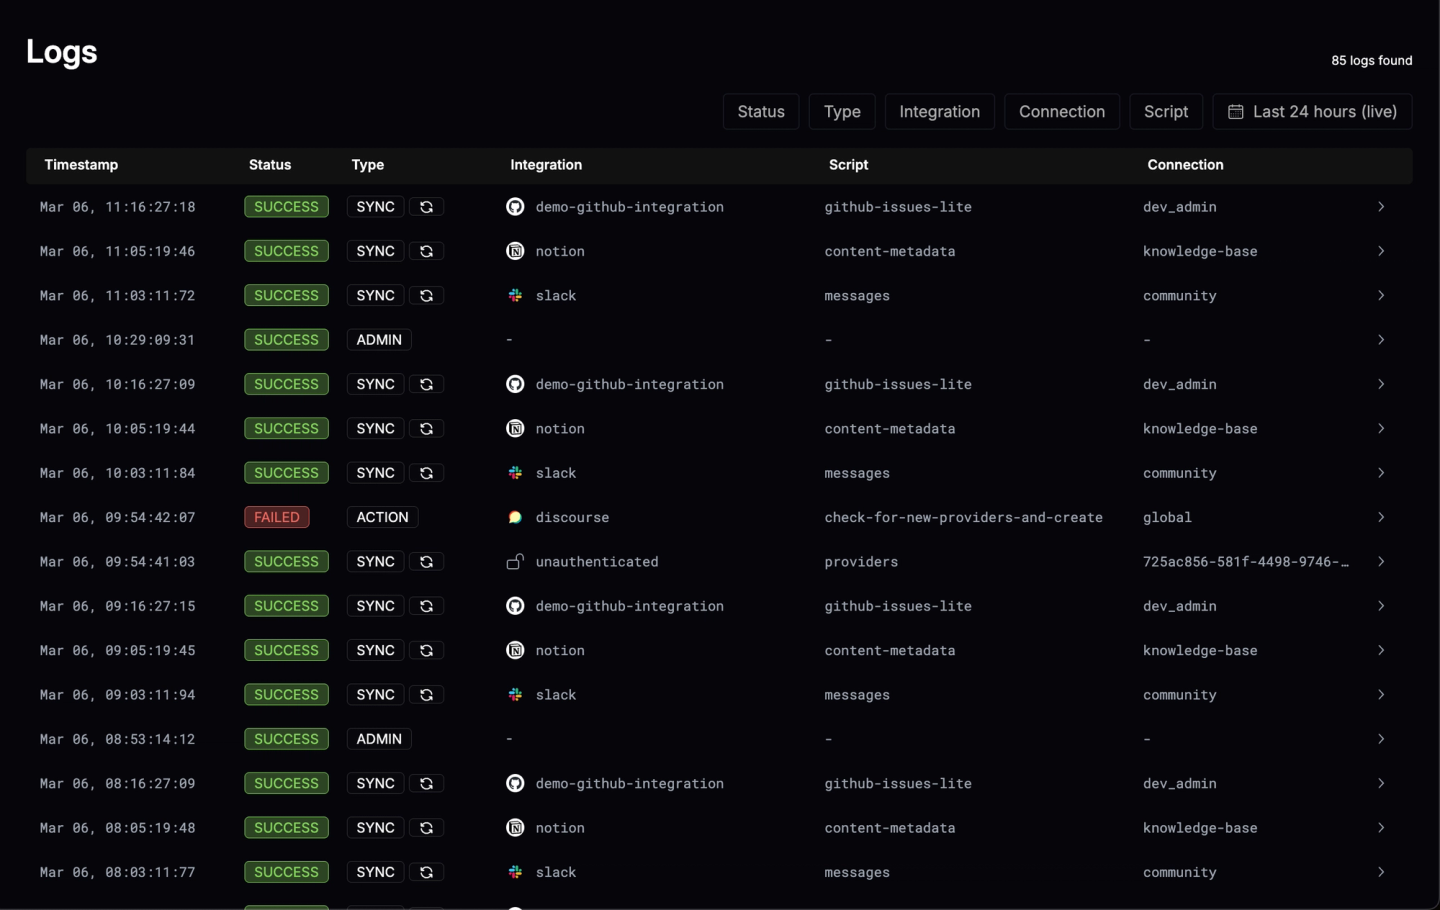
8. Monitor syncs with built-in observability
Every API request and sync run produces structured logs in Nango. You can inspect exactly what was sent to the external API and what came back, trace per-customer sync history, and export telemetry via OpenTelemetry to your existing monitoring stack.
FAQ
How do I handle a customer whose CRM schema changes after initial setup?
Poll the CRM’s metadata API on a schedule and compare against your cached schema. When fields are added, prompt the customer to update their mapping. When fields are removed or renamed, pause the sync and notify the customer rather than silently dropping data. If you’re using Nango, see the docs on customer configuration for how to update connection metadata when mappings change.
Should I use the Bulk API or REST API for Salesforce custom object syncs?
Use SOQL via the REST API for incremental syncs with small result sets (under a few thousand records). Use Bulk API 2.0 for initial full syncs or any query returning more than a few thousand records. Bulk API has separate rate limits (15,000 batches/24h, 100M records/24h) and is designed for high-volume data retrieval.
What permissions does the authorizing user need for custom object access?
The integration inherits the permissions of the user who completes the OAuth flow. As a general rule, the authorizing user needs read (and write, if applicable) access to every custom object and field the integration will touch. The exact permission model varies by system: some use object-level permissions, others use role-based access, and most require specific OAuth scopes for custom object access. Check each provider’s documentation for the current requirements, as these change frequently. If you’re using Nango, see the docs on configuring auth scopes to request the right permissions during the OAuth flow.
How do I build a field mapping UI for my customers?
Use the schema discovery step to fetch available fields, then present them in your product’s UI alongside your target fields. Let customers select source-to-target mappings, specify merge rules, and set enum translations. Store the configuration per customer and apply it at sync time. With Nango, you use actions to fetch the schema, store the mapping as connection metadata, and apply it in your sync function. The mapping logic lives in code you control, so merges, enum translations, and type coercion work however your product needs them to.
Conclusion
Building API integrations with custom objects and field mappings requires solving three connected problems: discovering the customer’s schema, letting them configure how their data maps to yours, and syncing that data reliably at scale.
With Nango, the heavy lifting is handled for you: actions fetch schema metadata, connection metadata stores per-customer field mappings, and syncs with built-in checkpointing handle incremental data pulls across Salesforce, HubSpot, NetSuite, and 900+ other APIs. The AI Integration Builder can scaffold the integration code from a prompt, so you go from zero to a working custom object sync in minutes rather than weeks.
The ongoing complexity is where most custom integrations break down: schemas that change, permissions that shift, and data volumes that grow. Nango handles this infrastructure so the integration code stays focused on your product’s mapping logic.
Related reading: