> ## Documentation Index
> Fetch the complete documentation index at: https://nango.dev/docs/llms.txt
> Use this file to discover all available pages before exploring further.
# Google Service Account - How do I link my account?
# Overview
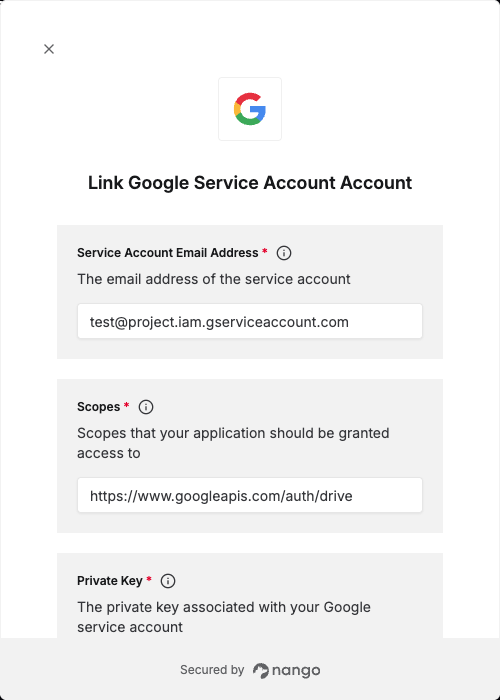
To authenticate with Google Service Account, you need:
1. **Service Account Email Address** – The unique email assigned to your service account.
2. **Private Key** – The private key generated when creating a service account key.
3. **Scopes** – A space-separated list of Google API scopes that your application should have access to.
4. **Delegated Access Email Address (optional)** – The user’s email address that the service account should impersonate when domain-wide delegation is [enabled](#step-3-delegate-domain-wide-authority-optional-for-google-workspace).
This guide will walk you through creating and obtaining your **Service Account credentials** in Google Cloud.
### Prerequisites
* If you don’t already have one, sign up for a [Google Cloud account](https://console.cloud.google.com/).
### Instructions
#### Step 1: Create a Service Account
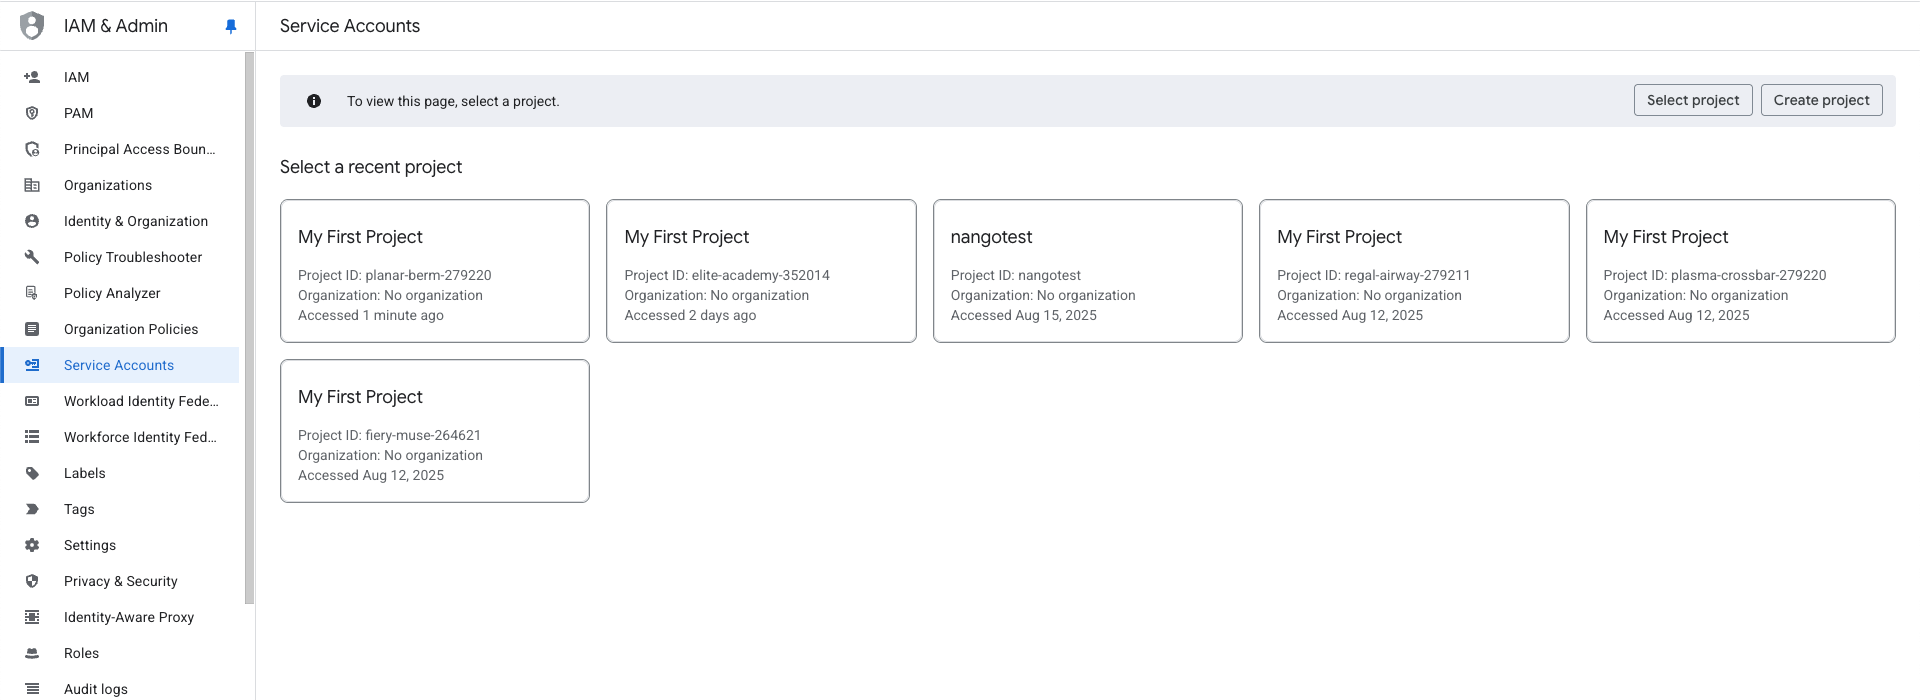
1. Go to the [Service Accounts page](https://console.cloud.google.com/iam-admin/serviceaccounts).
2. Select an existing project, or create a new one.
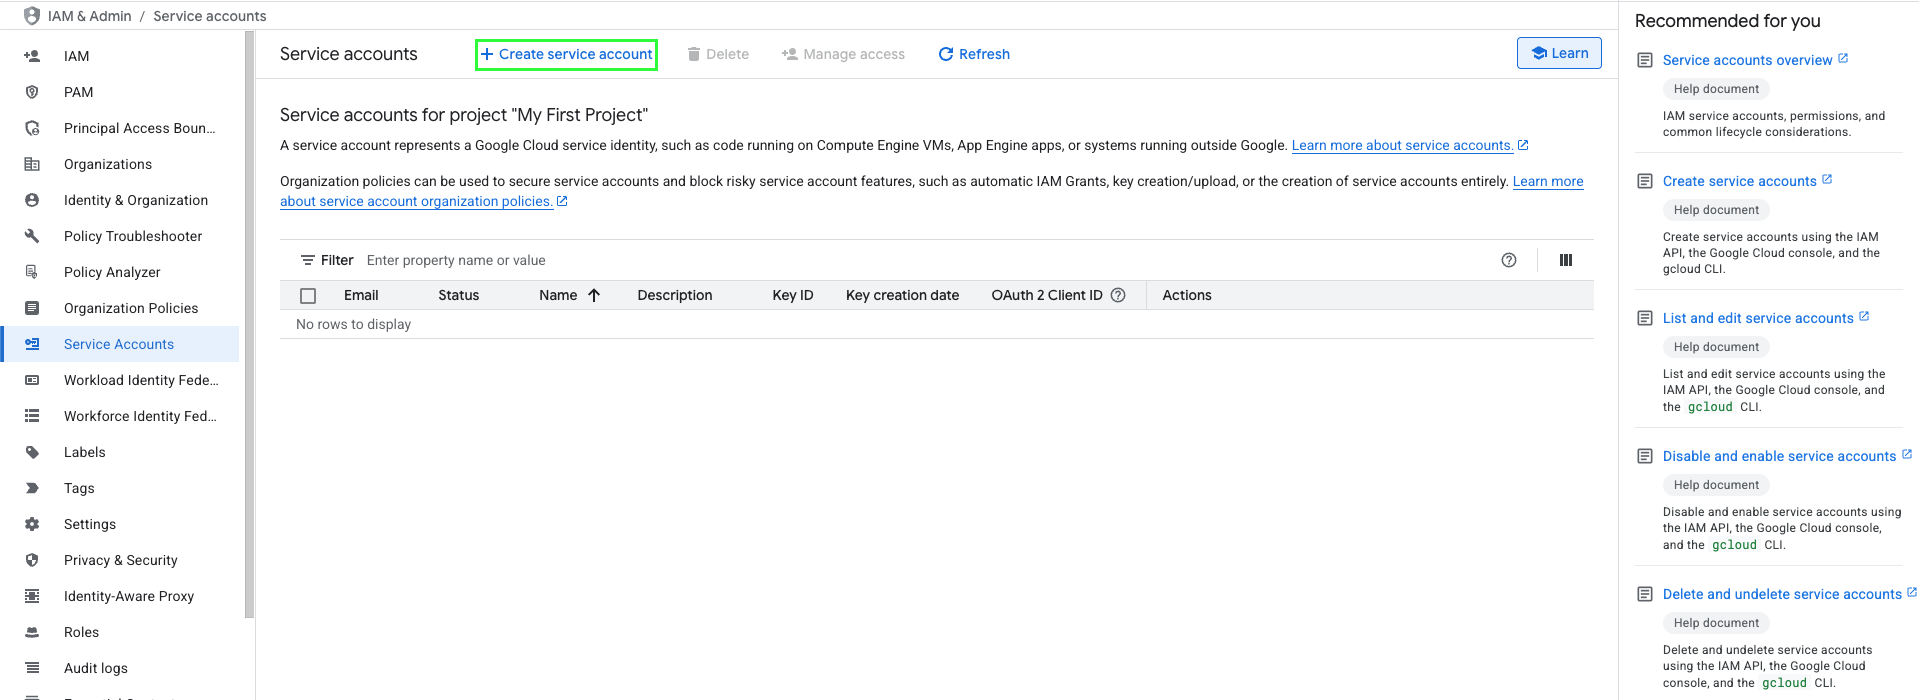
 3. Click **+ Create Service Account**.
 4. Fill in all the required information, then click **Create and continue**.
5. (Optional) Assign **Permissions** and **Principals with access**.
6. Click **Done**.
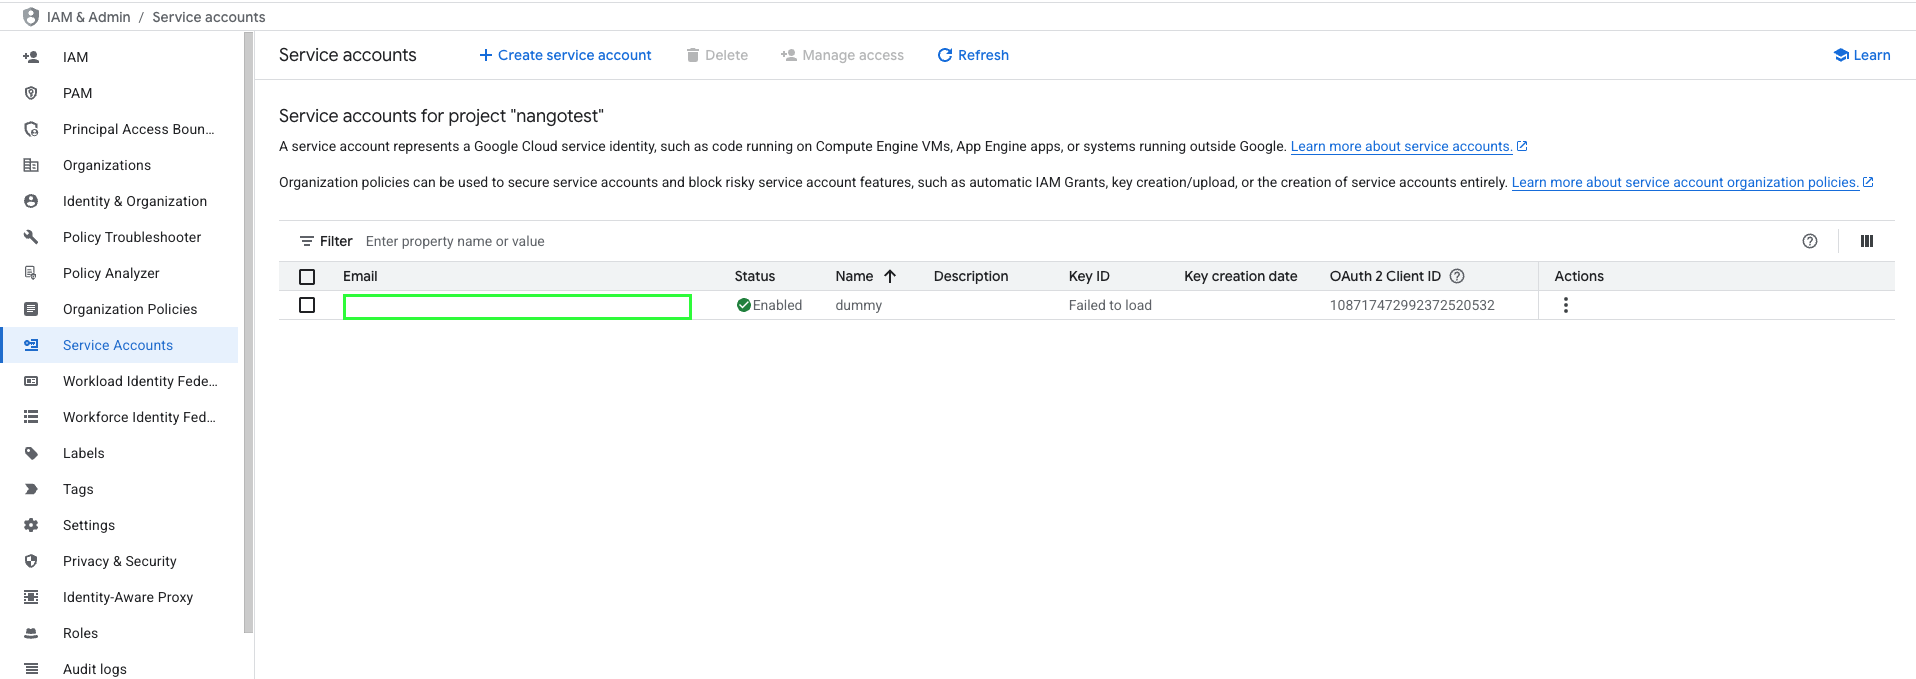
7. From your **Service accounts** list, you can obtain your **Service Account Email Address** in the **Email** column.
4. Fill in all the required information, then click **Create and continue**.
5. (Optional) Assign **Permissions** and **Principals with access**.
6. Click **Done**.
7. From your **Service accounts** list, you can obtain your **Service Account Email Address** in the **Email** column.
 #### Step 2: Generate a Service Account Key
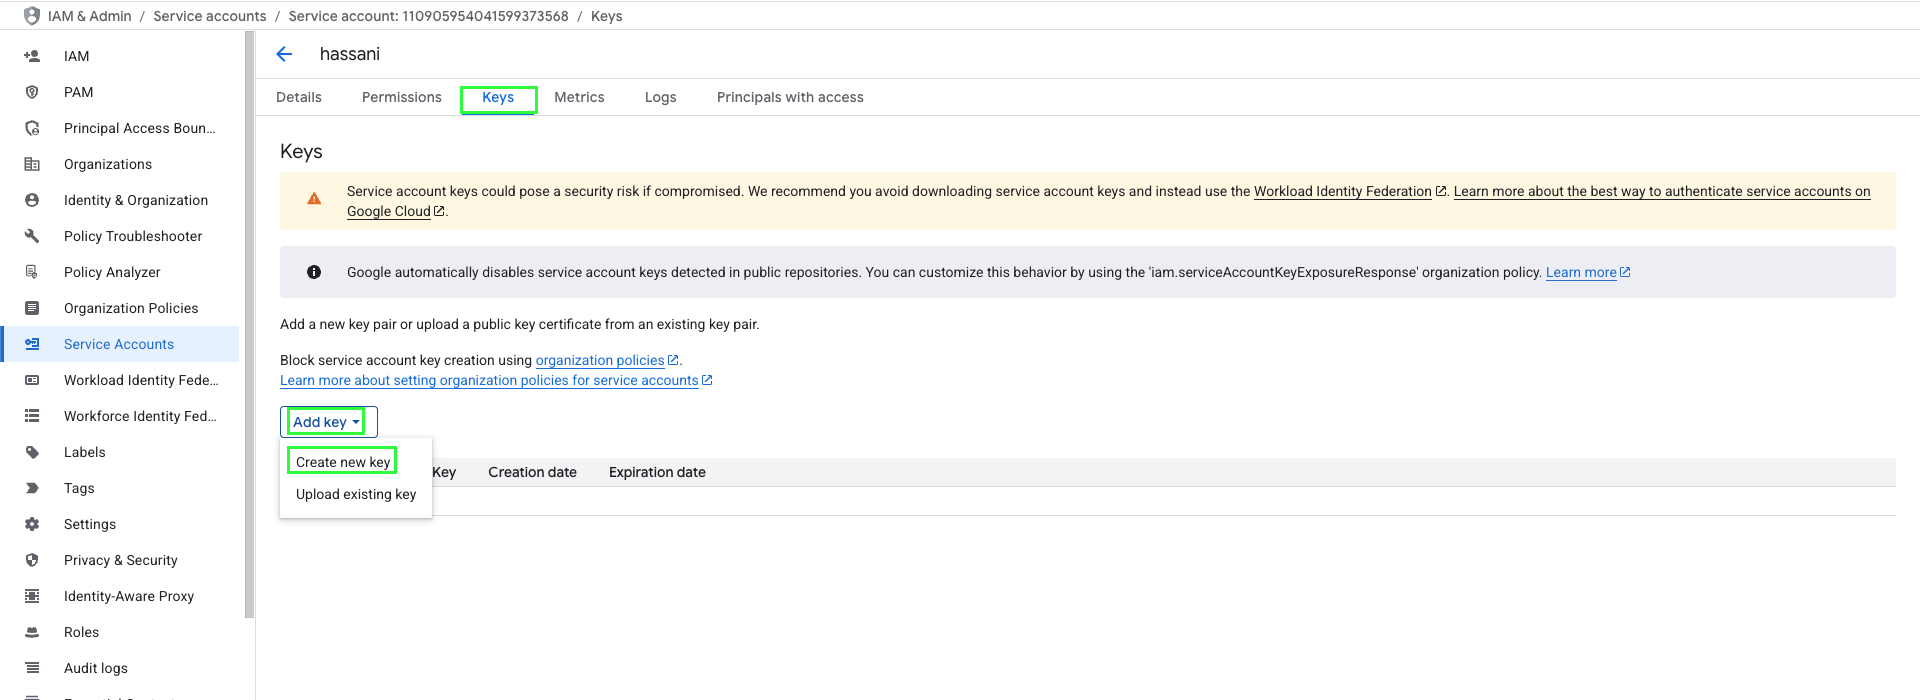
1. From the Service accounts page, click the **Email** address of the service account you created.
2. Navigate to the **Keys** tab.
3. Click **Add key** → **Create new key**.
#### Step 2: Generate a Service Account Key
1. From the Service accounts page, click the **Email** address of the service account you created.
2. Navigate to the **Keys** tab.
3. Click **Add key** → **Create new key**.
 4. Select **JSON** format and click **Create**.
5. A `.json` key file will be downloaded to your machine. Store it securely — this file contains your **Private Key**.
⚠️ Google does not keep a copy of the private key. If you lose it, you’ll need to generate a new one.
#### Step 3: Delegate Domain-Wide Authority (optional for Google Workspace)
If your application needs to act on behalf of users in your domain (e.g. read all users’ calendars), you must enable domain-wide delegation:
1. From your Google Workspace [Admin console](https://admin.google.com/), go to **Main menu** > **Security** > **Access and data control** > **API Controls**.
2. Under **Domain-wide delegation**, click **Manage Domain Wide Delegation**.
3. Click **Add new**.
4. Enter the **Client ID** of your service account (from the [Service Accounts page](https://console.developers.google.com/iam-admin/serviceaccounts)).
5. In **OAuth scopes**, enter the list of scopes you want to grant, for example: if your application needs domain-wide full access to the Google Drive API and the Google Calendar API, enter: `https://www.googleapis.com/auth/drive, https://www.googleapis.com/auth/calendar`.
6. Click **Authorize**.
Your application now has the authority to make API calls on behalf of users in your Workspace domain (`impersonating` them). You can specify the user to impersonate explicitly in the **Delegated Access Email Address** field.
#### Step 4: Finding your application's scopes
Ensure you enable the [API library](https://console.cloud.google.com/apis/library) you want access to, then you can find a list of scopes at [OAuth 2.0 Scopes for Google APIs](https://developers.google.com/identity/protocols/oauth2/scopes). This should be a space-separated list.
#### Step 5: Enter credentials in the Connect UI
Once you have all the required credentials:
1. Open the form to authenticate with Google Service Account.
2. Enter your credentials in their respective fields.
3. Submit the form, and you should be successfully authenticated.
4. Select **JSON** format and click **Create**.
5. A `.json` key file will be downloaded to your machine. Store it securely — this file contains your **Private Key**.
⚠️ Google does not keep a copy of the private key. If you lose it, you’ll need to generate a new one.
#### Step 3: Delegate Domain-Wide Authority (optional for Google Workspace)
If your application needs to act on behalf of users in your domain (e.g. read all users’ calendars), you must enable domain-wide delegation:
1. From your Google Workspace [Admin console](https://admin.google.com/), go to **Main menu** > **Security** > **Access and data control** > **API Controls**.
2. Under **Domain-wide delegation**, click **Manage Domain Wide Delegation**.
3. Click **Add new**.
4. Enter the **Client ID** of your service account (from the [Service Accounts page](https://console.developers.google.com/iam-admin/serviceaccounts)).
5. In **OAuth scopes**, enter the list of scopes you want to grant, for example: if your application needs domain-wide full access to the Google Drive API and the Google Calendar API, enter: `https://www.googleapis.com/auth/drive, https://www.googleapis.com/auth/calendar`.
6. Click **Authorize**.
Your application now has the authority to make API calls on behalf of users in your Workspace domain (`impersonating` them). You can specify the user to impersonate explicitly in the **Delegated Access Email Address** field.
#### Step 4: Finding your application's scopes
Ensure you enable the [API library](https://console.cloud.google.com/apis/library) you want access to, then you can find a list of scopes at [OAuth 2.0 Scopes for Google APIs](https://developers.google.com/identity/protocols/oauth2/scopes). This should be a space-separated list.
#### Step 5: Enter credentials in the Connect UI
Once you have all the required credentials:
1. Open the form to authenticate with Google Service Account.
2. Enter your credentials in their respective fields.
3. Submit the form, and you should be successfully authenticated.
 You are now connected to Google Service Account.