> ## Documentation Index
> Fetch the complete documentation index at: https://nango.dev/docs/llms.txt
> Use this file to discover all available pages before exploring further.
# Stripe (API Key) - How do I link my account?
# Overview
To authenticate with Stripe using API keys, you will need:
1. **Restricted API Key** - Your Stripe restricted API key for authentication (starts with `rk_test_` for test mode or `rk_live_` for live mode).
2. **Stripe Context** (Optional) - Only required if you're using an organization API key. Use the account ID or account path to identify which account the API request should affect.
This guide will walk you through generating your **Restricted API Key** and finding your **Stripe Context** (if needed) within the Stripe Dashboard.
### Prerequisites:
* You must have a Stripe account ([sign up for free](https://stripe.com/))
### Instructions:
#### Step 1: Generating your Stripe Restricted API Key
1. Log in to your [Stripe Dashboard](https://dashboard.stripe.com/).
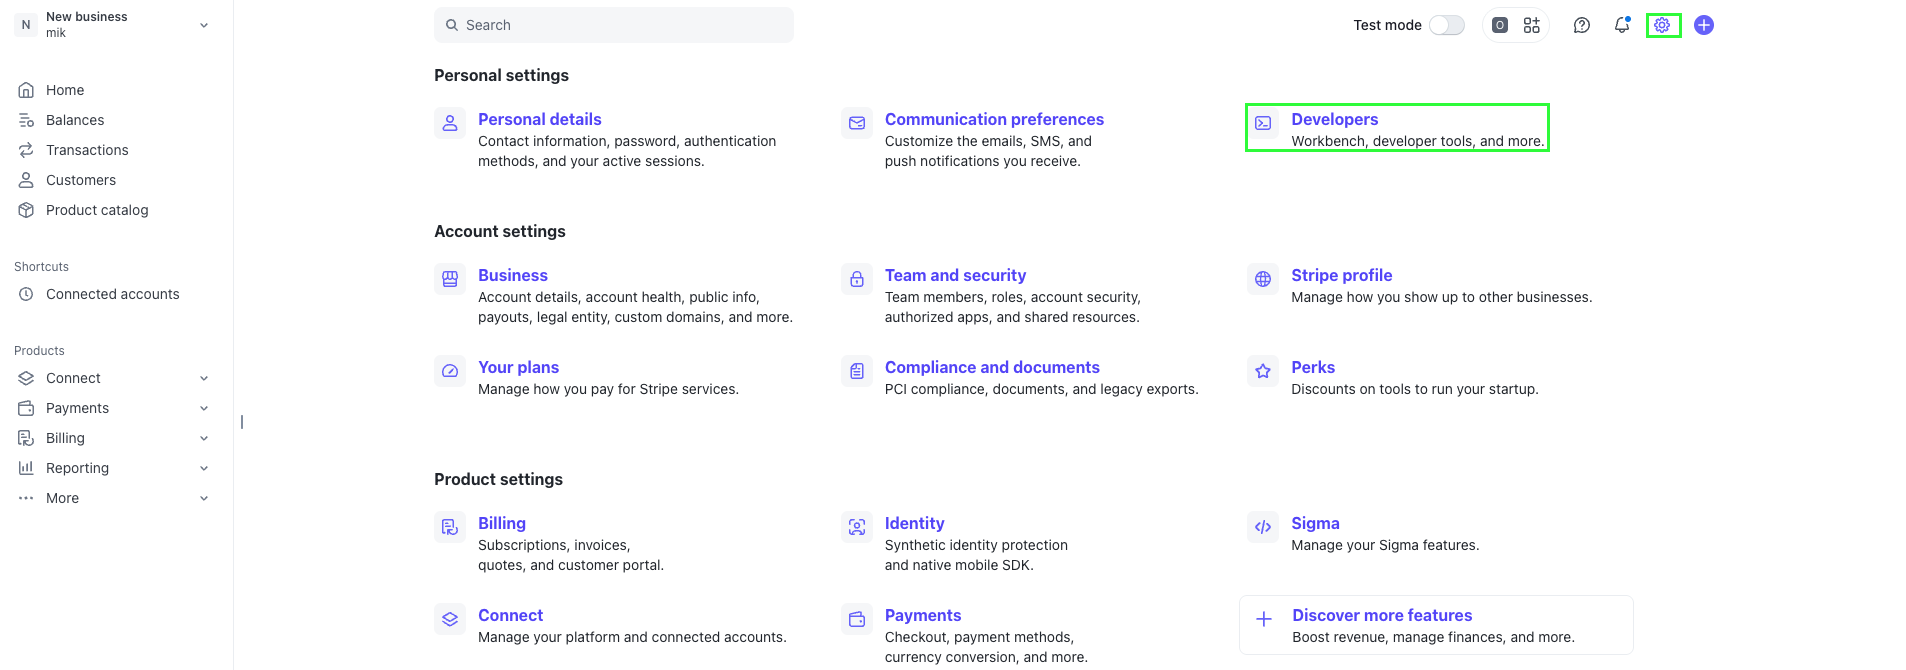
2. In the upper right corner, click on the **Settings** icon, then select **Developers**.
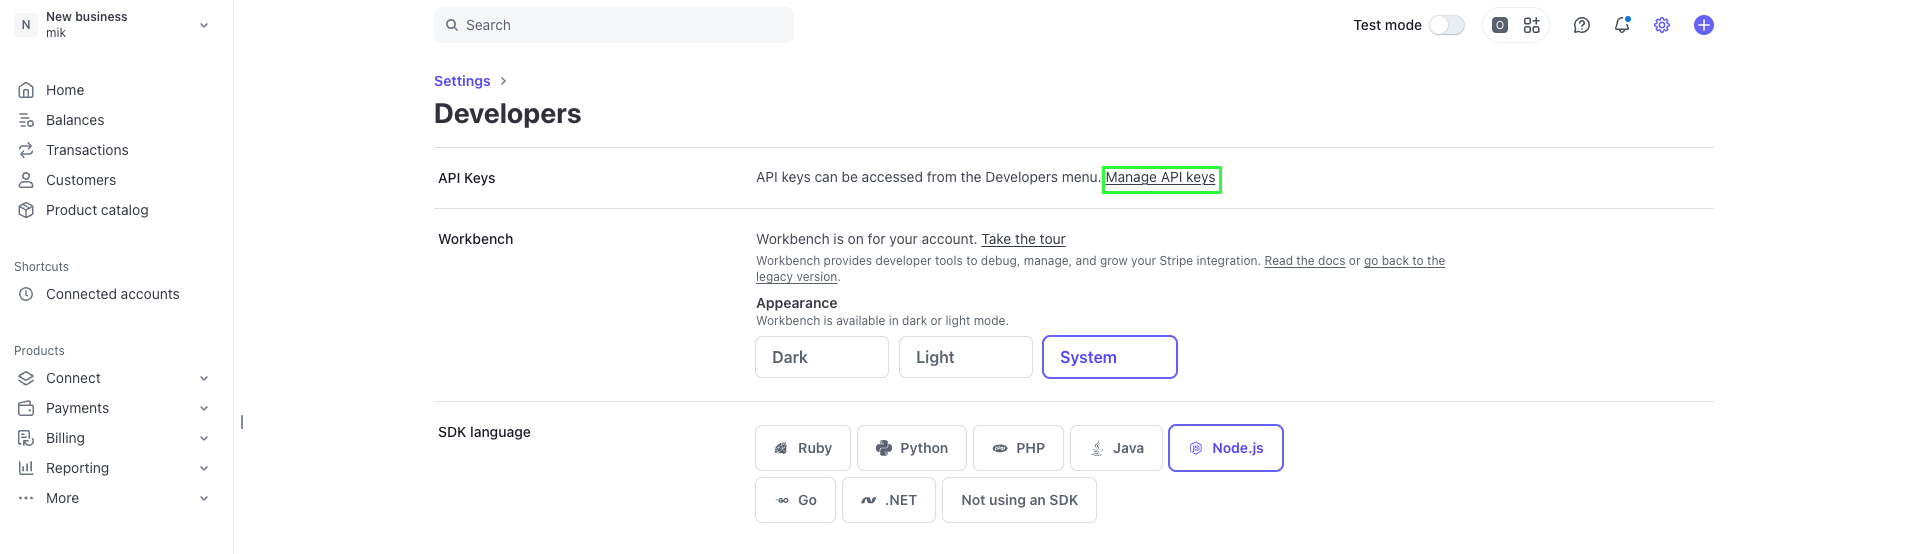
 3. Click on **Manage API Keys**.
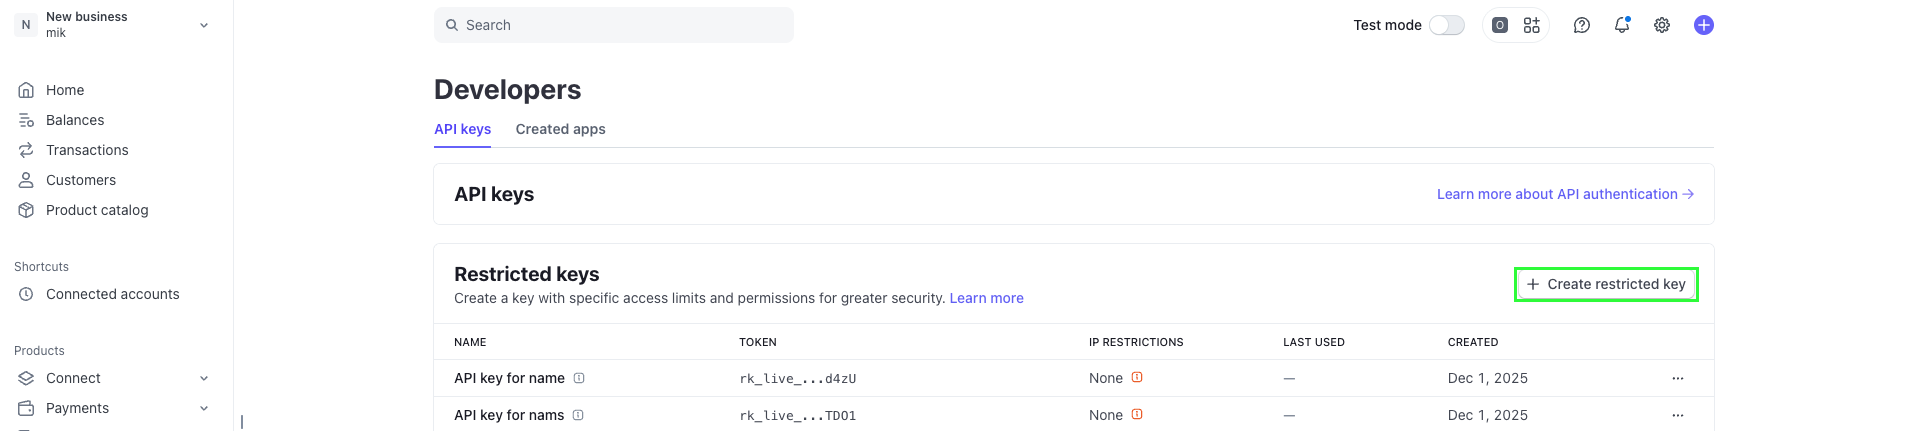
 4. In the **Restricted keys** section, click **+ Create restricted key**.
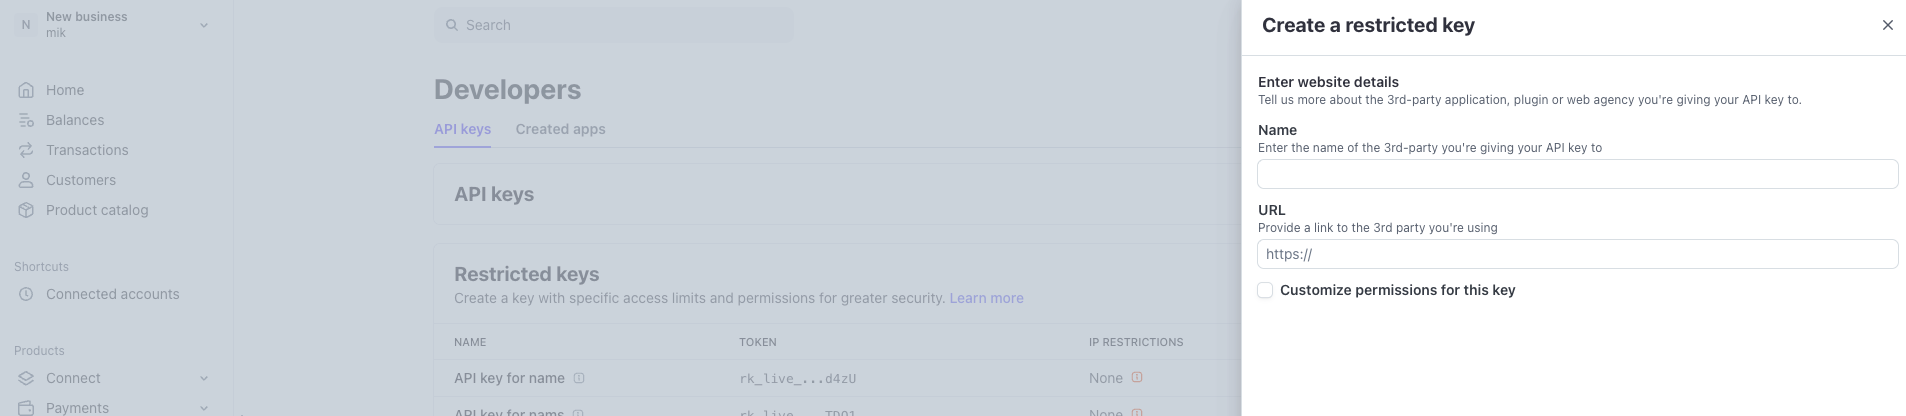
 5. Select the **Providing this key to another website** option. Click **Continue**.
6. In the **Name** field, type a name for your key (e.g., "Nango Integration"). In the **URL** field, enter `https://nango.dev`. Then choose one of the following options:
**Option A: Create with all permissions**
* Click **Create restricted key** to finalize and create an API key that grants access to all permissions.
**Option B: Customize permissions**
* Select **Customize permissions for this key**, then click **Continue**.
* Define permissions for your restricted API key, then click **Create key**.
5. Select the **Providing this key to another website** option. Click **Continue**.
6. In the **Name** field, type a name for your key (e.g., "Nango Integration"). In the **URL** field, enter `https://nango.dev`. Then choose one of the following options:
**Option A: Create with all permissions**
* Click **Create restricted key** to finalize and create an API key that grants access to all permissions.
**Option B: Customize permissions**
* Select **Customize permissions for this key**, then click **Continue**.
* Define permissions for your restricted API key, then click **Create key**.
 7. Copy the API key value shown and store it in a safe place.
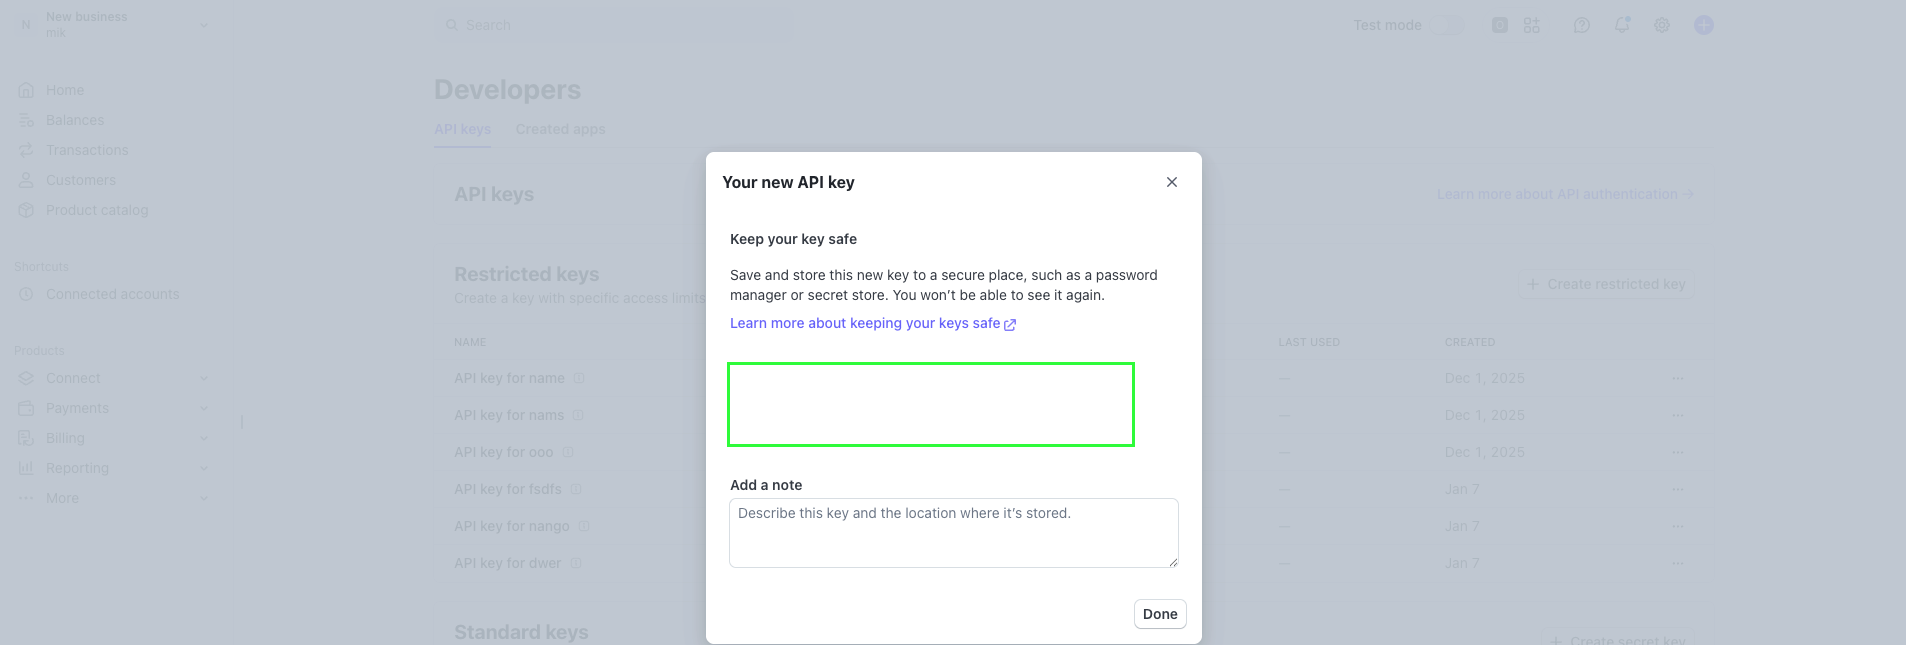 8. Click **Done**.
**Key Types:** Stripe provides different types of API keys. For Nango integration, use a **Restricted key** (`rk_test_...` or `rk_live_...`) for better security and access control.
**Test vs Live Mode:** Use test restricted keys (`rk_test_...`) during development (test mode doesn't process real payments). Use live restricted keys (`rk_live_...`) in production. You can toggle between test and live mode using the toggle switch in the top-right corner of the Stripe Dashboard.
#### Step 2: Finding your Stripe Context
**Note:** This step is only required if you're using an organization API key. For regular account API keys, you can skip this step.
When using an organization API key, you must specify the account context to identify which account the API request should affect. The context value depends on your organization structure:
**For a standalone account:**
* Use the account ID directly (e.g., `acct_1aTnTtAAB0hHJ26p`)
**For a connected account (platform account):**
* Use the format: `{platform_account_id}/{connected_account_id}` (e.g., `acct_1R3fqDP6919yCiFv/acct_1032D82eZvKYlo2C`)
To find your account ID:
1. Log in to your [Stripe Dashboard](https://dashboard.stripe.com/).
2. Navigate to **Settings** → **Personal Details**, then scroll to the bottom of the page to find your **Accounts**.
3. Your account ID is displayed (it starts with `acct_`).
For connected accounts, you can find the connected account ID in:
* The URL when viewing the connected account in your dashboard
* The connected account's settings page
**Example organization structure:**
```
Organization (org_6SD3oI0eSQemPzdmaGLJ5j6)
├── Platform account (acct_1R3fqDP6919yCiFv)
| └── Connected account (acct_1032D82eZvKYlo2C)
└── Standalone account (acct_1aTnTtAAB0hHJ26p)
```
#### Step 3: Enter credentials in the Connect UI
Once you have your **Restricted API Key** (and optionally your **Context** if using organization keys):
1. Open the form where you need to authenticate with Stripe.
2. Enter your **Restricted API Key** in its respective field.
3. (Optional) If you're using an organization API key, enter your **Stripe Context** in its respective field.
4. Submit the form, and you should be successfully authenticated.
8. Click **Done**.
**Key Types:** Stripe provides different types of API keys. For Nango integration, use a **Restricted key** (`rk_test_...` or `rk_live_...`) for better security and access control.
**Test vs Live Mode:** Use test restricted keys (`rk_test_...`) during development (test mode doesn't process real payments). Use live restricted keys (`rk_live_...`) in production. You can toggle between test and live mode using the toggle switch in the top-right corner of the Stripe Dashboard.
#### Step 2: Finding your Stripe Context
**Note:** This step is only required if you're using an organization API key. For regular account API keys, you can skip this step.
When using an organization API key, you must specify the account context to identify which account the API request should affect. The context value depends on your organization structure:
**For a standalone account:**
* Use the account ID directly (e.g., `acct_1aTnTtAAB0hHJ26p`)
**For a connected account (platform account):**
* Use the format: `{platform_account_id}/{connected_account_id}` (e.g., `acct_1R3fqDP6919yCiFv/acct_1032D82eZvKYlo2C`)
To find your account ID:
1. Log in to your [Stripe Dashboard](https://dashboard.stripe.com/).
2. Navigate to **Settings** → **Personal Details**, then scroll to the bottom of the page to find your **Accounts**.
3. Your account ID is displayed (it starts with `acct_`).
For connected accounts, you can find the connected account ID in:
* The URL when viewing the connected account in your dashboard
* The connected account's settings page
**Example organization structure:**
```
Organization (org_6SD3oI0eSQemPzdmaGLJ5j6)
├── Platform account (acct_1R3fqDP6919yCiFv)
| └── Connected account (acct_1032D82eZvKYlo2C)
└── Standalone account (acct_1aTnTtAAB0hHJ26p)
```
#### Step 3: Enter credentials in the Connect UI
Once you have your **Restricted API Key** (and optionally your **Context** if using organization keys):
1. Open the form where you need to authenticate with Stripe.
2. Enter your **Restricted API Key** in its respective field.
3. (Optional) If you're using an organization API key, enter your **Stripe Context** in its respective field.
4. Submit the form, and you should be successfully authenticated.
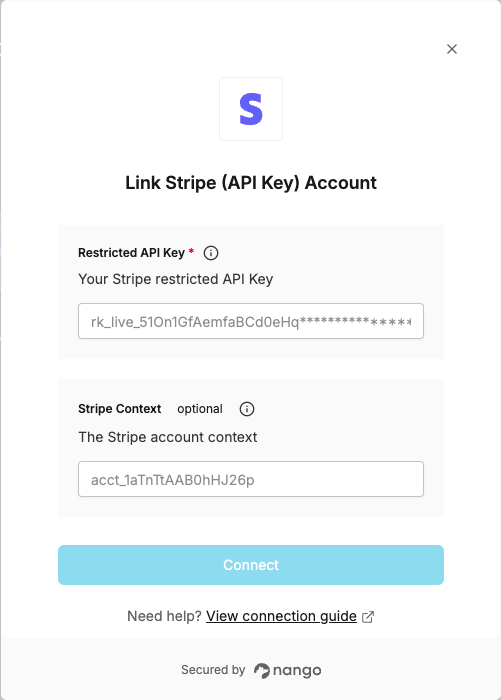 You are now connected to Stripe.
***
You are now connected to Stripe.
***