> ## Documentation Index
> Fetch the complete documentation index at: https://nango.dev/docs/llms.txt
> Use this file to discover all available pages before exploring further.
# SAP S/4HANA Cloud (Client Credentials) - How to Connect Your Account
# Overview
To authenticate with SAP S/4HANA Cloud using OAuth 2.0 Client Credentials, you will need the following:
1. **Subdomain**: The subdomain where your SAP S/4HANA Cloud instance is hosted.
2. **Region**: The region where your SAP S/4HANA Cloud instance is hosted.
3. **API Server**: The base URL of the SAP S/4HANA Cloud API service you want to connect to.
4. **Client ID**: A unique identifier for your client.
5. **Client Secret**: A confidential key used to authenticate the identity of the application (client).
This guide will walk you through enabling OAuth 2.0 and obtaining these credentials.
## Prerequisites
* Admin access to your SAP S/4HANA system.
## Step 1: Generating your Client Credentials
1. Log in to your SAP system and navigate to transaction code `/n/iwfnd/maint_service`.
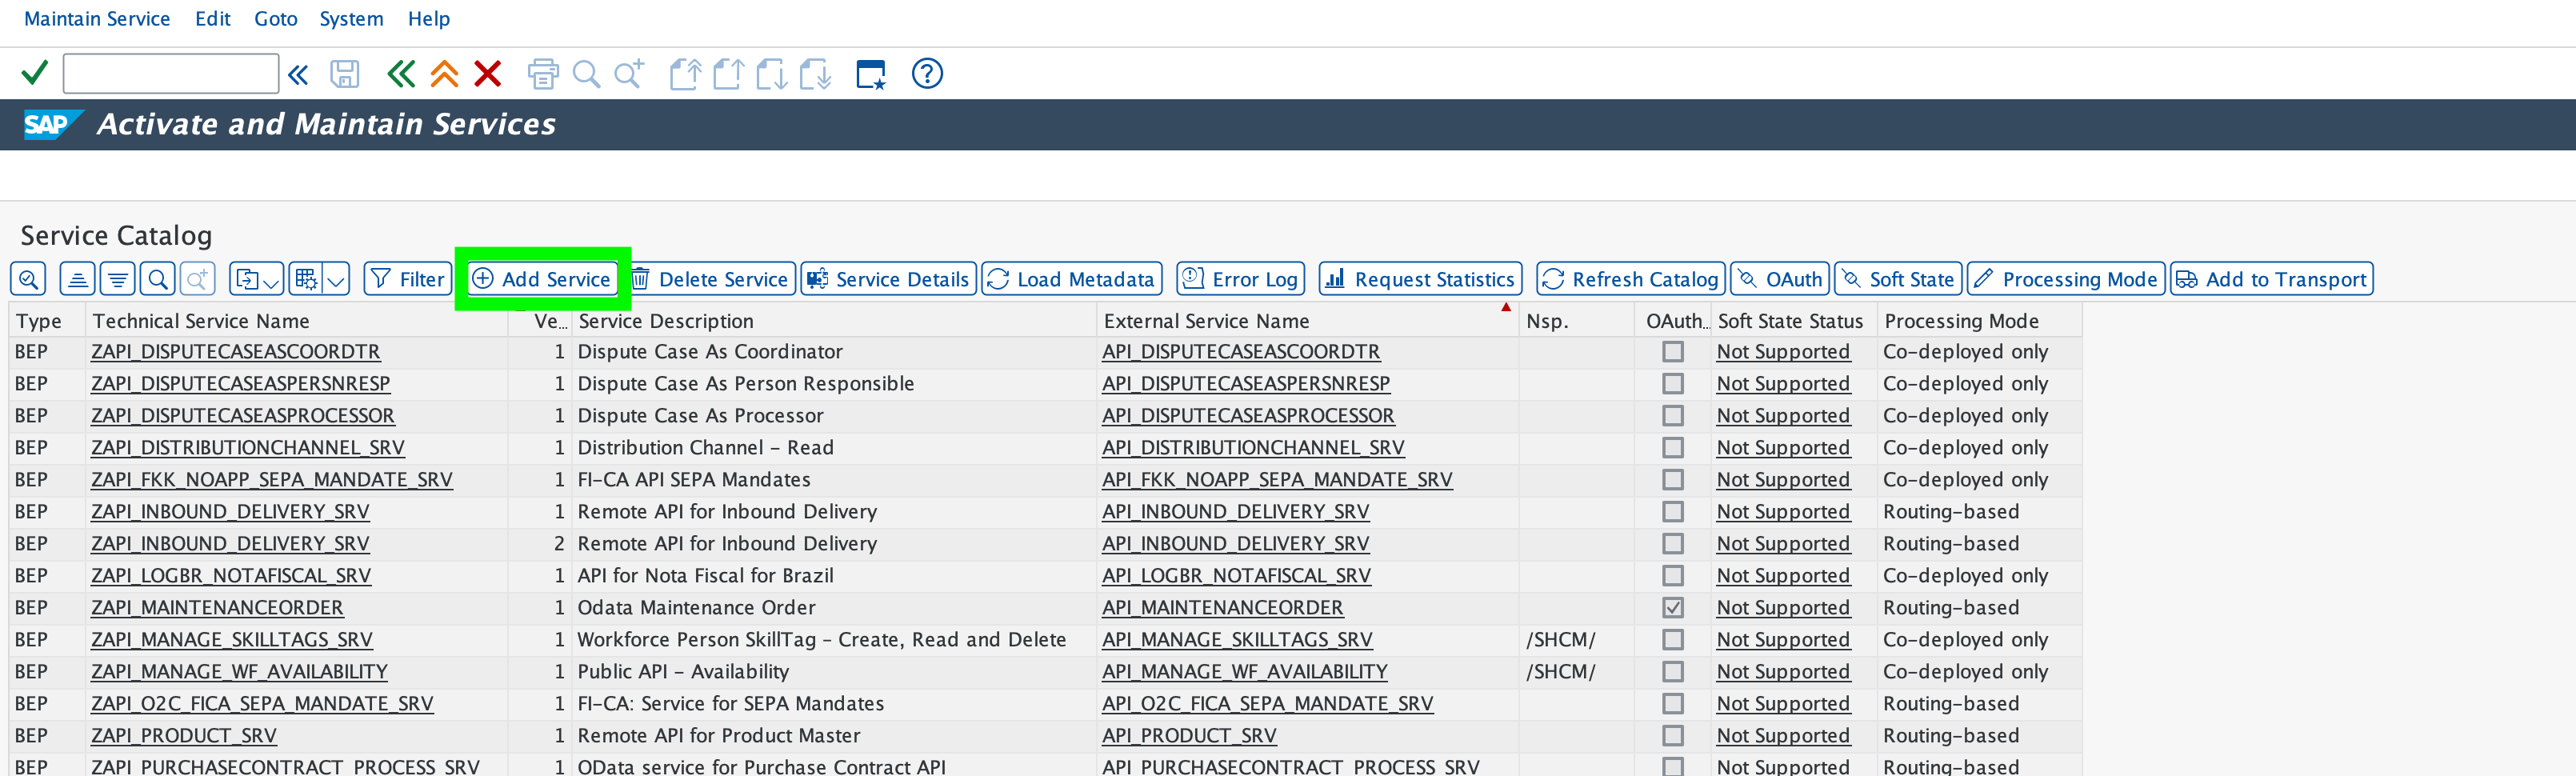
2. Click **Add Service**, enter `LOCAL` in the **System Alias** field, and press Enter.
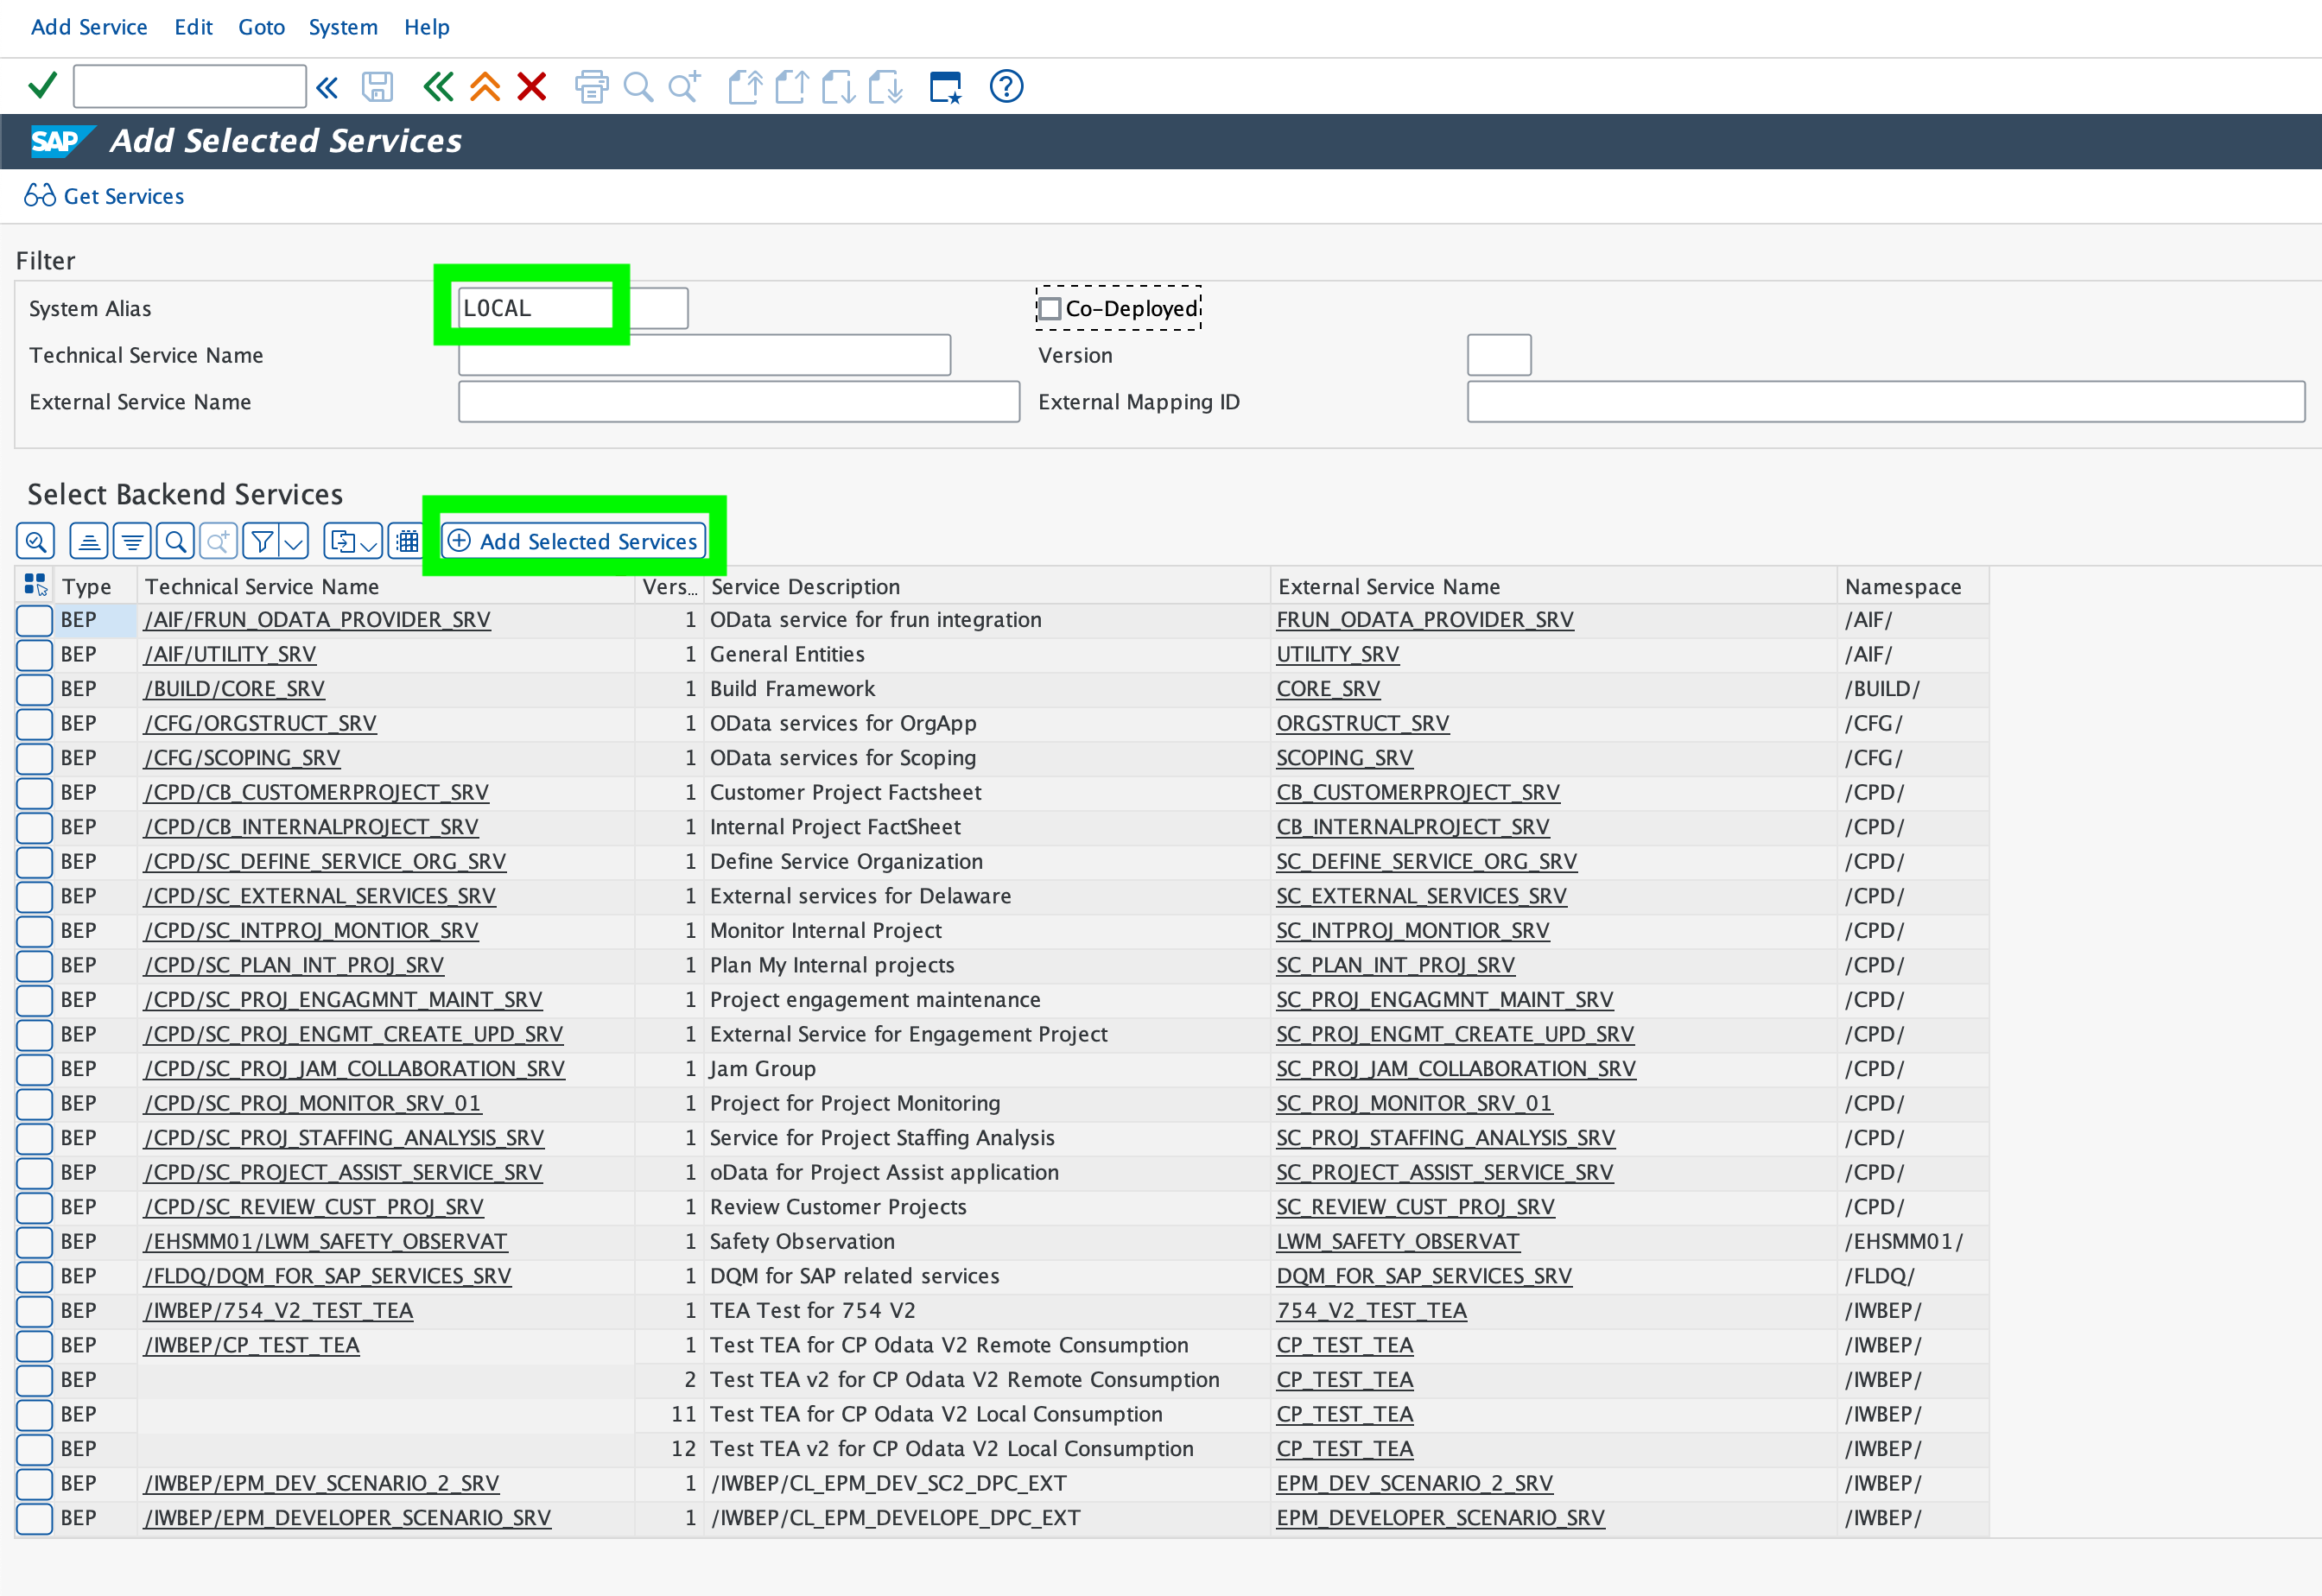
 3. Select the service you plan to use and click **Add Selected Services**.
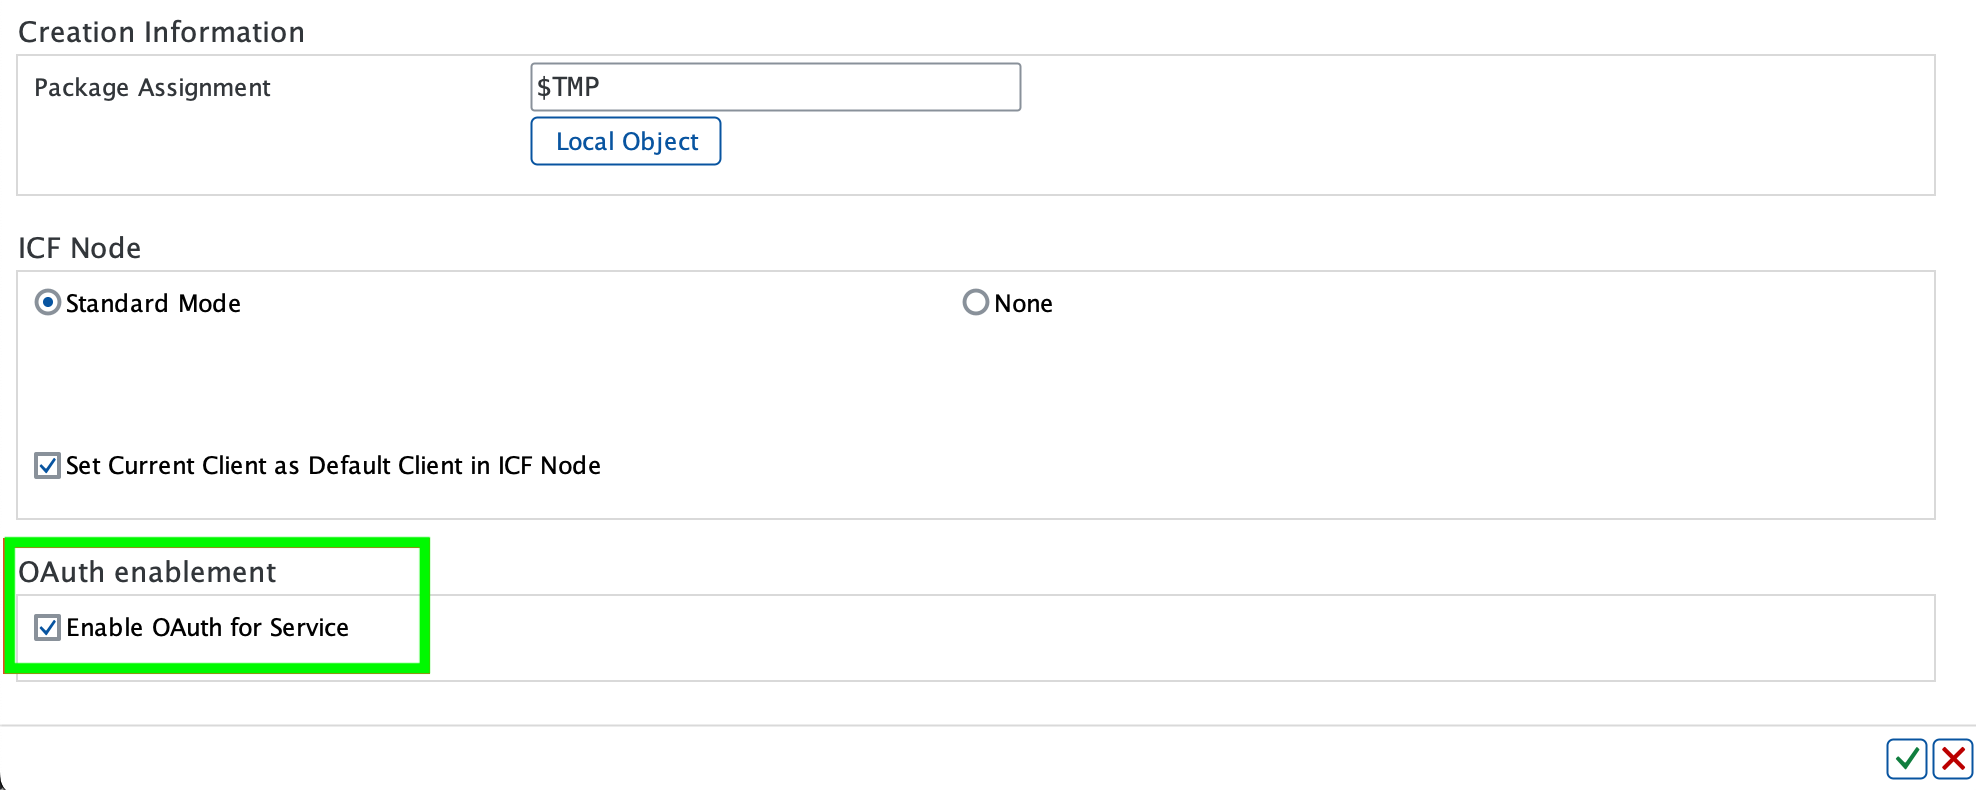
 4. Provide a custom name for the technical service, then click **Local Object** to save the service in the local package.
5. Select the **Enable OAuth for Service** checkbox under **OAuth enablement**.
4. Provide a custom name for the technical service, then click **Local Object** to save the service in the local package.
5. Select the **Enable OAuth for Service** checkbox under **OAuth enablement**.
 6. Save the configuration.
7. Double-click **Alias** and validate that the SAP System Alias is correct for the Service Doc Identifier.
6. Save the configuration.
7. Double-click **Alias** and validate that the SAP System Alias is correct for the Service Doc Identifier.
 If the service already exists in the service catalog, you can navigate directly to the service and click **OAuth** to enable OAuth authentication.
 8. Go to transaction code `SICF`.
9. Navigate to the service **authorize** under path: `default_host/sap/bc/sec/oauth2/`.
8. Go to transaction code `SICF`.
9. Navigate to the service **authorize** under path: `default_host/sap/bc/sec/oauth2/`.
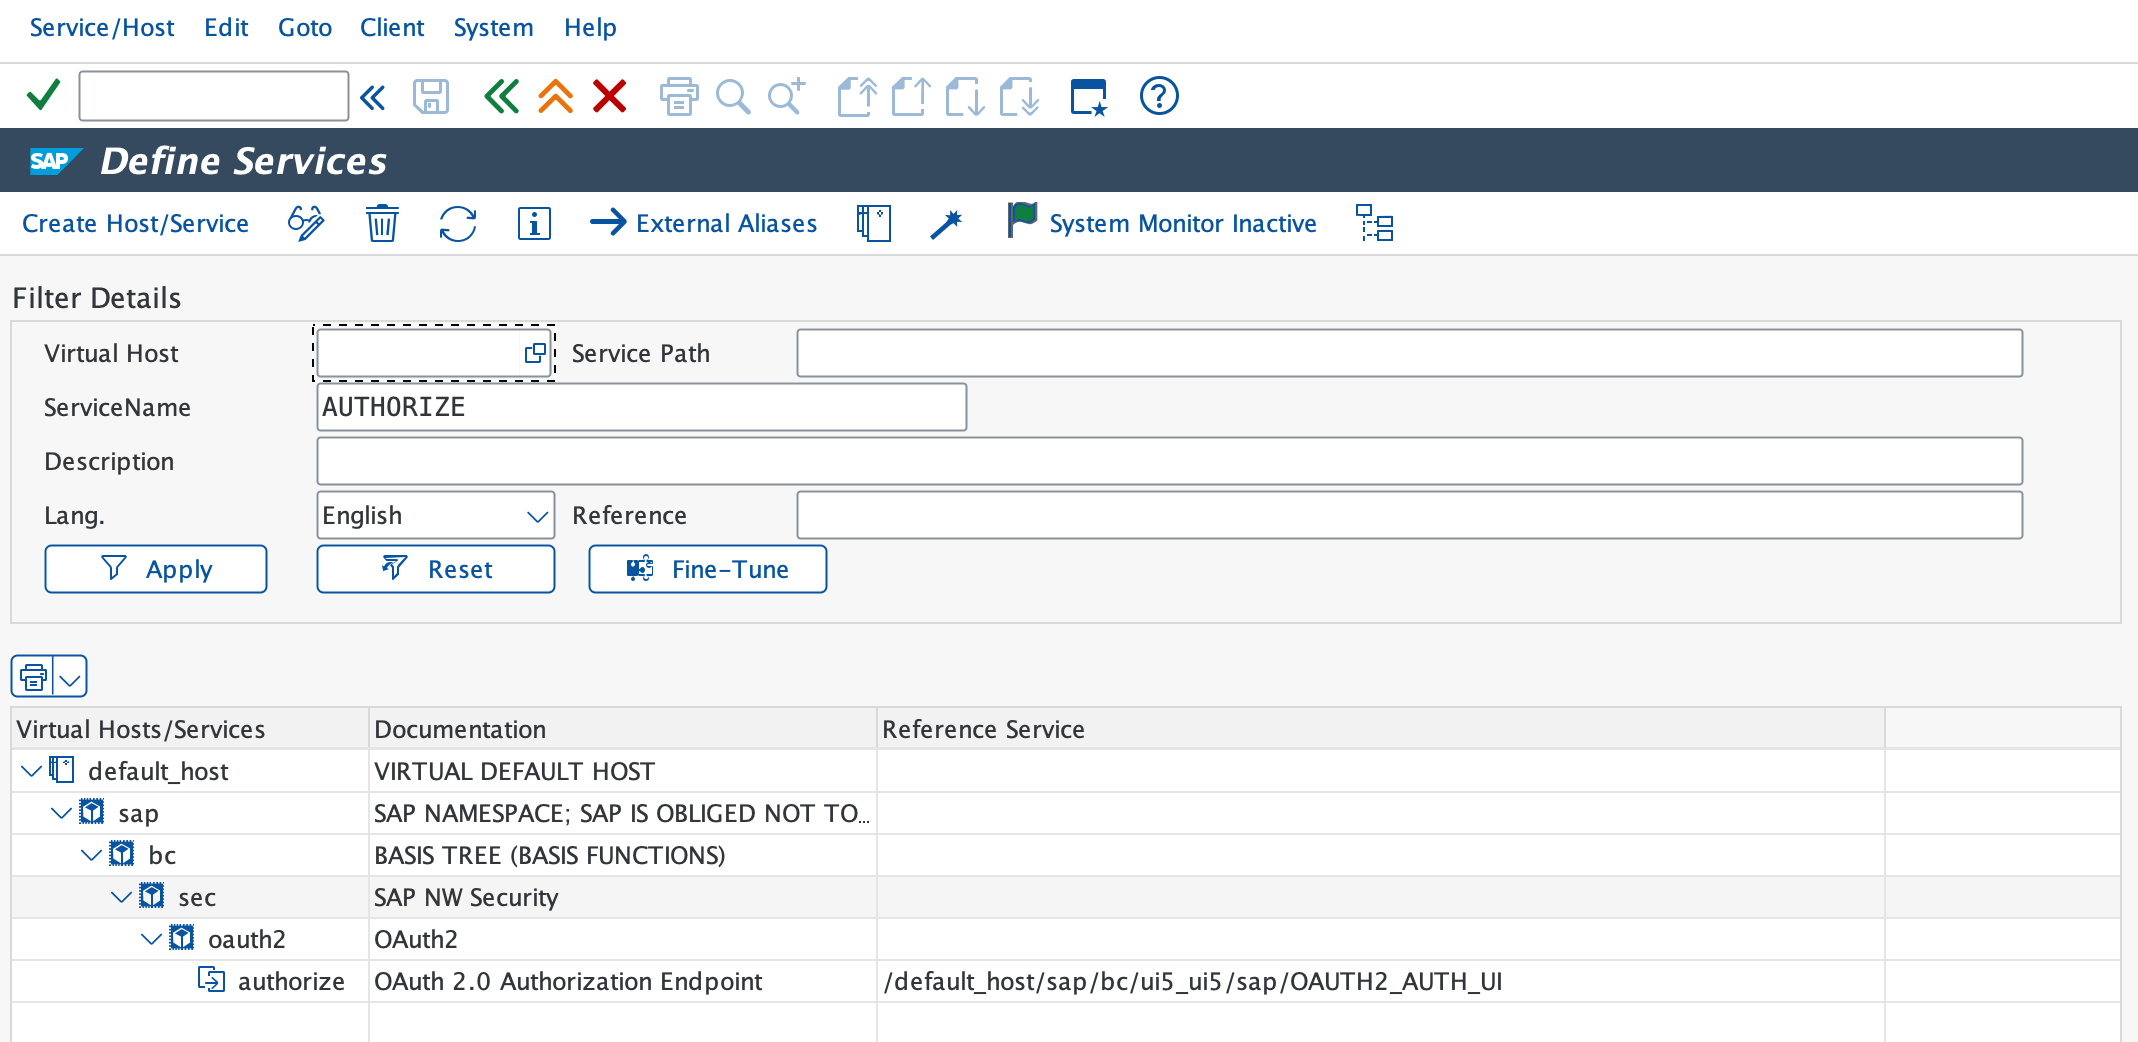 10. Right-click the **authorize** service and select **Activate Link**.
11. Right-click the service again and select **Test Link** to verify the URL: `https://:/sap/bc/sec/oauth2/authorize?sap-client=`
12. Navigate to the service **token** under path: `default_host/sap/bc/sec/oauth2/`.
10. Right-click the **authorize** service and select **Activate Link**.
11. Right-click the service again and select **Test Link** to verify the URL: `https://:/sap/bc/sec/oauth2/authorize?sap-client=`
12. Navigate to the service **token** under path: `default_host/sap/bc/sec/oauth2/`.
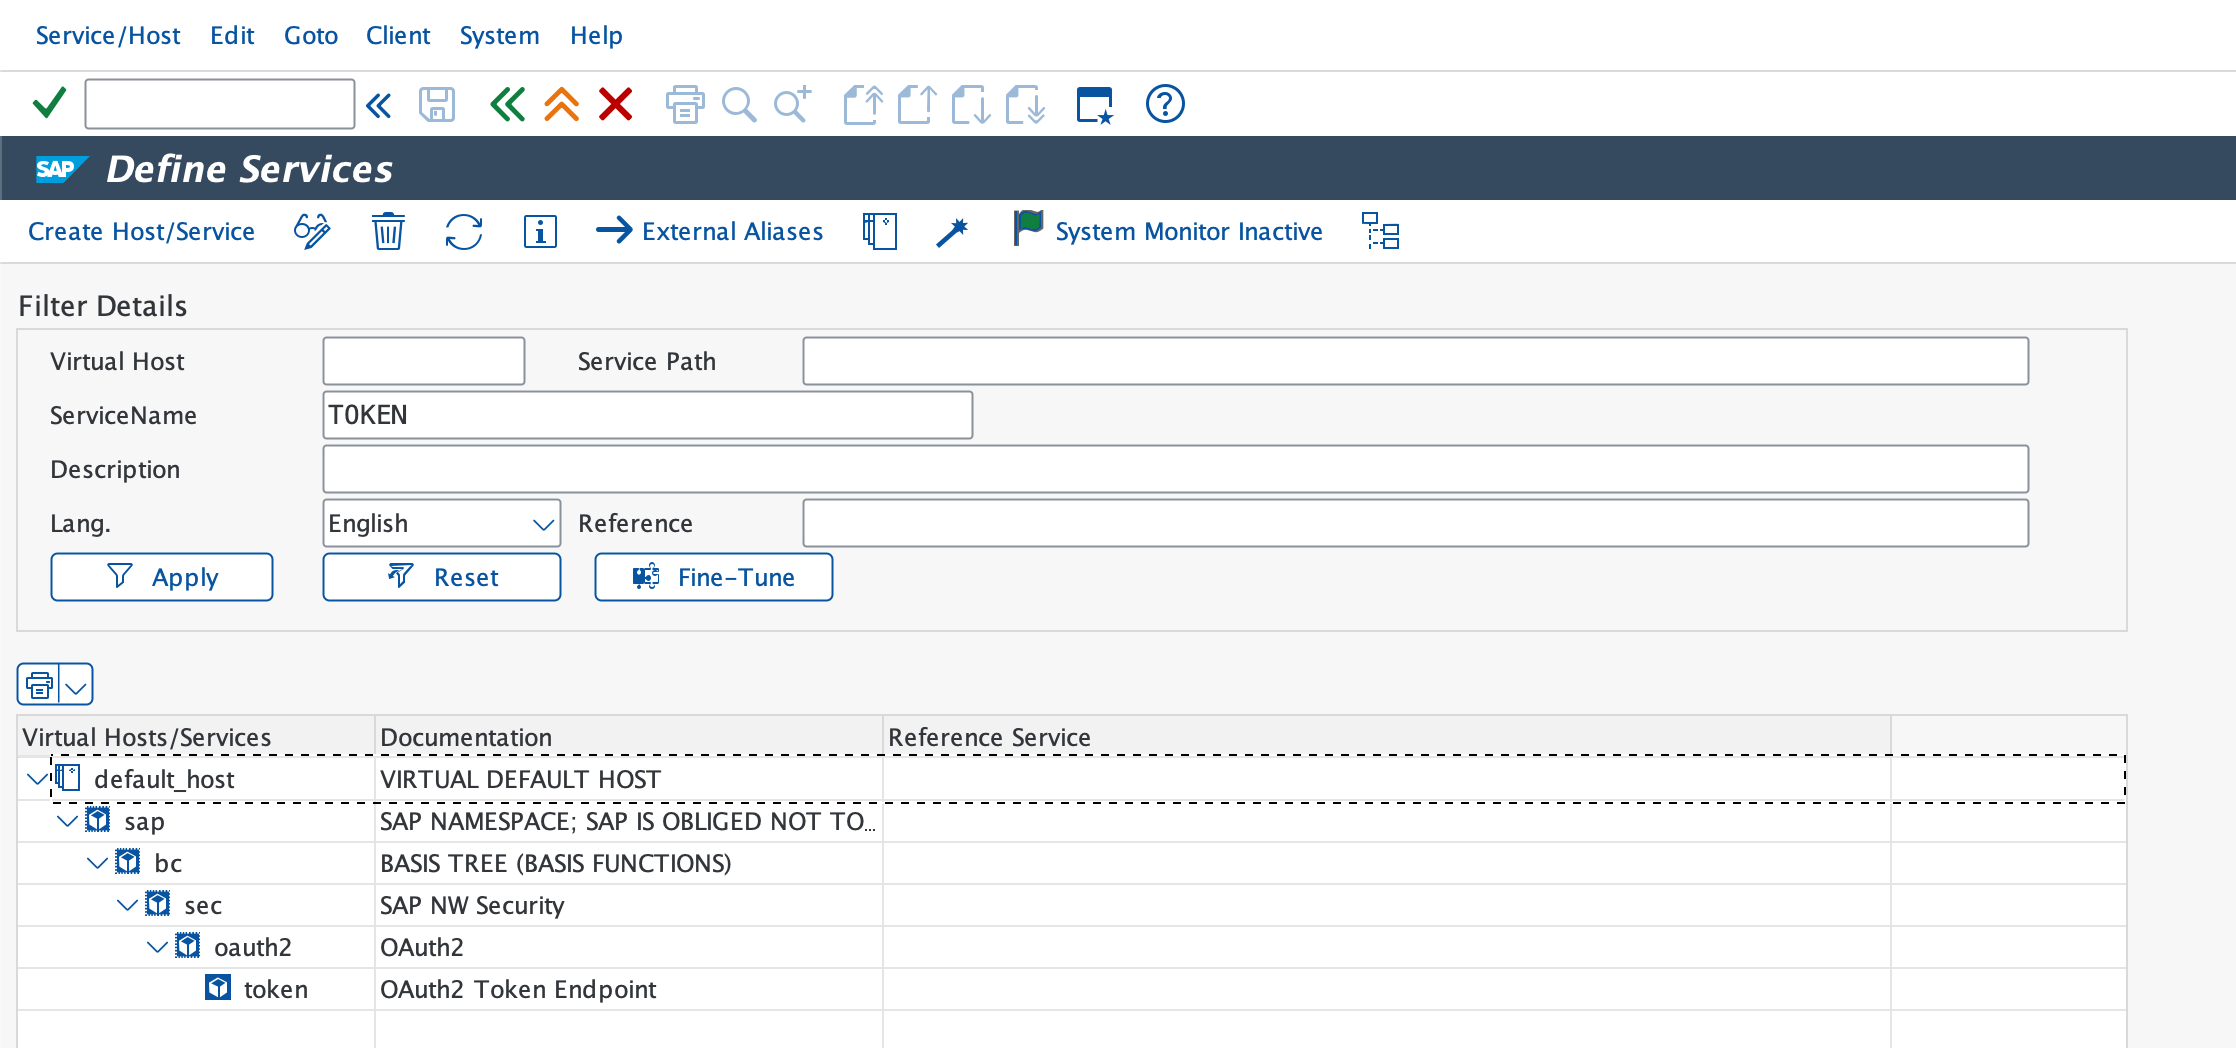 13. Right-click the **token** service and select **Activate Service**.
14. Right-click the service again and select **Test Service** to verify the URL: `https://:/sap/bc/sec/oauth2/token?sap-client=`
15. Go to transaction code `SU01`.
16. Create a new integration user to whom you will assign OAuth scopes. In the **Address** tab, enter the **Last name**. In the **Logon Data** tab:
* Set a **New Password**. We recommend using the **Generate** option to create a complex string for enhanced security. This password serves as the **Client Secret**.
* Set the **User Type** as **System** to restrict GUI access for this user.
The password set here is your **Client Secret**.
17. Save the integration user. The Username will be used as the **Client ID**.
18. Go to transaction code `SOAUTH2`.
19. Click **Create** and enter the integration user details created in step 16. Fill in all other required details.
20. Enable the **Client Credentials** grant type: Check the **Client Credentials** checkbox to activate it, and leave all other settings unchanged.
21. Click **Add** and select the OAuth scope you plan to use from the list.
13. Right-click the **token** service and select **Activate Service**.
14. Right-click the service again and select **Test Service** to verify the URL: `https://:/sap/bc/sec/oauth2/token?sap-client=`
15. Go to transaction code `SU01`.
16. Create a new integration user to whom you will assign OAuth scopes. In the **Address** tab, enter the **Last name**. In the **Logon Data** tab:
* Set a **New Password**. We recommend using the **Generate** option to create a complex string for enhanced security. This password serves as the **Client Secret**.
* Set the **User Type** as **System** to restrict GUI access for this user.
The password set here is your **Client Secret**.
17. Save the integration user. The Username will be used as the **Client ID**.
18. Go to transaction code `SOAUTH2`.
19. Click **Create** and enter the integration user details created in step 16. Fill in all other required details.
20. Enable the **Client Credentials** grant type: Check the **Client Credentials** checkbox to activate it, and leave all other settings unchanged.
21. Click **Add** and select the OAuth scope you plan to use from the list.
 22. Click **Next**, review the summary, and then click **Finish**.
## Step 2: Finding your Subdomain
1. The **Subdomain** is the tenant name of your SAP S/4HANA Cloud instance.
2. You can locate this in your SAP BTP Cockpit by checking the URL in your browser's address bar. The subdomain is the value between `https://` and `.hana` in the URL.
3. **Example**: In `https://acme.hana.ondemand.com`, the subdomain is `acme`.
## Step 3: Finding your Region
To identify your region:
1. Check the [SAP BTP Regions and API Endpoints table](https://help.sap.com/docs/btp/sap-business-technology-platform/regions-and-api-endpoints-available-for-cloud-foundry-environment) for Cloud Foundry environment.
2. Locate where your SAP instance is deployed (e.g., Europe, US, Asia).
3. Use the **Region** name from the table (e.g., `eu10`, `us10`, `ap21`).
**Example Region Values:**
* `us30` - US Central (IA)
* `us11` - US West (Oregon)
* `in30` - India (Mumbai)
## Step 4: Finding your API Server
1. The **API Server** is the base URL of your OData endpoint.
2. Navigate to the SAP Gateway Client or [Service Catalog](https://api.sap.com/content-type/API/apis/ODATAV4) to find the base URL.
3. **Example**: For the [Measurement Concept Class API](https://api.sap.com/api/MeasurementConceptClassAPI/overview), the API Server would be `c4u-foundation-mcm-service.cfapps.eu10.hana.ondemand.com`.
## Step 5: Enter Credentials in the Connect UI
Once you have all the required information:
1. Open the form where you need to authenticate with SAP S/4HANA Cloud (Client Credentials).
2. Enter the **Subdomain**, **Region**, **API Server**, **Client ID**, and **Client Secret** in their designated fields.
3. Submit the form, and you should be successfully authenticated.
22. Click **Next**, review the summary, and then click **Finish**.
## Step 2: Finding your Subdomain
1. The **Subdomain** is the tenant name of your SAP S/4HANA Cloud instance.
2. You can locate this in your SAP BTP Cockpit by checking the URL in your browser's address bar. The subdomain is the value between `https://` and `.hana` in the URL.
3. **Example**: In `https://acme.hana.ondemand.com`, the subdomain is `acme`.
## Step 3: Finding your Region
To identify your region:
1. Check the [SAP BTP Regions and API Endpoints table](https://help.sap.com/docs/btp/sap-business-technology-platform/regions-and-api-endpoints-available-for-cloud-foundry-environment) for Cloud Foundry environment.
2. Locate where your SAP instance is deployed (e.g., Europe, US, Asia).
3. Use the **Region** name from the table (e.g., `eu10`, `us10`, `ap21`).
**Example Region Values:**
* `us30` - US Central (IA)
* `us11` - US West (Oregon)
* `in30` - India (Mumbai)
## Step 4: Finding your API Server
1. The **API Server** is the base URL of your OData endpoint.
2. Navigate to the SAP Gateway Client or [Service Catalog](https://api.sap.com/content-type/API/apis/ODATAV4) to find the base URL.
3. **Example**: For the [Measurement Concept Class API](https://api.sap.com/api/MeasurementConceptClassAPI/overview), the API Server would be `c4u-foundation-mcm-service.cfapps.eu10.hana.ondemand.com`.
## Step 5: Enter Credentials in the Connect UI
Once you have all the required information:
1. Open the form where you need to authenticate with SAP S/4HANA Cloud (Client Credentials).
2. Enter the **Subdomain**, **Region**, **API Server**, **Client ID**, and **Client Secret** in their designated fields.
3. Submit the form, and you should be successfully authenticated.
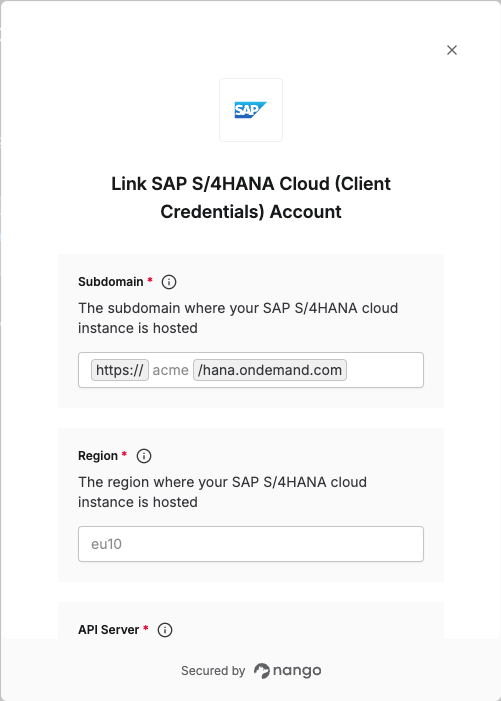 You are now connected to SAP S/4HANA Cloud (Client Credentials).