> ## Documentation Index
> Fetch the complete documentation index at: https://nango.dev/docs/llms.txt
> Use this file to discover all available pages before exploring further.
# Salesforce JWT - How do I link my account?
# Overview
To authenticate with Salesforce using JWT, you need:
1. **Consumer Key** – from your Salesforce External Client App
2. **Consumer Secret** – from your Salesforce External Client App
3. **Private Key** – the private key that matches the certificate you upload to the External Client App
4. **Username** – the Salesforce user the JWT will act on behalf of
5. **Authorization server's URL** – the Salesforce OAuth/token endpoint base URL (see Step 6 below)
This guide walks you through generating a certificate and private key, creating a JWT-enabled External Client App in Salesforce.
### Prerequisites
* A Salesforce org
* OpenSSL installed on your machine (for generating the certificate and key)
### Instructions
#### Step 1: Create a private key and self-signed digital certificate
JWT authentication requires a digital certificate and the private key used to sign it. We recommend using your own private key and a certificate from a certification authority (CA) for production. For getting started, you can use OpenSSL to create a self-signed certificate and key.
**You will create two files:**
* **server.key** – Your private key. Use this file (or its PEM content) in Nango as **Private Key**.
* **server.crt** – The digital certificate. Upload this file when creating the External Client App (under **Enable JWT Bearer Flow**).
**Steps:**
1. Open a terminal (macOS/Linux) or Command Prompt (Windows). Check that OpenSSL is installed by running `which openssl` (macOS/Linux) or `where openssl` (Windows).
2. Create a directory for the files and change into it, e.g. `mkdir ~/JWT && cd ~/JWT`.
3. Generate a private key and save it as `server.key`:
* `openssl genpkey -aes-256-cbc -algorithm RSA -pass pass:SomePassword -out server.pass.key -pkeyopt rsa_keygen_bits:2048`
* `openssl rsa -passin pass:SomePassword -in server.pass.key -out server.key`
4. Generate a certificate signing request: run `openssl req -new -key server.key -out server.csr` and enter your company information when prompted.
5. Generate a self-signed certificate: run `openssl x509 -req -sha256 -days 365 -in server.csr -signkey server.key -out server.crt`.
These steps are for getting started only. For production, use a key and certificate from a CA and follow your company's security policies.
#### Step 2: Create a new External Client App
1. Log in to Salesforce.
2. Go to **Setup** → **Apps** → **App Manager**, then click **New External Client App**.
3. Fill in all the required fields, for **Distribution State**: Choose **Local**.
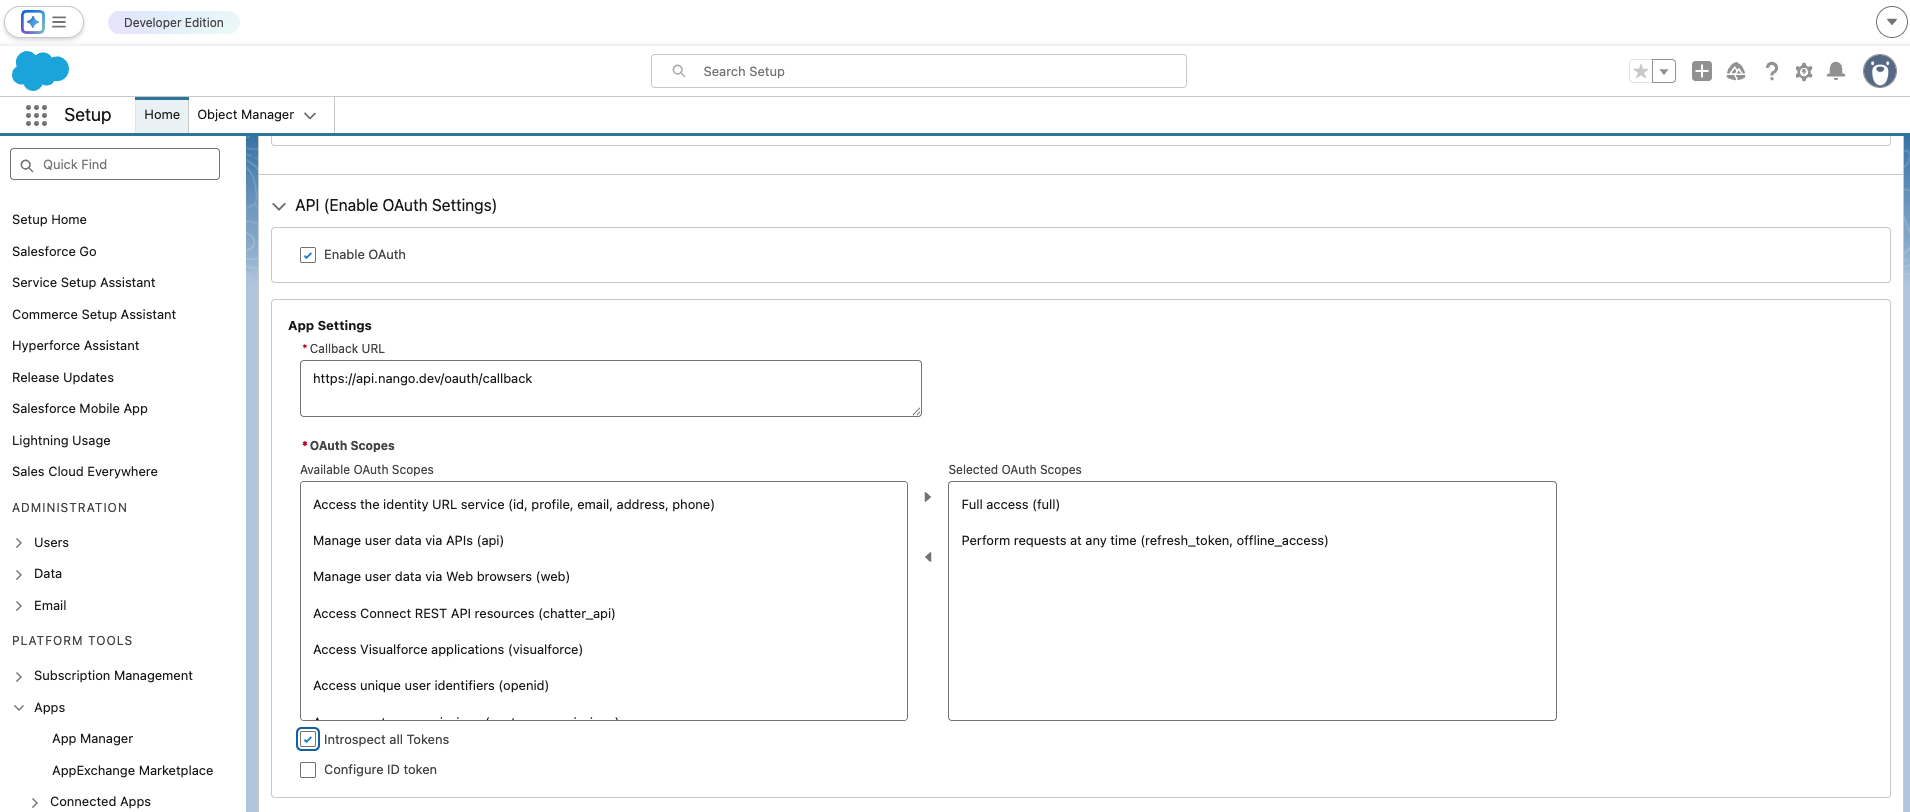
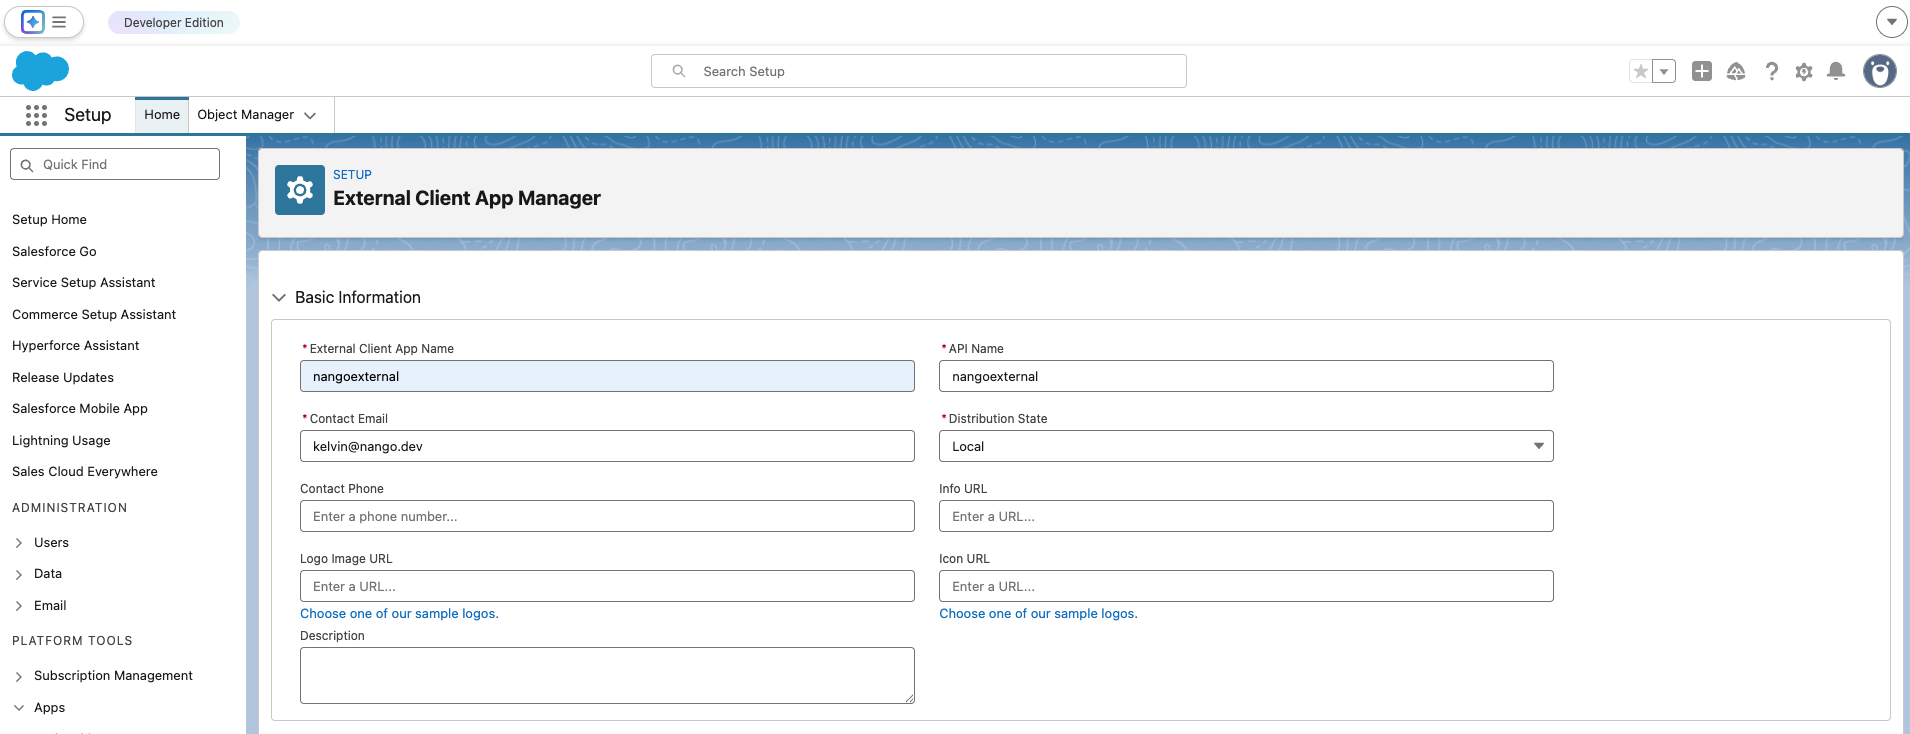 4. In the **API (Enable OAuth Settings)** section, check **Enable OAuth**.
5. For **Callback URL**, enter `https://api.nango.dev/oauth/callback`. Salesforce requires this field even though JWT Bearer Flow does not use it.
6. Under **Selected OAuth Scopes**, add:
* **Manage user data via APIs (api)**
* **Perform requests at any time (refresh\_token, offline\_access)**
7. Enable the **Introspect all Tokens** option.
4. In the **API (Enable OAuth Settings)** section, check **Enable OAuth**.
5. For **Callback URL**, enter `https://api.nango.dev/oauth/callback`. Salesforce requires this field even though JWT Bearer Flow does not use it.
6. Under **Selected OAuth Scopes**, add:
* **Manage user data via APIs (api)**
* **Perform requests at any time (refresh\_token, offline\_access)**
7. Enable the **Introspect all Tokens** option.
 8. Under **Flow Enablement**, check **Enable JWT Bearer Flow**, then click **Choose File** and upload your certificate file (e.g. `server.crt` from Step 1).
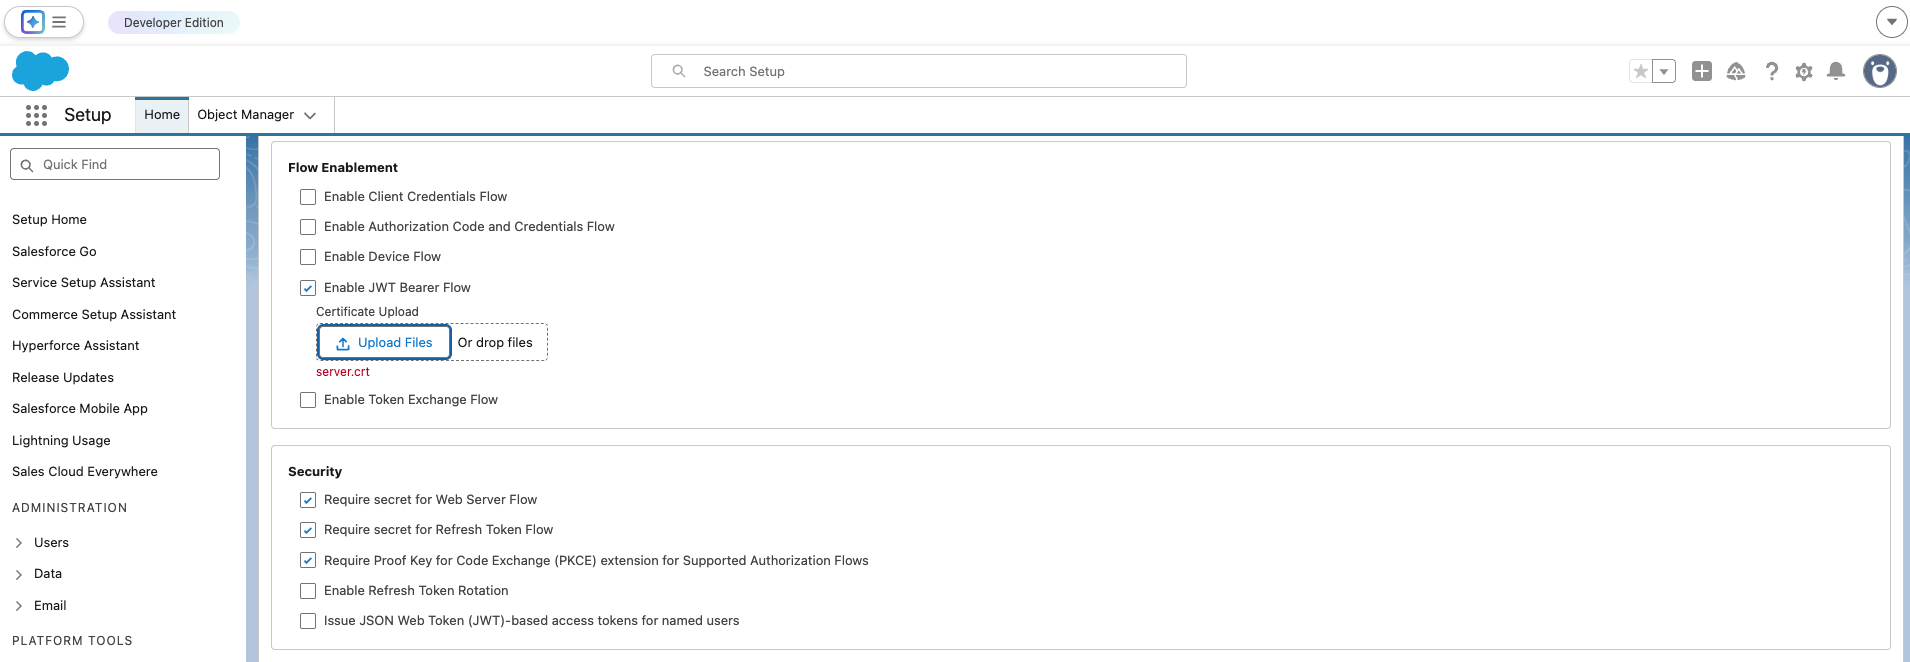 9. Click **Create** to finish.
#### Step 3: Get Consumer Key and Consumer Secret
1. Open your app, go to the **Settings** tab.
2. Expand the **OAuth Settings** section and click **Consumer Key and Secret**.
9. Click **Create** to finish.
#### Step 3: Get Consumer Key and Consumer Secret
1. Open your app, go to the **Settings** tab.
2. Expand the **OAuth Settings** section and click **Consumer Key and Secret**.
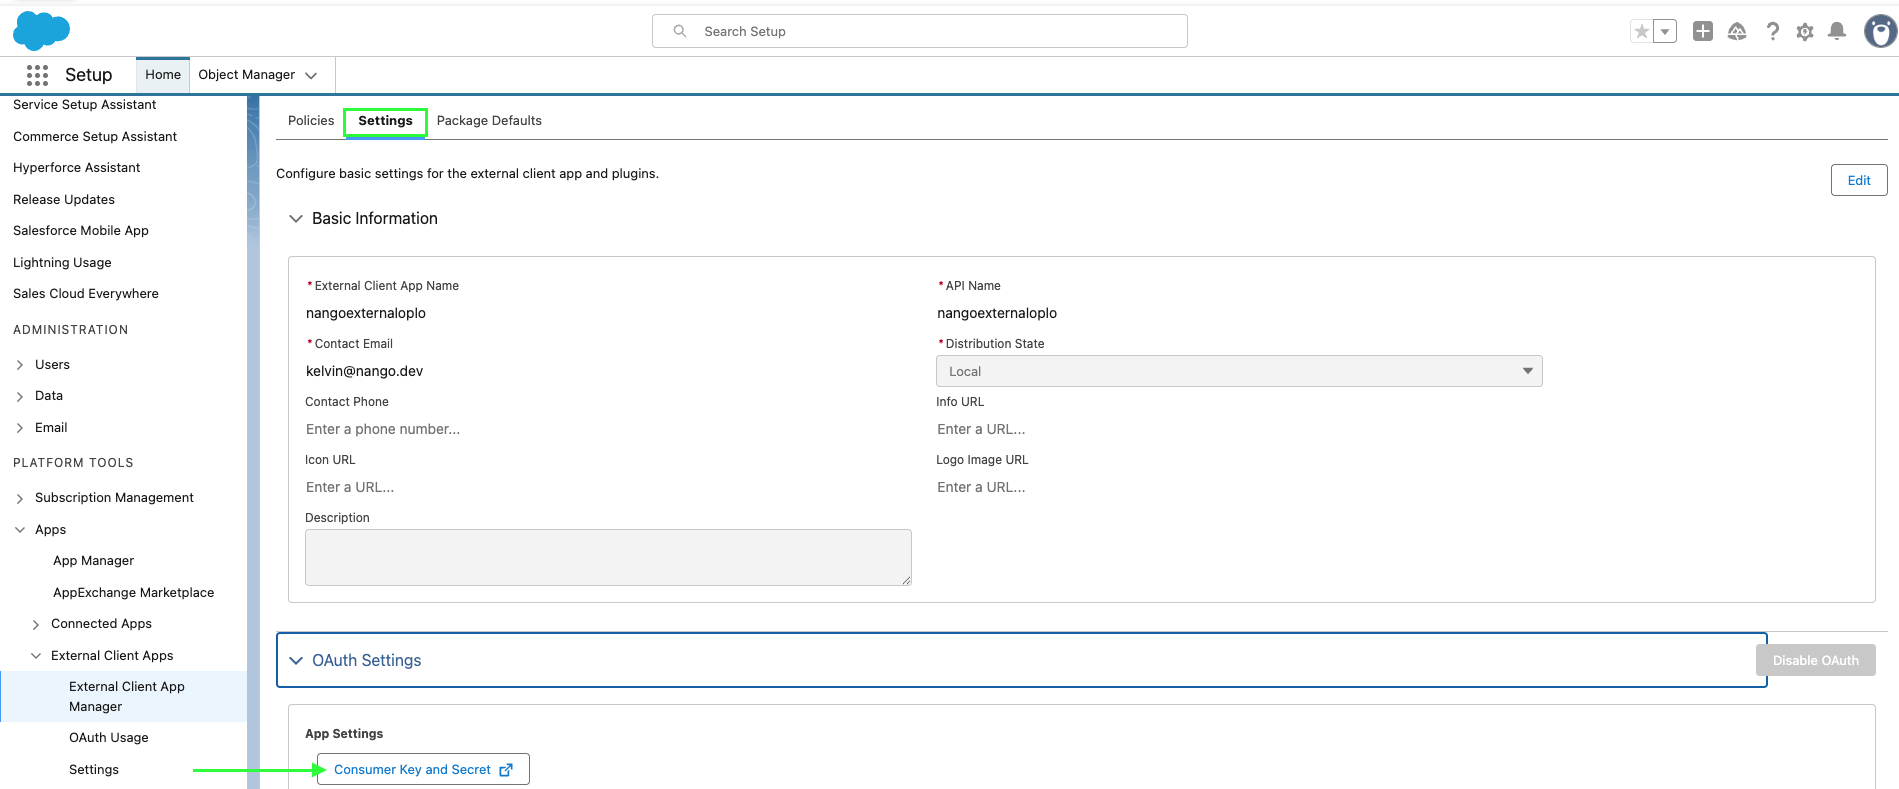 3. If prompted, verify your identity (e.g. enter the code sent to your email).
4. Copy the **Consumer Key** and **Consumer Secret**; you’ll need them when setting up a connection in Nango.
3. If prompted, verify your identity (e.g. enter the code sent to your email).
4. Copy the **Consumer Key** and **Consumer Secret**; you’ll need them when setting up a connection in Nango.
 #### Step 4: Configure token and session policies
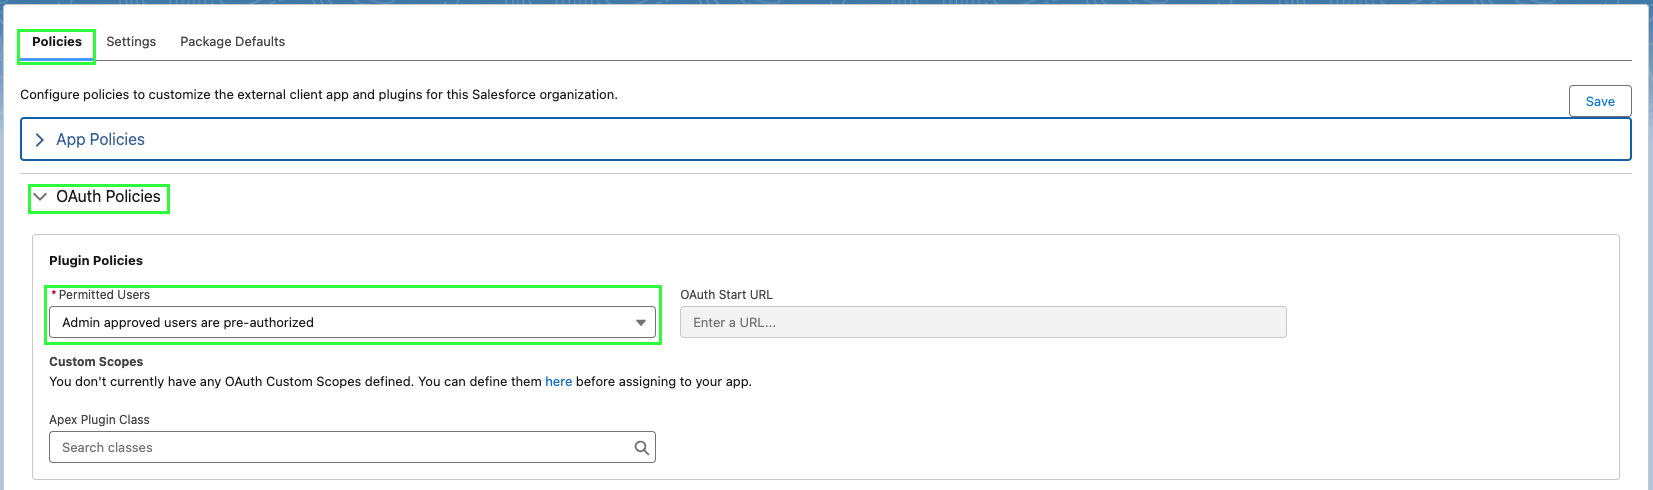
1. In your app, go to the **Policies** tab and click **Edit**. Under **OAuth Policies**, select **Admin approved users are pre-authorized**, then click **OK**, then **Save**.
#### Step 4: Configure token and session policies
1. In your app, go to the **Policies** tab and click **Edit**. Under **OAuth Policies**, select **Admin approved users are pre-authorized**, then click **OK**, then **Save**.
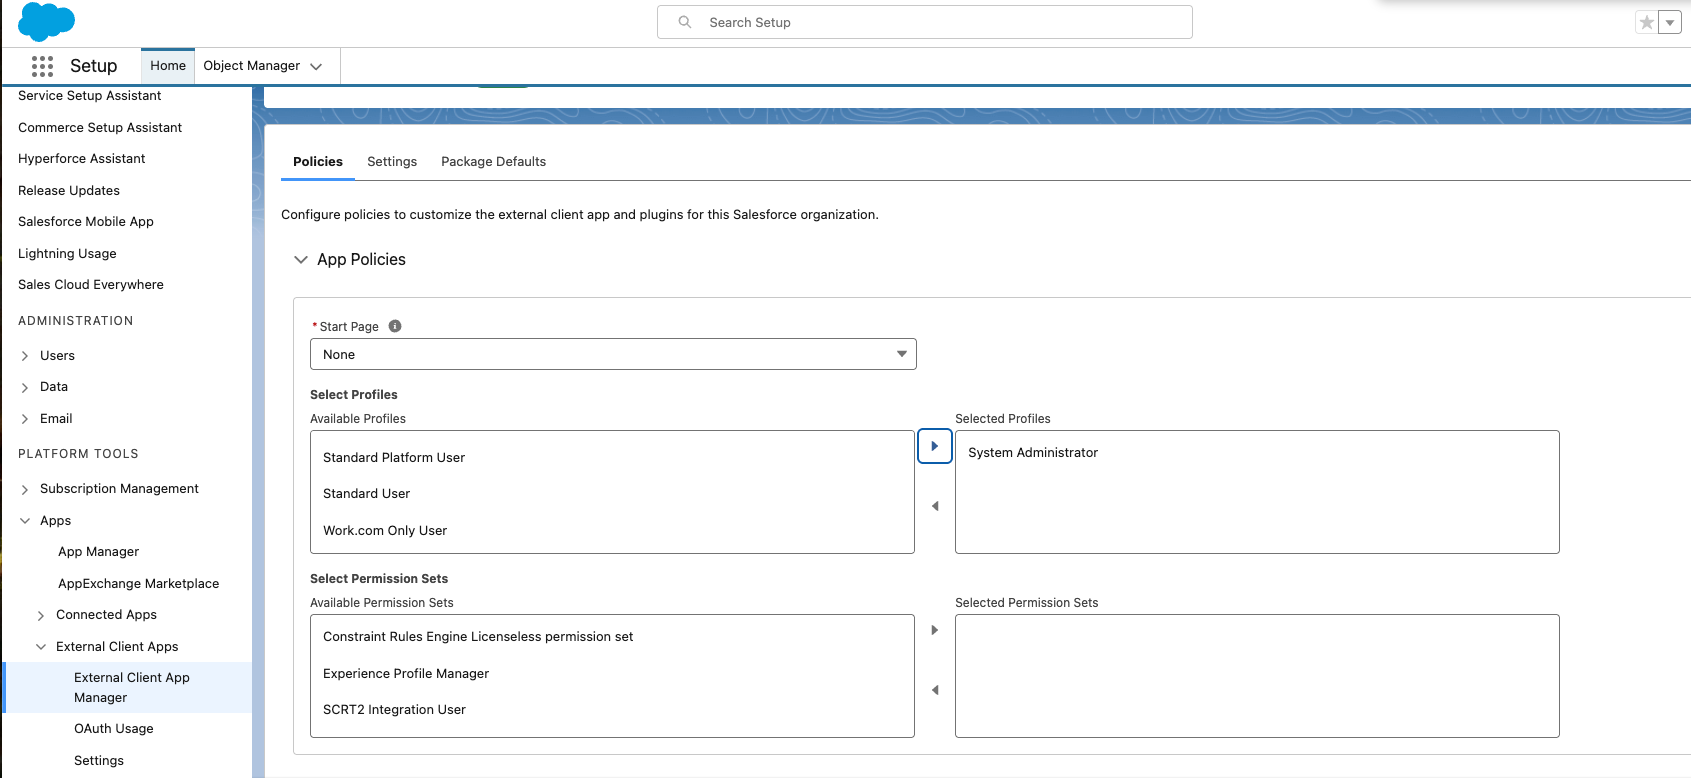
 2. Click **App Policies**, select the profiles or permission sets that can use this app, then click **Save**.
 #### Step 5: Finding the authorization server URL
Use the authorization server's URL that matches your environment:
* **Production:** `login.salesforce.com`
* **Sandbox:** `test.salesforce.com`
* **Experience Cloud site:** `site.force.com/customers` (or your Experience Cloud site URL if implementing for a site)
Enter this URL in Nango as the **Authorization server's URL**.
#### Step 6: Finding the username
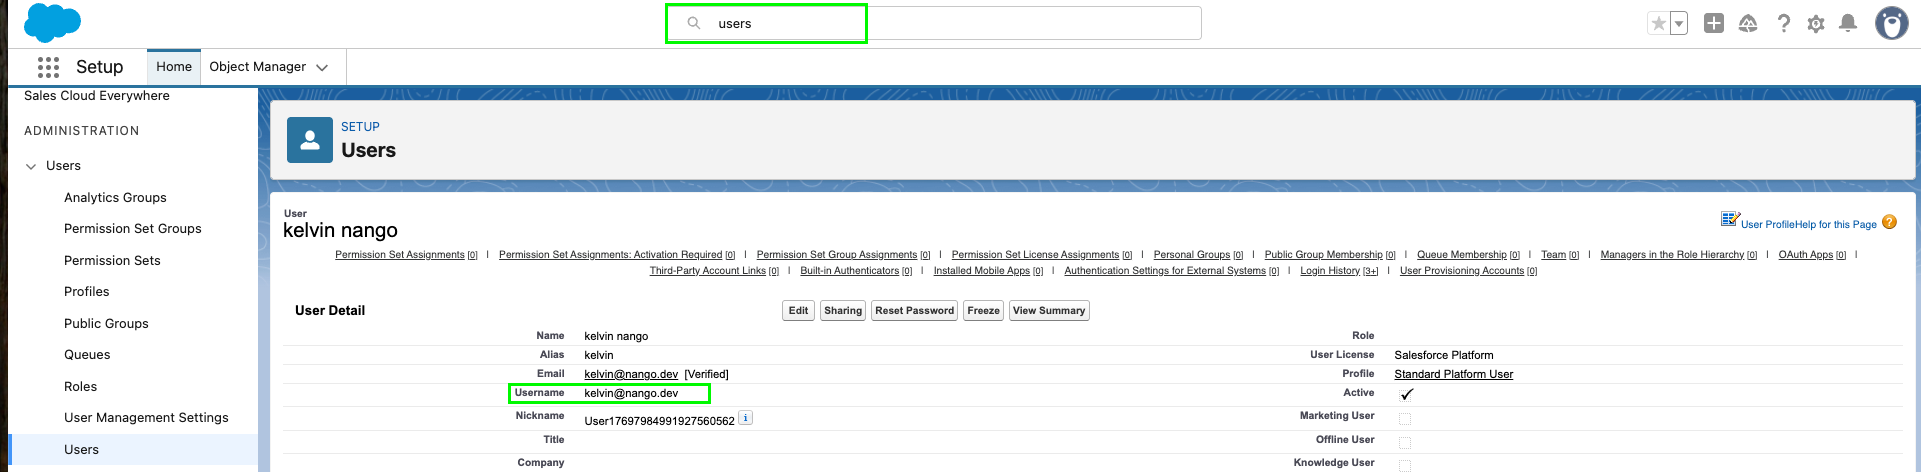
The **Username** you use for JWT must belong to a user who has one of the profiles you selected in **Selected Profiles** above. To find a valid username:
1. In Salesforce, go to **Setup**.
2. In the Quick Find box, search for **Users**, then select **Users**.
3. Open a user record that has one of the profiles you authorized for the External Client App.
4. On the user detail page, copy the **Username** value.
#### Step 5: Finding the authorization server URL
Use the authorization server's URL that matches your environment:
* **Production:** `login.salesforce.com`
* **Sandbox:** `test.salesforce.com`
* **Experience Cloud site:** `site.force.com/customers` (or your Experience Cloud site URL if implementing for a site)
Enter this URL in Nango as the **Authorization server's URL**.
#### Step 6: Finding the username
The **Username** you use for JWT must belong to a user who has one of the profiles you selected in **Selected Profiles** above. To find a valid username:
1. In Salesforce, go to **Setup**.
2. In the Quick Find box, search for **Users**, then select **Users**.
3. Open a user record that has one of the profiles you authorized for the External Client App.
4. On the user detail page, copy the **Username** value.
 #### Step 7: Enter credentials in the Connect UI
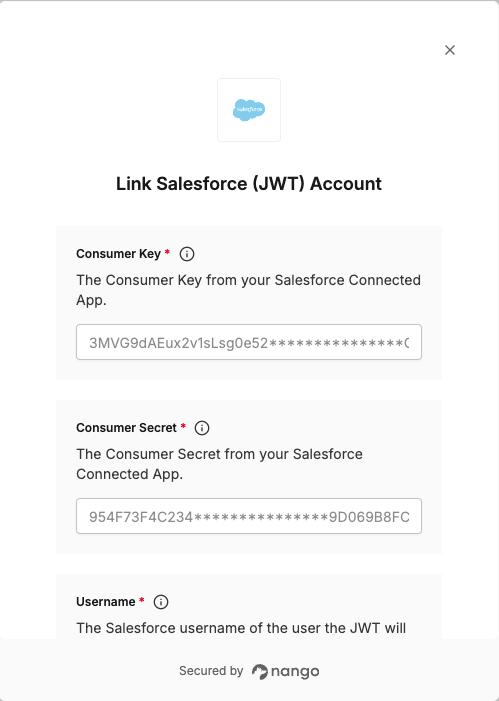
When you have your **Consumer Key**, **Consumer Secret**, **Private Key**, **Username**, and **Authorization server's URL**:
1. Open the form where you authenticate with Salesforce JWT.
2. Enter your **Consumer Key**, **Consumer Secret**, **Private Key**, **Username**, and **Authorization server's URL** in their respective fields.
3. Submit the form, and you should be successfully authenticated.
#### Step 7: Enter credentials in the Connect UI
When you have your **Consumer Key**, **Consumer Secret**, **Private Key**, **Username**, and **Authorization server's URL**:
1. Open the form where you authenticate with Salesforce JWT.
2. Enter your **Consumer Key**, **Consumer Secret**, **Private Key**, **Username**, and **Authorization server's URL** in their respective fields.
3. Submit the form, and you should be successfully authenticated.
 You are now connected to Salesforce via JWT.