> ## Documentation Index
> Fetch the complete documentation index at: https://nango.dev/docs/llms.txt
> Use this file to discover all available pages before exploring further.
# Set up Netsuite TBA with Nango
> Configure token-based authentication with Netsuite and connect it to Nango
This guide shows you how to set up token-based authentication (TBA) with Netsuite and connect it to Nango. TBA provides a machine-to-machine authentication flow that's more reliable than OAuth, as it doesn't have the 7-day refresh token expiration that Netsuite's standard OAuth flow has.
Creating a Netsuite account typically requires scheduling a call with their sales team. If you don't have an account yet, visit [Netsuite's website](https://www.netsuite.com/) to get started.
## Admin Setup for Token-Based Authentication
If you have admin privileges in your Netsuite account, follow these steps to enable TBA and create the necessary credentials.
### Enable Required Features
Log in to your Netsuite account and navigate to **Setup** > **Company** > **Enable Features**.
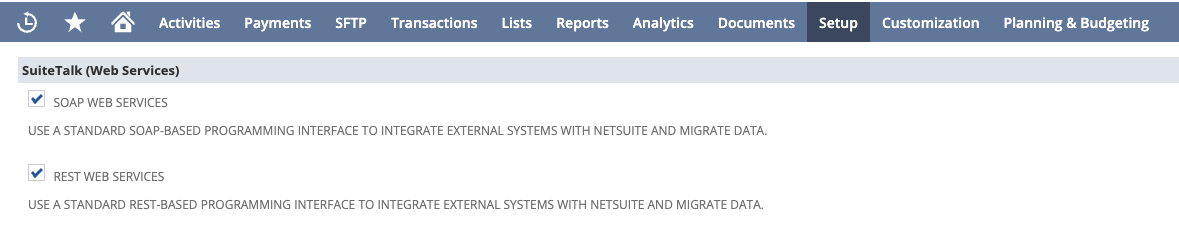
Under the "**SuiteTalk**" header, check both:
* *SOAP WEB SERVICES*
* *REST WEB SERVICES*
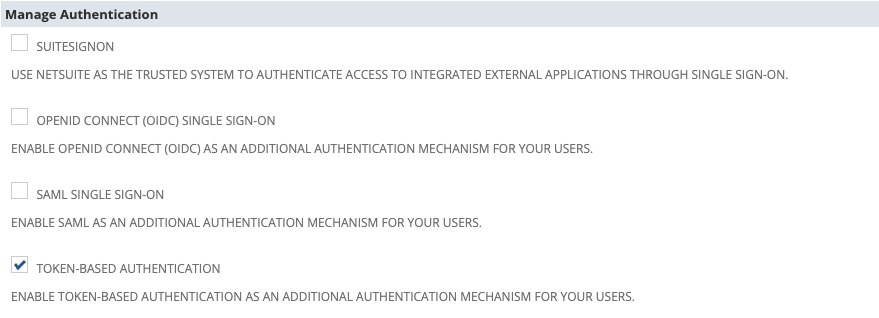
 Under the "**Manage Authentication**" header, check:
* *TOKEN-BASED AUTHENTICATION*
Under the "**Manage Authentication**" header, check:
* *TOKEN-BASED AUTHENTICATION*
 Click the save button.
### Create an Integration Application
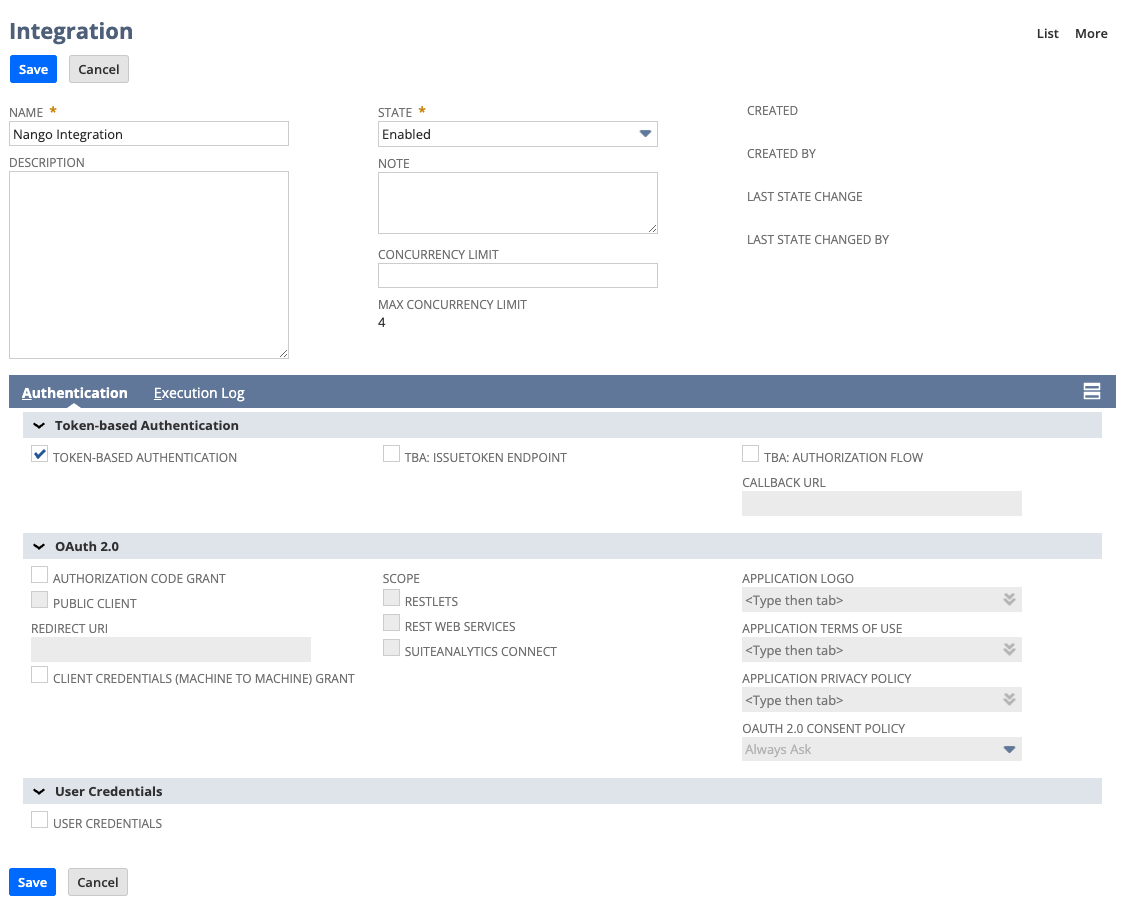
Navigate to **Setup** > **Integration** > **Manage Integrations** > **New**.
Set the desired name for this integration.
Enable *TOKEN-BASED AUTHENTICATION* and disable both:
* *TBA: AUTHORIZATION FLOW*
* *AUTHORIZATION CODE GRANT*
Click the save button.
### Create an Integration Application
Navigate to **Setup** > **Integration** > **Manage Integrations** > **New**.
Set the desired name for this integration.
Enable *TOKEN-BASED AUTHENTICATION* and disable both:
* *TBA: AUTHORIZATION FLOW*
* *AUTHORIZATION CODE GRANT*
 Click the save button.
The client credentials will now be displayed. Copy and securely store:
* **Consumer Key** (also called Client ID)
* **Consumer Secret** (also called Client Secret)
You'll need these to configure your Nango integration.
### Generate Access Tokens
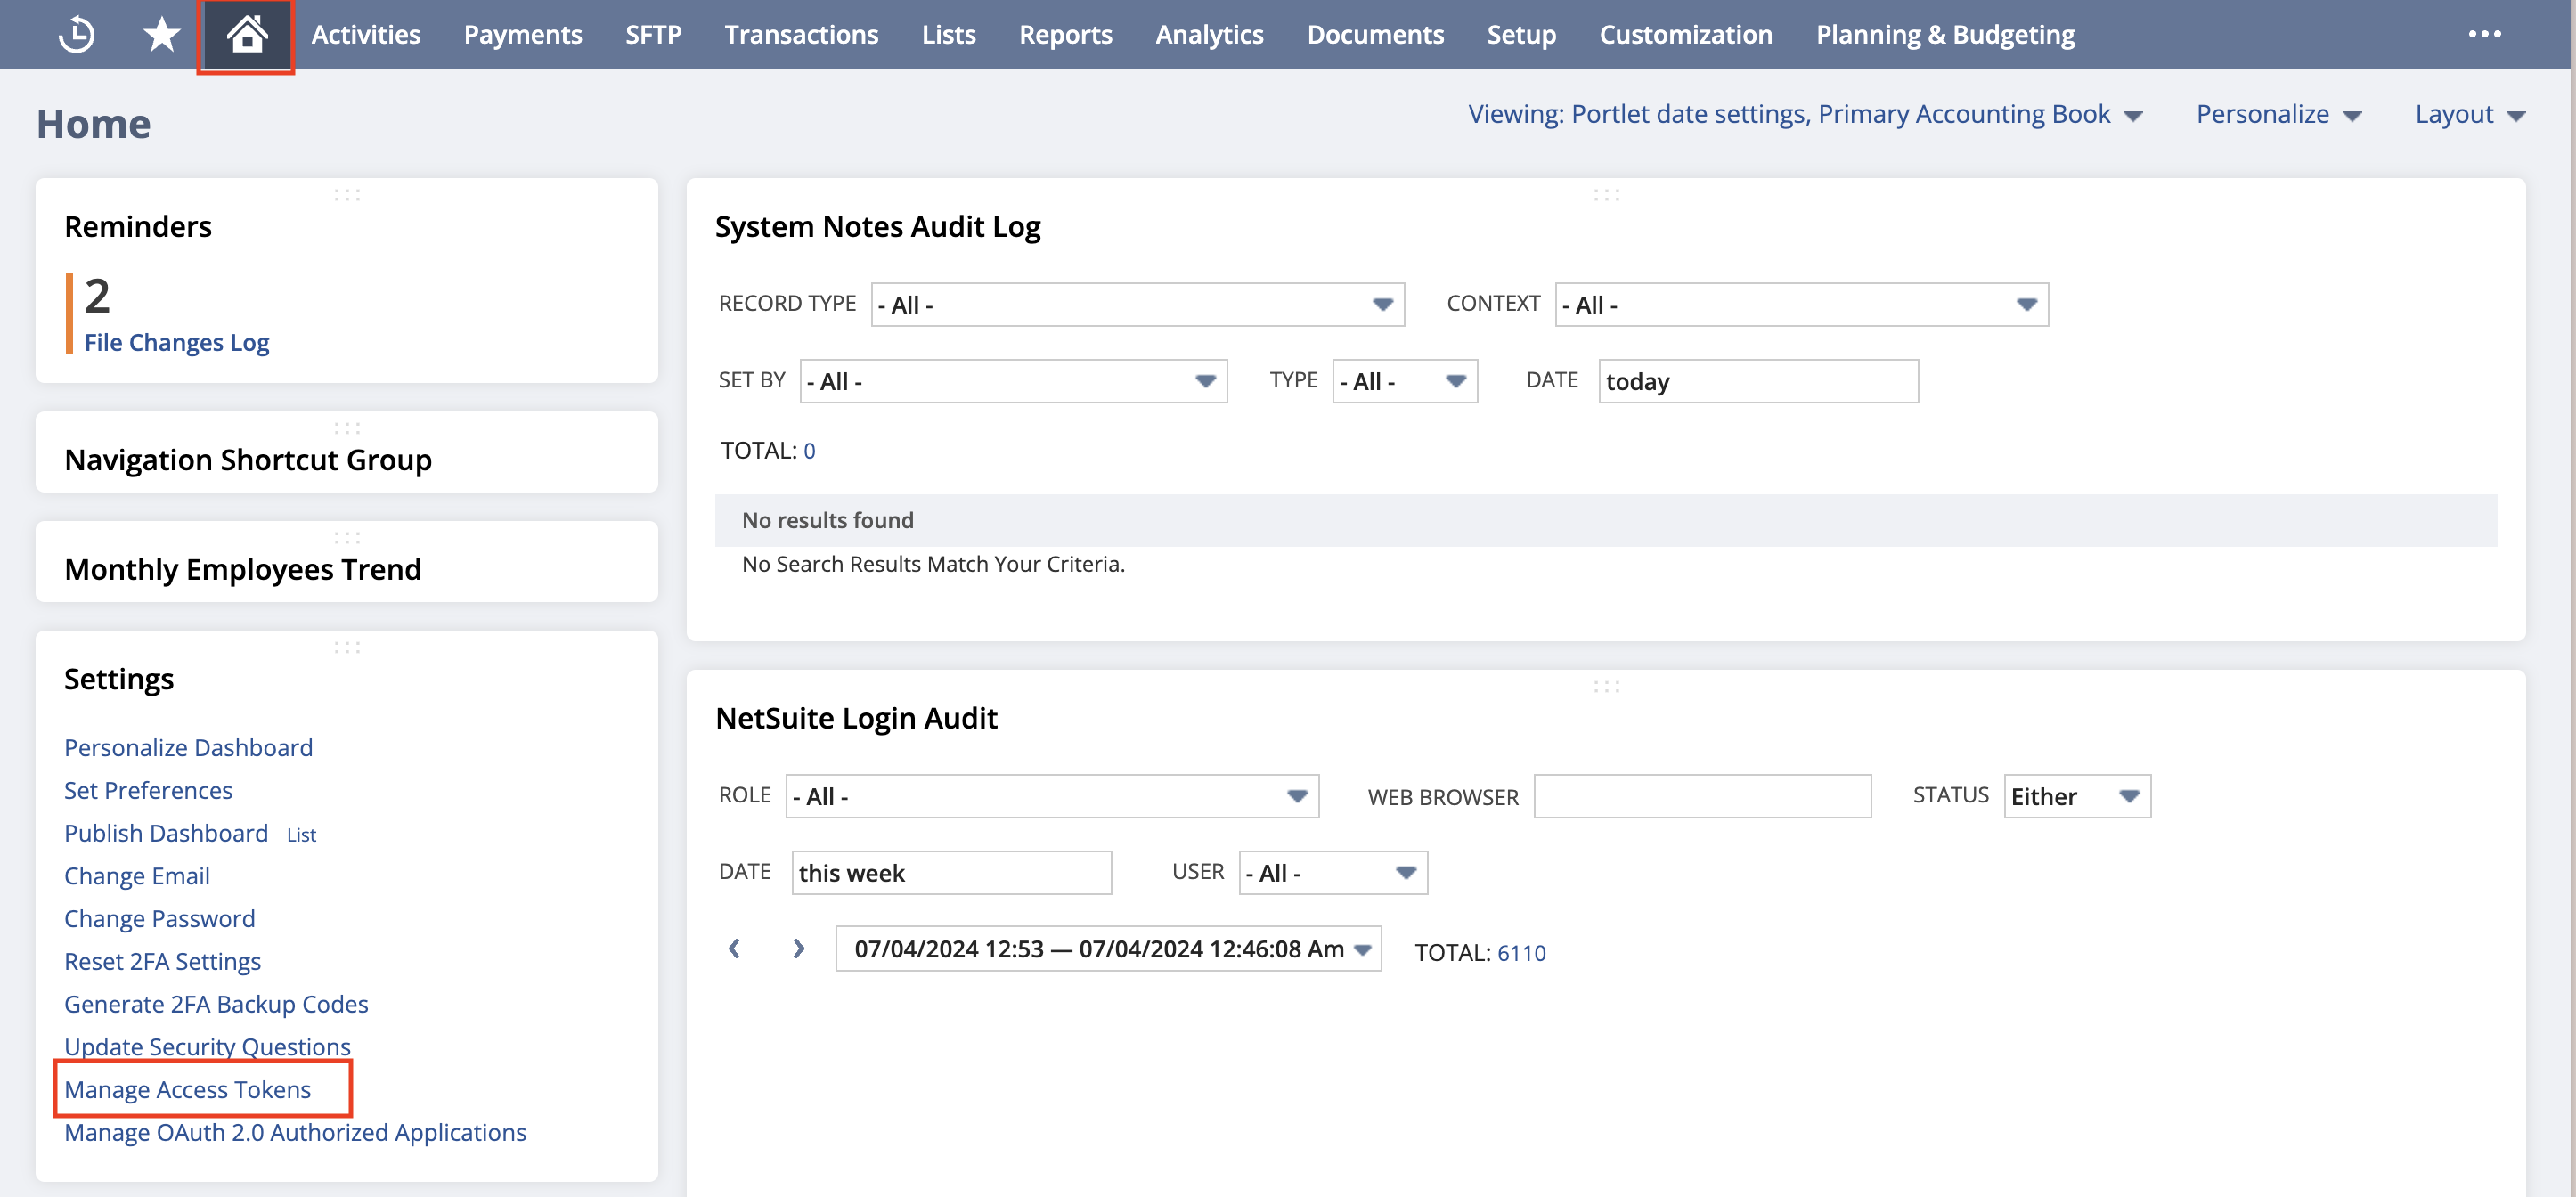
Return to the homepage by clicking the home icon. At the bottom left corner, click the **Manage Access Tokens** button.
Click the save button.
The client credentials will now be displayed. Copy and securely store:
* **Consumer Key** (also called Client ID)
* **Consumer Secret** (also called Client Secret)
You'll need these to configure your Nango integration.
### Generate Access Tokens
Return to the homepage by clicking the home icon. At the bottom left corner, click the **Manage Access Tokens** button.
 * Select the **Application Name** you created for this integration
* Enter a "**Token Name**"
* Save your new access token
The token credentials will now be displayed. Copy and securely store:
* **Token ID**
* **Token Secret**
### Configure Nango
In Nango, create a new integration using the `netsuite-tba` provider and leave the "Client Id" and "Client Secret" values empty.
Create a new connection and provide the following values:
* **OAuth Client Id Override**: Paste the **Client ID** (Consumer Key) from Netsuite
* **OAuth Client Secret**: Paste the **Client Secret** (Consumer Secret) from Netsuite
* **Token ID**: Paste the **Token ID** from the access token step
* **Token Secret**: Paste the **Token Secret** from the access token step
* **Account ID**: Your Netsuite account ID (found in your [Netsuite URL instance](https://docs.oracle.com/en/cloud/saas/netsuite/ns-online-help/section_1498754928.html))
## Non-Admin Role Setup
When setting up Netsuite TBA with a non-admin role, additional configuration is required. This section covers the necessary permissions and setup steps for non-administrator users.
### Required Role Permissions
The role must have the following permissions enabled under **Setup** > **Users/Roles** > **Manage Roles** > **\[Your Role]** > **Permissions**:
Under "Setup":
* *SOAP Web Services* permission
* *REST Web Services* permission
* *Token-Based Authentication* permission
* *OAuth 2.0* permission (recommended for future flexibility)
### Creating Access Tokens with Specific Roles
To create an access token for a non-admin role:
1. Switch to the desired role using the role selector in the top-right corner
2. Navigate to **Setup** > **Integration** > **Manage Access Tokens**
3. Click "New Access Token"
4. Select your application from the dropdown
5. Provide a token name
6. Save and securely store the Token ID and Token Secret that are displayed
The role selection at token creation time determines the permissions available to that token. Make sure you're using the correct role before creating the token.
### Required Permissions for Token Management
Users who will be creating integrations and tokens need these additional permissions:
Under "Setup":
* *Access Token Management* permission
* *Integration Application* permission
* *Manage Integration* permission
### Concurrent Web Services User
If you need to make concurrent API calls:
1. Navigate to **Setup** > **Company** > **Enable Features** > **SuiteCloud** tab
2. Enable "CONCURRENT USERS FOR WEB SERVICES"
3. For each user that needs this capability:
* Go to **Setup** > **Users/Roles** > **Manage Users**
* Edit the user
* Check "Web Services User"
* Check "Concurrent Web Services User"
The "Concurrent Web Services User" setting may require an additional user license. Consult your Netsuite account representative for details.
### Troubleshooting Non-Admin Access
If you encounter authentication issues:
1. **Permission Verification**:
* Log out and log back in after permission changes
* Verify permissions are saved by checking the role again
* Ensure all parent permissions are also enabled (some permissions have dependencies)
2. **Role Configuration**:
* Confirm the user is assigned the correct role
* Verify the role has all required permissions listed above
* Check if the role has access to the necessary records and features
## Additional Resources
For more details on Netsuite's token-based authentication and REST API, see the official documentation:
* [Netsuite Token-Based Authentication Setup Guide](https://docs.oracle.com/en/cloud/saas/netsuite/ns-online-help/article_0605103340.html)
* [Netsuite REST API Browser](https://system.netsuite.com/help/helpcenter/en_US/APIs/REST_API_Browser/record/v1/2023.1/index.html)
* [OAuth 2.0 Setup](https://docs.oracle.com/en/cloud/saas/netsuite/ns-online-help/section_158081944642.html)
***
* Select the **Application Name** you created for this integration
* Enter a "**Token Name**"
* Save your new access token
The token credentials will now be displayed. Copy and securely store:
* **Token ID**
* **Token Secret**
### Configure Nango
In Nango, create a new integration using the `netsuite-tba` provider and leave the "Client Id" and "Client Secret" values empty.
Create a new connection and provide the following values:
* **OAuth Client Id Override**: Paste the **Client ID** (Consumer Key) from Netsuite
* **OAuth Client Secret**: Paste the **Client Secret** (Consumer Secret) from Netsuite
* **Token ID**: Paste the **Token ID** from the access token step
* **Token Secret**: Paste the **Token Secret** from the access token step
* **Account ID**: Your Netsuite account ID (found in your [Netsuite URL instance](https://docs.oracle.com/en/cloud/saas/netsuite/ns-online-help/section_1498754928.html))
## Non-Admin Role Setup
When setting up Netsuite TBA with a non-admin role, additional configuration is required. This section covers the necessary permissions and setup steps for non-administrator users.
### Required Role Permissions
The role must have the following permissions enabled under **Setup** > **Users/Roles** > **Manage Roles** > **\[Your Role]** > **Permissions**:
Under "Setup":
* *SOAP Web Services* permission
* *REST Web Services* permission
* *Token-Based Authentication* permission
* *OAuth 2.0* permission (recommended for future flexibility)
### Creating Access Tokens with Specific Roles
To create an access token for a non-admin role:
1. Switch to the desired role using the role selector in the top-right corner
2. Navigate to **Setup** > **Integration** > **Manage Access Tokens**
3. Click "New Access Token"
4. Select your application from the dropdown
5. Provide a token name
6. Save and securely store the Token ID and Token Secret that are displayed
The role selection at token creation time determines the permissions available to that token. Make sure you're using the correct role before creating the token.
### Required Permissions for Token Management
Users who will be creating integrations and tokens need these additional permissions:
Under "Setup":
* *Access Token Management* permission
* *Integration Application* permission
* *Manage Integration* permission
### Concurrent Web Services User
If you need to make concurrent API calls:
1. Navigate to **Setup** > **Company** > **Enable Features** > **SuiteCloud** tab
2. Enable "CONCURRENT USERS FOR WEB SERVICES"
3. For each user that needs this capability:
* Go to **Setup** > **Users/Roles** > **Manage Users**
* Edit the user
* Check "Web Services User"
* Check "Concurrent Web Services User"
The "Concurrent Web Services User" setting may require an additional user license. Consult your Netsuite account representative for details.
### Troubleshooting Non-Admin Access
If you encounter authentication issues:
1. **Permission Verification**:
* Log out and log back in after permission changes
* Verify permissions are saved by checking the role again
* Ensure all parent permissions are also enabled (some permissions have dependencies)
2. **Role Configuration**:
* Confirm the user is assigned the correct role
* Verify the role has all required permissions listed above
* Check if the role has access to the necessary records and features
## Additional Resources
For more details on Netsuite's token-based authentication and REST API, see the official documentation:
* [Netsuite Token-Based Authentication Setup Guide](https://docs.oracle.com/en/cloud/saas/netsuite/ns-online-help/article_0605103340.html)
* [Netsuite REST API Browser](https://system.netsuite.com/help/helpcenter/en_US/APIs/REST_API_Browser/record/v1/2023.1/index.html)
* [OAuth 2.0 Setup](https://docs.oracle.com/en/cloud/saas/netsuite/ns-online-help/section_158081944642.html)
***