> ## Documentation Index
> Fetch the complete documentation index at: https://nango.dev/docs/llms.txt
> Use this file to discover all available pages before exploring further.
# GitLab (Group Access Token) - How do I link my account?
## Overview
To authenticate with GitLab using a Group Access Token, you need:
1. **Hostname** — the hostname of your GitLab instance, such as `gitlab.com` or your self-hosted instance domain.
2. **Group ID** — the numeric ID of the GitLab group the token belongs to.
3. **Group Access Token** — a token issued by GitLab that authenticates as an auto-provisioned bot user inside the group.
This guide walks you through finding your hostname and group ID, creating a Group Access Token in GitLab, and entering the credentials in Nango Connect.
### Prerequisites
* You must have the **Owner** role in the target GitLab group to create a Group Access Token.
* On GitLab.com, Group Access Tokens require a **Premium** or **Ultimate** subscription. On GitLab Self-Managed and GitLab Dedicated, they are available on any tier.
### Step 1: Find your hostname
Use the domain where your GitLab instance is hosted:
* For GitLab.com, use `gitlab.com`.
* For GitLab Self-Managed or GitLab Dedicated, use your instance domain, such as `gitlab.example.com`.
### Step 2: Find your group ID
1. Sign in to your GitLab instance.
2. Open your group's overview page.
3. Copy the numeric **Group ID** displayed under the group name.
Resolve a group's numeric ID from its full URL-encoded path by calling GitLab directly. Set `GITLAB_HOSTNAME` to the hostname from [Step 1](#find-hostname). Authenticate with a token that has access to the group. Private groups require a Personal Access Token, Project Access Token, or Group Access Token with `read_api` or wider scope. Public groups can be looked up without authentication.
```bash theme={null}
# Replace `acme/platform-team` with the group's full path, URL-encoded.
curl -H "PRIVATE-TOKEN: " \
"https://${GITLAB_HOSTNAME}/api/v4/groups/acme%2Fplatform-team"
```
Read the numeric `id` field from the JSON response. See the [GitLab groups API](https://docs.gitlab.com/api/groups/#retrieve-a-group) for the response schema.
### Step 3: Create a Group Access Token
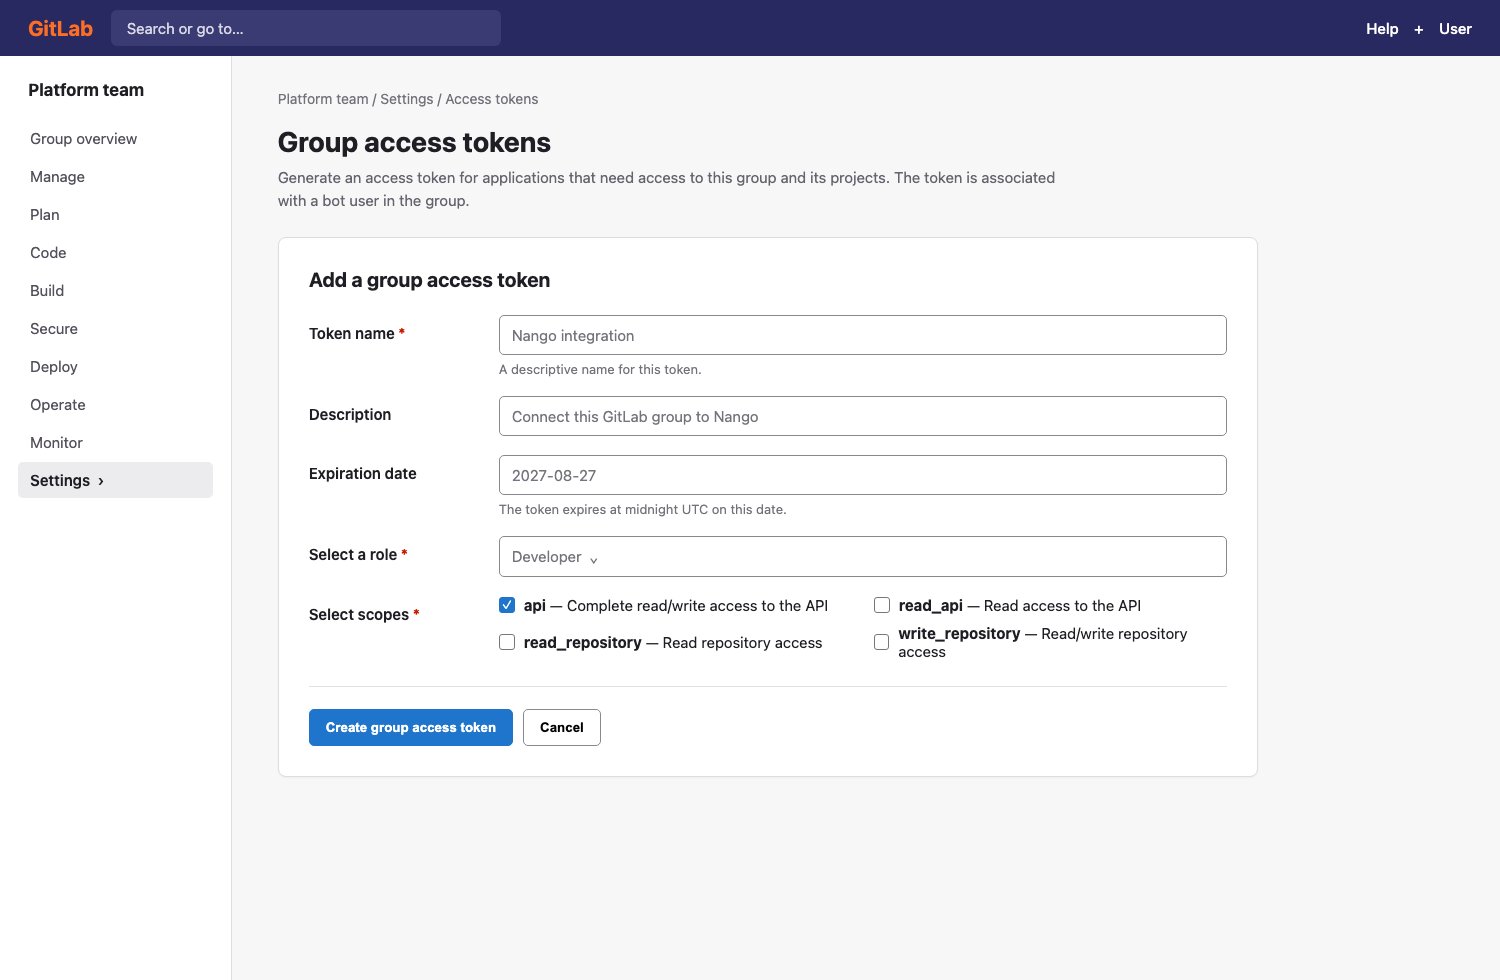
1. From the top bar, select **Search or go to** and find your group.
2. Select **Settings > Access tokens**.
3. Select **Add new token**.
4. Enter a name and expiration date. The name becomes the display name of the auto-provisioned bot user.
5. Select the bot user's **Role** based on the operations your integration performs. Lower roles may support viewing or commenting. Creating merge requests generally requires **Developer**. Approval and protected-branch merge permissions depend on the project's settings.
6. Select the [scopes](https://docs.gitlab.com/user/group/settings/group_access_tokens/#scopes-for-a-group-access-token) you need. `api` grants full read and write access; use narrower scopes such as `read_api` and `read_repository` where possible.
7. Select **Create group access token**.
 Copy the token immediately. GitLab does not show it again after you leave the page.
GitLab creates a bot user inside the group when you generate the token. The bot's username follows the pattern `group__bot_`. The bot counts as a group member but not as a licensed seat.
Create a Group Access Token with the GitLab API. Authenticate with a token belonging to a group Owner, and replace the placeholders with the target group ID and desired token configuration.
```bash theme={null}
curl --request POST \
--header "PRIVATE-TOKEN: " \
--data-urlencode "name=Nango integration" \
--data-urlencode "scopes[]=api" \
--data-urlencode "access_level=30" \
--data-urlencode "expires_at=" \
"https://${GITLAB_HOSTNAME}/api/v4/groups//access_tokens"
```
`access_level=30` creates a Developer bot user. Choose the minimum [access level](https://docs.gitlab.com/api/access_tokens/#valid-access-levels) and [scopes](https://docs.gitlab.com/api/group_access_tokens/#create-a-group-access-token) required for the integration. Save the returned `token` value immediately because GitLab only returns it once.
### Step 4: Enter credentials in Nango Connect
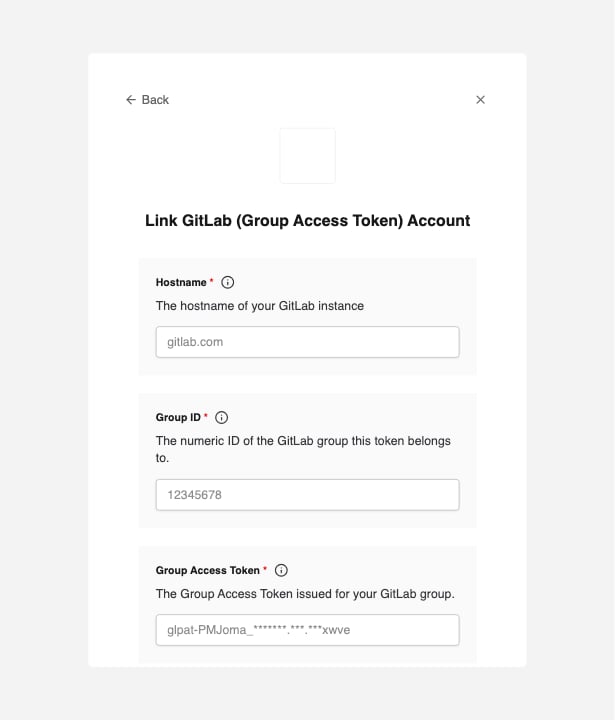
1. Open the Nango Connect form for GitLab (Group Access Token).
2. Enter the **Hostname**, **Group ID**, and **Group Access Token**.
3. Submit the form to connect the group.
Copy the token immediately. GitLab does not show it again after you leave the page.
GitLab creates a bot user inside the group when you generate the token. The bot's username follows the pattern `group__bot_`. The bot counts as a group member but not as a licensed seat.
Create a Group Access Token with the GitLab API. Authenticate with a token belonging to a group Owner, and replace the placeholders with the target group ID and desired token configuration.
```bash theme={null}
curl --request POST \
--header "PRIVATE-TOKEN: " \
--data-urlencode "name=Nango integration" \
--data-urlencode "scopes[]=api" \
--data-urlencode "access_level=30" \
--data-urlencode "expires_at=" \
"https://${GITLAB_HOSTNAME}/api/v4/groups//access_tokens"
```
`access_level=30` creates a Developer bot user. Choose the minimum [access level](https://docs.gitlab.com/api/access_tokens/#valid-access-levels) and [scopes](https://docs.gitlab.com/api/group_access_tokens/#create-a-group-access-token) required for the integration. Save the returned `token` value immediately because GitLab only returns it once.
### Step 4: Enter credentials in Nango Connect
1. Open the Nango Connect form for GitLab (Group Access Token).
2. Enter the **Hostname**, **Group ID**, and **Group Access Token**.
3. Submit the form to connect the group.
 You are now connected to GitLab using a Group Access Token.