> ## Documentation Index
> Fetch the complete documentation index at: https://nango.dev/docs/llms.txt
> Use this file to discover all available pages before exploring further.
# Dayforce - How do I link my account?
# Overview
To authenticate with Dayforce, you will need:
1. **Company ID** - Your unique Dayforce company identifier.
2. **Username** - Your Dayforce account username.
3. **Password** - Your Dayforce account password.
4. **Client host** (optional) - Your Dayforce instance API hostname, leave empty for production.
5. **Identity host** (optional) - Your Dayforce Identity hostname, leave empty for production.
This guide will walk you through configuring your Dayforce user and obtaining your **Company ID**.
### Prerequisites:
* You must have a Dayforce account with administrative access.
> **Important Note**: Having a live integration will hide the option to edit member details manually. This is because the integration automatically becomes a Provision Master (main expected source of employee data) and other member updating methods become unavailable to prevent conflicting data sources. If you need to do a manual edit, please disable the integration by going to **Integrations** > **Tools** > **Edit** > turn the toggle **OFF**. Once you finish your edits, turn it back **ON** from the same toggle.
### Instructions:
#### Step 1: Finding your Company ID
1. Once logged in, look at the URL in your browser's address bar.
2. For example if the url is `https://test.dayforcehcm.com/acme`, the **Company ID** would be `acme`.
#### Step 2: Configure your Dayforce user
1. **Log in** to your Dayforce account.
2. Navigate to **System Admin** > **User** and find your user account.
3. **Important**: Click on your user and select the **"Is Default"** checkbox for the role you will be configuring for this integration. This step is crucial for the integration to work properly.
4. From the hamburger menu in the top left, click **System Admin** > **Roles**.
 5. Navigate to **Features** and ensure **HCM Anywhere** and **Web Services** are checked, with **Read Data** enabled at a minimum.
 6. Navigate to **Web Services Field-Level Access**.
 7. Depending on your use case, click on the words (not the empty check box) and click **Select All**.
8. Navigate to the **Human Resources** section of RESTful Services.
9. Expand **Employee**, and scroll to the very last one to ensure **XRefCode** is enabled.
10. Navigate to **System Admin** > **User**. Please note, the user authenticating will need "Can See Self" enabled.
7. Depending on your use case, click on the words (not the empty check box) and click **Select All**.
8. Navigate to the **Human Resources** section of RESTful Services.
9. Expand **Employee**, and scroll to the very last one to ensure **XRefCode** is enabled.
10. Navigate to **System Admin** > **User**. Please note, the user authenticating will need "Can See Self" enabled.
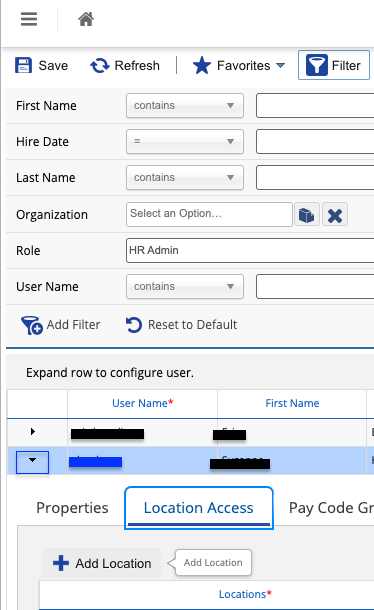
 11. Expand the User by clicking the small down arrow.
12. Click on **Location Access**, then **+ Add Location**, and add the **Company Level Location**.
11. Expand the User by clicking the small down arrow.
12. Click on **Location Access**, then **+ Add Location**, and add the **Company Level Location**.
 13. **Optional**: If you need support for writes functionality (i.e. POST /Time-Off), navigate to **System Admin** > **Roles** > **Features** and ensure under **HCM Anywhere** and **Web Services**, **Patch/Post Employee Time Off** is enabled.
#### Step 3: Identifying your Identity host
**Identity host** is used for the token endpoint. The token URL format is: `https://{identity_host}/connect/token`.
* **Production:** Leave **Identity hostname** empty. Nango uses `dfid.dayforcehcm.com` (e.g. `https://dfid.dayforcehcm.com/connect/token`).
* **Test:** Enter your identity host, e.g. `dfidtst.np.dayforcehcm.com` (e.g. `https://dfidtst.np.dayforcehcm.com/connect/token`).
These details are typically in your Dayforce welcome email or provided by your HR/IT administrator.
#### Step 4: Identifying your Client host
**Client host** is your Dayforce instance URL hostname, the host used for API requests (e.g. `https://{client_host}/api`).
* **Production:** Leave **API hostname** empty. Nango uses `www.dayforcehcm.com`.
* **Test/sample:** Enter your instance host, e.g. `usconfigr58.dayforcehcm.com` for a sample environment or `test.dayforcehcm.com` for test environment.
These details are typically in your Dayforce welcome email or provided by your HR/IT administrator.
#### Step 5: Enter credentials in the Connect UI
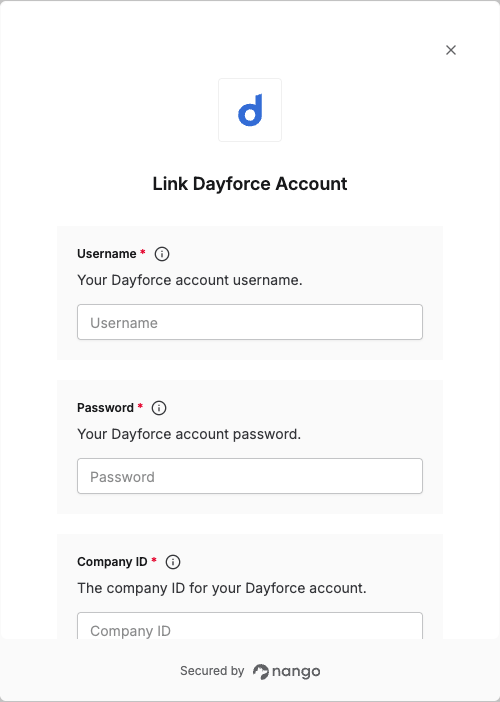
Once you have your **Company ID**, **Username**, and **Password** (and optional Client host and Identity host for non-production):
1. Open the form where you need to authenticate with Dayforce.
2. Enter your **Company ID**, **Username**, and **Password** in the designated fields.
3. Submit the form, and you should be successfully authenticated.
13. **Optional**: If you need support for writes functionality (i.e. POST /Time-Off), navigate to **System Admin** > **Roles** > **Features** and ensure under **HCM Anywhere** and **Web Services**, **Patch/Post Employee Time Off** is enabled.
#### Step 3: Identifying your Identity host
**Identity host** is used for the token endpoint. The token URL format is: `https://{identity_host}/connect/token`.
* **Production:** Leave **Identity hostname** empty. Nango uses `dfid.dayforcehcm.com` (e.g. `https://dfid.dayforcehcm.com/connect/token`).
* **Test:** Enter your identity host, e.g. `dfidtst.np.dayforcehcm.com` (e.g. `https://dfidtst.np.dayforcehcm.com/connect/token`).
These details are typically in your Dayforce welcome email or provided by your HR/IT administrator.
#### Step 4: Identifying your Client host
**Client host** is your Dayforce instance URL hostname, the host used for API requests (e.g. `https://{client_host}/api`).
* **Production:** Leave **API hostname** empty. Nango uses `www.dayforcehcm.com`.
* **Test/sample:** Enter your instance host, e.g. `usconfigr58.dayforcehcm.com` for a sample environment or `test.dayforcehcm.com` for test environment.
These details are typically in your Dayforce welcome email or provided by your HR/IT administrator.
#### Step 5: Enter credentials in the Connect UI
Once you have your **Company ID**, **Username**, and **Password** (and optional Client host and Identity host for non-production):
1. Open the form where you need to authenticate with Dayforce.
2. Enter your **Company ID**, **Username**, and **Password** in the designated fields.
3. Submit the form, and you should be successfully authenticated.
 You are now connected to Dayforce.